Increasing utility of sTeam tools

(ˢᵒᶜⁱᵉᵗʸserver) aims to be a platform for developing collaborative applications.
sTeam server project repository: sTeam.

User Utils

User  convenience is an important aspect for any application to succeed. The sTeam root user should be able to create or delete a user. A command to add / delete a user was added successfully.

The root user should be able to add new user’s using the command line.
The parameter’s like username, password, email-id etc. should be asked and then the user should be created.

Issue. Github Issue Github PR
Create a user. Issue-58 PR-59
Delete an object Issue-56 PR-57
Delete a user. Issue-69 PR-70

To create a new user:

create_user username password email

The current users can be found by running the command

 _Server->get_module("users")->get_users();

Similarly a command to delete the user was added to the steam-shell.

The user should be able to delete the objects created/existing inside the user area. A steam-shell command needs to be added to delete the objects from the command line.

The usage of command to delete a user inside steam-shell.pike. Only the root user can delete other user.
Command:

delete_user username

UserActivities
In order to delete an object which can be a container, document or a room in the current steam directory, run the command;

delete test.pike

The object would be deleted.

Tab-Completion Module

The tab completion module of the sTeam shell was analyzed during this period. The tab completion module has an issue whereby it doesn’t lists the options on pressing the tab after  ".

query_attribute("

After pressing the tab after ” the options should be listed. But this is not the case. The bug needs to be resolved.

Tab_completion

Import from git script

The import to git script can now import a single file into the sTeam directory.

The feature for this was added.

Issue. Github Issue Github PR
Add utility to support single import in import-from-git script . Issue-16 PR-76
sudo ./import-from-git.pike gitfolder/xyz.mp3 /home/sTeam/

The xyz.mp3 would be imported to the sTeam directory.

Import-script

The future work would include resolving the tab_completion module issues and enhancing the import script to support the feature where by a user would be able to specify the name of the file in the sTeam directory.

Checkout the FOSSASIA Idea’s page for more information on projects supported by FOSSASIA.

Continue ReadingIncreasing utility of sTeam tools

Sending e-mail from linux terminal

So while finalizing the apk-generator for my GSoC project, I faced a roadblock in sending the generated App to the organizer.

Normally the build takes around 10–12 minutes, so asking the user to wait for that long on the website and then providing him/her with a download link did not feel like a good option. (amirite?)

So I and Manan Wason thought of a different approach to this problem, which was to email the generated app to the organzier.

For doing this, we used 2 handy tools MSMTP and Mutt.
We can use MSMTP to send email but unfortunately we cannot include attachments, so we used Mutt to help us send email with attachments from the command line.
So hang tight and follow the rest of the guide to start sending emails from your terminal and get yourself some developer #swag

Step 1 : Installation

Use the following commands to install MSMTP and Mutt

sudo apt-get -y install msmtp
sudo apt-get -y install ca-certificates
sudo apt-get -y install mutt

We need to have a file that contains Certificate Authority (CA) certificates so that we can connect using SSL / TLS to the email server.

Step 2 : Configuring MSMTP

Now we’ll MSMTP configuration on /etc/msmtprc with the content below. NOTE : You will have to enter your username and password on this file so make sure to make this file private.

Lets first open this file

nano /etc/msmtprc

Next, add following text to the file,

account default
tls on
tls_starttls off
tls_certcheck off
auth on
host smtp.mail.yahoo.com (change this to smtp.gmail.com for gmail)
user username
password password
from username@yahoo.com
logfile /var/log/msmtp.log

NOTE : Refrain from using gmail as they might terminate your account for sending email via MSMTP.

For configuring mutt, we’ll use a similar command to edit the file located at /root/.muttrc

nano /root/.muttrc

Add following text to it which specifies the MSMTP account to use for sending email

set sendmail=”/usr/bin/msmtp”
set use_from=yes
set realname=”MY Real Name”
set from=username@yahoo.com
set envelope_from=yes

That’s it!
Now lets get ready for the fun part, SENDING THOSE EMAILS 😀

Step 3 : Sending

Now, there are 2 cases that might arise while sending the email,

1 : Sending without attachment

This is pretty straightforward and can be done with either MSMTP or Mutt.

Using MSMTP

printf “To: recipient@domain.comnFrom: username@domain.comnSubject: Testing MSMTPnnHello there. This is email test from MSMTP.” | msmtp recipient@domain.com

Entering the following code will send the email to the recipient and also display the sent email in the terminal.

Using Mutt

mutt -s “Testing Mutt” — recipient@domain.com < /path/to/body.txt

NOTE : ‘body.txt’ is the file whose contents will be used in the body of the email that will be sent to ‘recipient@domain.com’.

2 : Sending WITH an attachment

Unlike the previous case, this can be done ONLY using Mutt and the code used is

mutt -a /path/to/attachment.txt -s “Testing Mutt — recipient@domain.com < /path/to/body.txt

The syntax is similar to the above case where we sent the email without attachments.

So well, that it then!
If you followed the instructions carefully, you will have a working email client built into your terminal!
Pretty cool right?

So that’s it for this week, hope to catch you next week with some more interesting tips and tutorials.

Continue ReadingSending e-mail from linux terminal

Implementing TLS in pike

My next task was an enhancement. The command line client for sTeam was not using any kind of encryption and all the data sent over a network was in clear text. Now this was a little different from normal tasks because,

1. TLS had to be implemented in Pike.

2. TLS was to be implemented over COAL.

COAL is a home grown protocol specially for sTeam. My mentor Martin helped me to go about this task. He taught me how to break a task into small ones. I began with writing an SSL client in pike that can interact with an https server. It turned out pike has an SSL module that just made the task very simple. I had to understand how SSL works however pike made the task quite easy. I also received constant help from the pike mailing list where people actively guided me in the right direction.

Once I was done with the SSL client I approached the actual problem. I had to understand the functioning of COAL and narrow down the particular files involved. I had to wrap the COAL protocol in TLS so that it becomes COALS. Pike allows users to import programs at objects. This was used to import client_base.pike. This file involved the code for the connection. I had to throughly go through this and the files that it imported that is kernel/socket. After several experiment with these files I was able to use the SSL module and successfully make the connection use the TLS protocol. I checked this using wireshark, which captured all the packets over the network and all the data could be seen as encrypted.

wireshark clear text
clear text data over network
wireshark ssl
encrypted data after implementing TLS protocol
Continue ReadingImplementing TLS in pike

Errors and Error handlers for REST API

Errors are an essential part of a REST API system. Error instances must follow a particular structure so the client developer can correctly handle them at the client side. We had set a proper error structure at the beginning of creating REST APIs. It’s as follows:

{
    "error": {
        "message": "Error description",
        "code": 400
    }
}

Any error occurring during client server communication would follow the above format. Code is the returned status code and message is a brief description of the error. To raise an error we used an _error_abort() function which was an abstraction over Flask-RESTplus abort(). We defined an error structure inside _error_abort() and passed it to abort().

def _error_abort(code, message):
    error = {
        'code': code,
        'message': message,
    }
    abort(code, error=error)

This method had its limitations. Since the error handlers were not being overidden, only errors raised through _error_abort() had the defined structure. So if an Internal Server error occurred, the returned error response wouldn’t follow the format.

To overcome this, we wrote our own exceptions for errors and created error handlers to handle them. We first made the response structure more detailed, so the client developer can understand what kind of error is being returned.

{
    "error": {
        "code": 400,
        "message": "'name' is a required parameter",
        "status": "INVALID_FIELD",
        "field": "name"
    }
}

The above is an example of a validation error.

The “status” key helps making the error more unique. For example we use 400 status code for both validation errors and invalid service errors (“Service not belonging to said event”). But both have different statuses: “INVALID_FIELD” and “INVALID_SERVICE”.

The “field” key is only useful in the case validation errors, where it names the field that did not pass the validation. For other errors it remains null.

I first documented what kind of errors we would need.

Code Status Field Description
401 NOT_AUTHORIZED null Invalid token or user not authenticated
400 INVALID_FIELD “field_name” Missing or invalid field
400 INVALID_SERVICE null Service ID mentioned in path does not belong to said Event
404 NOT_FOUND null Event or Service not found
403 PERMISSION_DENIED null User role not allowed to perform such action
500 SERVER_ERROR null Internal server error

Next part was creating exception classes for each one these. I created a base error class that extended the python Exception class.

class BaseError(Exception):
    """Base Error Class"""

    def __init__(self, code=400, message='', status='', field=None):
        Exception.__init__(self)
        self.code = code
        self.message = message
        self.status = status
        self.field = field

    def to_dict(self):
        return {'code': self.code,
                'message': self.message,
                'status': self.status,
                'field': self.field, }

The to_dict() method would help when returning the response in error handlers.

I then extended this base class to other error classes. Here are three of them:

class NotFoundError(BaseError):
    def __init__(self, message='Not found'):
        BaseError.__init__(self)
        self.code = 404
        self.message = message
        self.status = 'NOT_FOUND'


class NotAuthorizedError(BaseError):
    def __init__(self, message='Unauthorized'):
        BaseError.__init__(self)
        self.code = 401
        self.message = message
        self.status = 'NOT_AUTHORIZED'


class ValidationError(BaseError):
    def __init__(self, field, message='Invalid field'):
        BaseError.__init__(self)
        self.code = 400
        self.message = message
        self.status = 'INVALID_FIELD'
        self.field = field

I then defined the error handlers for the api:

@api.errorhandler(NotFoundError)
@api.errorhandler(NotAuthorizedError)
@api.errorhandler(ValidationError)
@api.errorhandler(InvalidServiceError)
def handle_error(error):
    return error.to_dict(), getattr(error, 'code')

For overriding the default error handler, Flask-RESTplus let’s you create one with the same decorator, but without passing and argument to it.

@api.errorhandler
def default_error_handler(error):
    """Returns Internal server error"""
    error = ServerError()
    return error.to_dict(), getattr(error, 'code', 500)

I had set the default error to be the internal server error.

class ServerError(BaseError):
    def __init__(self, message='Internal server error'):
        BaseError.__init__(self)
        self.code = 500
        self.message = message
        self.status = 'SERVER_ERROR'

Now raising any of these error classes would activate the error handlers and a proper response would be sent to the client.

Continue ReadingErrors and Error handlers for REST API

Open Event Apk generator

So we made this apk generator currently hosted on a server (http://192.241.232.231) which let’s you generate an android app for your event in 10 minutes out of which the server takes about 8 minutes to build 😛 . So, essentially you just have to spare 2 minutes and just enter 3 things(email, Desired app’s name and Api link). Isn’t this cool?

So how exactly do we do this?

At the backend, we are running a python scripts with some shell scripts where the python script is basically creating directories, interacting with our firebase database to get the data entered by a user. So we made these scripts to first of all to clone the open event android repo, then customise and change the code in the repo according to the parameters entered by the organiser earlier(shown in the image).

Screen Shot 2016-06-14 at 12.13.12 AM
Generator Website

After the code has been changed by the scripts to customise the app according to the event the app will be used for, we move on to the script to build the apk, where we build and sign the apk in release mode using signing configs and release keys from the server because we don’t the organiser to generate keys and store it on the server to avoid the hassle and also the privacy concerns involving the keys. So this is when the apk is generated on the server. Now you have questions like the apk is generated but how do I get it? Do I have to wait on the same page for 10 minutes while the apk is being sent? The answer is no and yes. What I mean by this is that you can wait to download the apk if you want but we’ll anyways send it to your email you specified on the apk generator website. This is the sample Email we got when we were testing the system

Screen Shot 2016-06-14 at 12.08.59 AM.png

So it’s an end to end complete solution from which you can easily get an android app for your event in just 2 minutes. Would love to hear feedback and reviews. Please feel free to contact me @ manan13056@iiitd.ac.in or on social media’s(Twitter, Facebook). Adios!

P.S. : Here is the link to the scripts we’re using.

Continue ReadingOpen Event Apk generator

The beauty of Directives, Transclusion in Angular.JS

week3gsoc1

To be honest in Angular directives are nothing but DOM elements simply put on steroids. Now if you add transclusion to it literally the possibilty of exploring the playground is boundless .With that said before diving into what directives are and how cool are they, let us basically understand what makes directives in angular so powerful.

Some of the well known directives which are used regularly are :

  • ng-src
  • ng-show
  • ng-hide
  • ng-model
  • ng-repeat

Custom Directives and the benifit of creating reusable components

We often tend to waste a lot of time and energy in writing code which is already/previously written and components which are already built. But what if you could write them only once and reuse them as many times as possible ?
ANS : “Directives”
You can create truly reusable components with directives, and the approach to build custom components is definitely neater and more intuitive.
Where do Custom Directives get implemented ?

  • elements
  • attributes
  • classes

Scope of Directives

After we initialize a directive we can observe that it gets a parent scope by default. In the best interests of the application you write you won’t really want that to happen. So in order to freely modify the properties of the directive we expose the parent’s controller scope to the directives.In some cases your directive may want to add several properties and functions to the scope that are for internal use only.

Example : If you have a directive that deals with comments(just like my sTeam web interface), you may want to set some internal variable to show or hide some of its specific sections. If we set these models to the parent’s scope we would pollute it.

Without polluting, is there any option ?

Absolutely there are two options,

  • Use a child scope
  • Use an isolated scope

If we use a child scope then the child scope prototypically inherits the parent’s scope. If we use an isolated scope then its all on its own, by not inheriting its parent’s scope

Transclusion

Transclusion is a feature that enables us to wrap a directive around arbitrary content. We can extract and compile it against the correct scope later, and eventually place it at the specified position in the directive template. If you set transclude:true in the directive definition, a new transcluded scope will be created which prototypically inherits from the parent scope. If you want your directive with isolated scope to contain an arbitrary piece of content and execute it against the parent scope, transclusion can be used.

Example :

week3gsoc2

See the above snippet, here ng-transclude says where to put the transcluded content. In this case the DOM content Hello {{name}} is extracted and put inside div ng-tran- sclude /div> . The important point to remember is that the expression {{name}} interpolates against the property defined in the parent scope rather than the isolated scope.

Thats it folks,
Happy Hacking !!

Continue ReadingThe beauty of Directives, Transclusion in Angular.JS

Sending a streaming zip file in node.js

The webapp generator that we set up is now up and running on a heroku instance and is working to generate zips of generated websites.

One of the requirements was that when the front-end presses, the “Generate” button, a request is created to the backend node app to start creating the html pages, and pack them into a zip file. Then the said zip file will be made available to download.

I intended for the zip file to become available to download immediately and the server to continuously pack data into the zip, as the user downloads it – a process known as streaming zip serving. (If you might have noticed, Google Drive uses this too. You do not know the final zip size before the download has completed.)

If the server takes time in creating the contents of the zip, this method can help, as it will allow the user to start downloading the file, before all the contents are finalised.


To achieve the mentioned goal, the idea Node.js module to use archiver.

If you look at the app.js code you’ll find on the /generate POST endpoint, we take the ‘req’ params and pass to a pipeToRes() function, which is defined in generator.js

app.post('/generate', uploadedFiles, function(req, res, next) {
console.log(req.files);
console.log(req.body);
res.setHeader('Content-Type', 'application/zip');
generator.pipeZipToRes(req, res);
});

And in the generator, you can find this block of code that pipes the streaming archive to the response.


      const zipfile = archiver('zip');

      zipfile.on('error', (err) => {
        throw err;
      });

      zipfile.pipe(res);

      zipfile.directory(distHelper.distPath, '/').finalize();

We zip the directory defined in distPath and the archiver API has a fluent call to .finalize() that finished the download for the user, when the zip is completed.

Continue ReadingSending a streaming zip file in node.js

Language Localization for Engelsystem

Localization takes place when you adapt content to a specific location. In translation, it means that your content can be read by another in their native language with as much ease as if the information were written in that language to begin with. In other words, just translating a document does not mean that it has been localized. When it is your brand, information, or material at stake, it is important to understand the elements that separate a mere translation from the language localization necessary to maximize impact with your target audience.

Some Examples of Localized Content

Understanding excellent localization may be easier with some positive examples.

  • Google is the search engine of choice in much of the English-speaking world. It accounts for only one percent of the search market in China, however. Baidu gives Chinese users the look and feel that they understand. Has Google given up? Hardly, they are working on improving the localization of their content.
  • Many television and phone manufacturers compete for the French markets. Samsung is made in Korea, but they marketed themselves according to the French tastes and desires. The manufacturer stressed the artistic design and high definition of its televisions. Their phones were tailored to the French market with apps specifically designed for the French lifestyle and location of the users.
  • Packaging is very important to an American consumer, even with toiletries; it is not very important at all to Chinese consumers. Proctor and Gamble localized their product marketing for Crest toothpaste by reducing their packaging costs and focusing on the flavors, which the Chinese do value. The localization not only increased their market share but cut their costs by 50 percent.

Remember, the purpose of localization is to give your text or product the impression that they were designed or written specifically for that market regardless of the language, culture, or location.

Understanding the Localization Process in Translation

Within the world of translation, localization includes a number of critical elements such as:

  • Modification of grammar, punctuation, and lexical elements
  • Adaptation of formality and other culturally-based items of etiquette
  • Ensuring figurative language is replaced with localized idioms and metaphors
  • Making sure content is culturally sensitive and relevant
  • Aligning conversions such as money, time, dates, voltages, and so forth
  • Formatting numbers, values, and so on according to local variations
  • Verifying the text and format meet legal requirements

In order to localize content, the translator must have a comprehensive understanding of the culture, the language, and the specific field the information references. Note, in the list above, those cultural adaptations are as important to the translation as lexical and grammatical issues. Local sensitivities must be considered to avoid conflicts with culture, customs, or habits.

Some specific items that might be tailored to the local populace are references to political leaders or situations that are deemed offensive (think about China and Taiwan), animals (rats are looked upon favorably in china as is the chicken), flowers, gestures, shoes (wearing shoes inside can be taboo), gum (illegal in Singapore), meats (think about Kosher or Halal ideals, vegetarianism is also stressed in some places), smoking (banned for Sikhs), and bodily functions (what is funny or cute for some is offensive to others).

If your documents, texts, or project will be going to several locations and translated into several local languages, you might want to consider “internationalizing” it first. This is the process of highlighting or adjusting any questionable text or ideas in advance to save the translator’s time when preparing it for the local dialect. The process is most effective when done during the formulation stages of the document, but it can be done later as well. For papers that are going to be translated into multiple languages, the time and expense that could be saved through this step are tremendous.

Whether your documents go through an intermediary step or are translated straight to a local language, it is imperative that your translation service understands the importance of an exhaustive and thorough localization process.

09

When selecting translation services, one of the most important questions you can ask is whether or not you want your documents prepared for internationalization or localization.

Localization is the process of translating a document or project for use within a specific target market. Localization includes all of the components of translation required to meet cultural and linguistic adaptations of text. Localization can be accomplished from an original source text, or from a test that has been prepared for international translation.

Internationalization is the process of preparing a document or project to be used anywhere in the world and localized as necessary. The process of creating a document that is bothlinguistically deliverable and culturally sensitive for a worldwide audience is not easy or quick. Yet, when internationalization takes place during the initial stages of product development it is far easier than trying to work backwards, and a document that has been successfully internationalized can be quickly and easily localized.

Understanding the Elements

Some of the elements that are impacted during the internationalization or localization process include:

  • Formatting: Not everybody formats their date the same way. Time signatures are also not universal. Even numbers are not standard. Deciding where to put colons, commas, symbols and the like will make a huge difference in the readability of your final document.
  • Symbols/Abbreviations: English speakers often do not realize that their symbols are not universal. When symbols are used in text, they can take on many different meanings based upon the target language. Other times, the symbol may have no meaning at all, in which case the intent of the content will have been lost without a proper translation. Consider such a simple abbreviation as E. for east: since the German word for east is osten, east would be O. Even if we agreed to use metric vs imperial or American units, a square kilometer (sq km) would be a German Quadratkilometer or qkm.
  • Gender: English does not assign gender to most items, Spanish and French assign gender to just about everything, Japanese has gender, but also special rules for adults and children.
  • Graphics:Items that are just fine in one culture may be meaningless in another culture, or, worse, offensive and derogatory. For example, the stork delivers babies in many cultures; however, in Japan, a stork and baby will not have the same meaning. Colors also have different meanings in different cultures. Not everybody associates white with purity, weddings, and truth.
  • Legal Requirements: who has to sign documents, where do signatures go, are witnesses required, who is allowed to be a witness, and so forth. If you are doing business in an international community, these are essential elements of translation.

Why Internationalization or Localization is so Important

If your document is going to go to one region or local, and only one region or local, direct translation into the target text is the cheapest and most expedient way to translate your document. However, suppose you have a document that is going to be translated into 10, 20, even 50 different languages.

While you could hire a unique translator for each language independent of all others, another approach would be to go through the internationalization process. During this process, translators would create a master document that addresses the main elements that would be difficult to translate. They would standardize the elements that could be standardized, and highlight those ideas which are going to need more elaboration by a local translator. This way, when the translators who will be working on the localized documents start their translations, much of the groundwork has already been done for them.

When choosing a translation service, you will want to know the number of target languages. If you only have one or two, you may be better off going with a straight translation; however, if you are going to be addressing multiple languages (even many within the same family: Mexican Spanish, Puerto Rican Spanish, Argentinian Spanish, Andalusian Spanish) you may be able to save considerable time.

During the 3rd week of my Summer of Code, I’ve implemented localization on Engelsystem. Users can get more information on my previous blog post, here.

In the later weeks, other developers and I would be working on adding more languages to the system. Anyone who would like to work in the project are welcome. Developers can feel free to take up any issues they would like to work on just like any other open source projects.

Development: https://github.com/fossasia/engelsystem                                           Issues/Bugs:https://github.com/fossasia/engelsystem/issues

Continue ReadingLanguage Localization for Engelsystem

Language Localization on Engelsystem

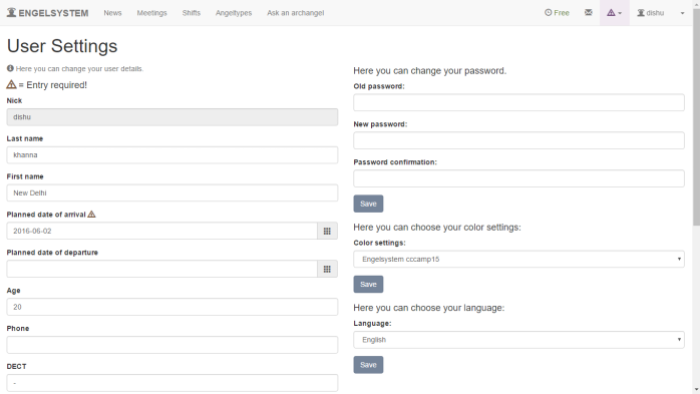
During the 3rd  week of my Summer of Code, I worked on implementing Localization of different languages on the system and creating a different settings page for user and admin.

One of our goals is for Engelsystem to be a great experience for users worldwide. To achieve this goal we need to make some significant changes. The main reason of localization is that it can be used by different people with different native languages across the world and help them to understand the system better .

First, a little background.

Right now, Engelsystem has two localization systems available:

  • Deutsch
  • English

All of the current translations will be updated. We are also expanding the list of supported languages to as many as we can. Currently, I’ve implemented:

  • Bulgarian
  • Chinese- simplified
  • English UK
  • French
  • Hindi-IN
  • Hungarian
  • Irish
  • Punjabi-IN
  • Spanish
  • Tamil-IN

The tools used in implementing localization are poedit where we create the .po files .

For installing Poedit on Linux distro’s, users can use the following command in the terminal,

sudo apt-get install poedit

For Windows and Mac users, they can download the executable file here.

Steps to run Poedit in Linux/Windows/Mac:

  1. choose File → New Catalog.Enter the details in Translation properties like your email. Source code charset should be selected as UTF-8.Now the source path should be selected as (.) dot to tell Poedit to search for PHP files in the same folder.
    06
  2. In the source, there are three options ‘_’ , ‘gettext’ and  ‘gettext_noop’.Make sure all necessary functions are added and press OK.
  3. Now we can see the list of strings on left and their translated strings on the right.we need to install the necessary dictionary for this.
    07
  4. Save the file  with an extension ‘.po’ . 

    In Engelsystem, to implement the translated localization file we need to make the changes in the file,internationalization_helper.php

    $locales = array(
    ‘de_DE.UTF-8’ => “Deutsch”,
    ‘hi_IN.UTF-8’ => “Hindi”,
    ‘sp_EU.UTF-8’ => “Spanish”,
    ‘en_US.UTF-8’ => “English”
    );

    During the week 3 of my Summer of Code I also worked on creating different settings page for user and Admin. Earlier settings page for user and admin were same, providing same privileges to both of them. Now we have separate pages for both.

                                                                             User Settings
    Admin Settings
                                                                        Admin Settings

    In the later weeks, other developers and I would be working on adding more languages to the system. Anyone who would like to work in the project are welcome. Developers can feel free to take up any issues they would like to work on just like any other open source projects.

    Development: https://github.com/fossasia/engelsystem                                           Issues/Bugs:https://github.com/fossasia/engelsystem/issues

Continue ReadingLanguage Localization on Engelsystem

Why should you use Heroku?

Last week I’ve dedicated most time to implement new heroku features to Open Event. Due to the fact that wasn’t easy tasks I can share my experience.

What is heroku?

Heroku is a cloud Platform-as-a-Service (PaaS) supporting several programming languages like Java, Node.js, Scala, Clojure, Python, PHP, and Go

Easy to deploy

what you need to do:

  1. Create account on heroku
  2. Download a heroku toolbelt to your enviroment.
  3. Go to your project directory(/open-event-orga-server)
  4. Sign in to heroku in your command line using your credentials
    $ heroku login
  5. Create app with name $
    heroku apps:create your_app_name

    after execution above command you will recive a link to your application

    http://your_app_name.herokuapp.com/
  6. Push latest changes to heroku
    $ git push heroku master
  7. If everythings is ok you can check results http://your_app_name.herokuapp.com/ (sometimes it does not work like we want 🙁 )

Easy to configure

To list/set/get config variables use:

$ heroku config
$ heroku config:set YOUR_VARIABLE=token123
$ heroku config:get YOUR_VARIABLE

or you can go to you application dashboard and make above operations

How you can get access to this variables using python langauges?

$ python

Python 2.7.10 (default, Oct 23 2015, 19:19:21) 

[GCC 4.2.1 Compatible Apple LLVM 7.0.0 (clang-700.0.59.5)] on darwin

Type "help", "copyright", "credits" or "license" for more information.

>>> import os

>>> your_variable  = os.environ.get('YOUR_VARIABLE', None)

>>> print your_variable
token123

I’ve used this to display current release in my python application(You need to generate a special API token and add it to config variables)

os.popen('curl -n https://api.heroku.com/apps/open-event/releases -H 
"Authorization: Bearer ' + token + '" -H 
"Accept: application/vnd.heroku+json; version=3"').read()

Easy to monitor

If something is wrong with your APP you need to use this command

$ heroku logs

it shows all logs

To see 10 latest releases use:

$ heroku releases

How you can set up Open Event to deploy to heroku?

  1. Clone https://github.com/fossasia/open-event-orga-server
  2. Go to directory of open event orga server(/open-event-orga-server)
  3. Add git remote
     heroku git:remote -a open-event
  4. You can check if open event is added to git remote
    $ git remote -v
    heroku https://git.heroku.com/open-event.git (fetch)
    heroku https://git.heroku.com/open-event.git (push)
    origin https://github.com/fossasia/open-event-orga-server.git (fetch)
    origin https://github.com/fossasia/open-event-orga-server.git (push)
  5. Now you can deploy changes to open-event application(You need a permissions 🙂 )

Why should you use a Heroku?

It’s great to deploy apps because you are able to share content in short time what I’ve done. Besides it’s very well documented so you can find there answers for most of your questions. Finally most of things you can configure using Heroku dashboard so it’s the best advantages of this tool.

Continue ReadingWhy should you use Heroku?