Handling file uploading in HTML5 and Express

The Open Event Webapp Generator has a pure HTML front end form, and Express based backend.


We needed an option where users can upload their own JSON files to create a schedule page for it.

On the HTML form that’s easy. As you can see here we simple add input tags with type=”file”


<input type="file" name="sponsorfile" id="sponsorfile">

In our express app, we need to use multer to be able to handle file uploads.

We create a middleware called uploadedFiles, and pass the middleware to the get() block


var express = require('express');
var multer = require('multer');
var app = express();

var upload = multer({dest: 'uploads/'});

var uploadedFiles = upload.fields([
  {name: 'speakerfile', maxCount: 1},
  {name: 'sessionfile', maxCount: 1},
  {name: 'trackfile', maxCount: 1},
  {name: 'sponsorfile', maxCount: 1},
  {name: 'eventfile', maxCount: 1},
  {name: 'locationfile', maxCount: 1}
]);

app.post('/live', uploadedFiles, function(req, res) {
         // req.files has the files
         // req.body has the POST body params
  });
});

Now we can access the files inside req.files (that will have a path to the temporary location of the file, you’ll have to use some filesystem module to read the files)

Continue ReadingHandling file uploading in HTML5 and Express

Building interactive elements with HTML and javascript: Resizing

{ Repost from my personal blog @ https://blog.codezero.xyz/building-interactive-elements-with-html-and-javascript-resizing }

Unlike draggable, HTML/js does not provide us with a direct spec for allowing users to graphically resize HTML DOM elements. So, we’ll be using mouse events and pointer locations to achieve the ability of resizing.

We’ll start with a box div.

<div id="box">  
    <div>Resize me !</div>
</div>  

A little bit of CSS magic to make it look a little bit better and square.

#box {
    position: relative;
    width: 130px;
    height: 130px;
    background-color: #2196F3;
    color: white;
    display:flex;
    justify-content:center;
    align-items:center;
    border-radius: 10px;
}

Now, we need a handle element. The user will be using this handle element to drag and resize the box.

<div id="box">  
    <div>Resize me !</div>
    <div id="handle">
    </div>
</div>  

Now, we just have an invisible div. Let’s give it some color, make it square. We also have to position it at one corner of the box.

#handle {
    background-color: #727272;
    width: 10px;
    height: 10px;
    cursor: se-resize;
    position:absolute;
    right: 0;
    bottom: 0;
}

The parent div#box has the CSS property position: relative and by setting div#handle the property position:absolute, we have the ability to position the handle absolutely with respect to its parent.

Also, note the cursor: se-resize property. This instructs the browser to set the cursor to the resize cursor () when the user is over it.

Now, it’s upto to javascript to take over. :wink:

var resizeHandle = document.getElementById('handle');  
var box = document.getElementById('box');  

For resizing, the user would click on the handle and drag it. So, we need to start resizing the moment the user presses and holds on the handle. Let’s setup a function to listen for the mousedown event.

resizeHandle.addEventListener('mousedown', initialiseResize, false);  

the initialiseResize function should do two things:

  1. Resize the box every time the mouse pointer moves.
  2. Listen for mouseup event so that the event listeners can be removed as soon as the user is done resizing.
function initialiseResize(e) {  
    window.addEventListener('mousemove', startResizing, false);
    window.addEventListener('mouseup', stopResizing, false);
}
function startResizing(e) {  
    // Do resize here
}
function stopResizing(e) {  
    window.removeEventListener('mousemove', startResizing, false);
    window.removeEventListener('mouseup', stopResizing, false);
}

To resize the box according to the user’s mouse pointer movements, we’ll be taking the current x and y coordinates of the mouse pointer (in pixels) and change the box’s height and width accordingly.

function startResizing(e) {  
   box.style.width = (e.clientX) + 'px';
   box.style.height = (e.clientY) + 'px';
}

e.clientX gives the mouse pointer’s X coordinate and e.clientY gives the mouse pointer’s Y coordinate

Now, this works. But this would only work as expected if the box is placed in the top-left corner of the page. We’ll have to compensate for the box’s left and top offsets. (position from the left and top edges of the page)

function startResizing(e) {  
   box.style.width = (e.clientX - box.offsetLeft) + 'px';
   box.style.height = (e.clientY - box.offsetTop) + 'px';
}

There you go :smile: We can now resize the box !

https://jsfiddle.net/niranjan94/w8k1ffju/embedded

Continue ReadingBuilding interactive elements with HTML and javascript: Resizing

Paginated APIs in Flask

Week 2 of GSoC I had the task of implementing paginated APIs in Open Event project. I was aware that DRF provided such feature in Django so I looked through the Internet to find some library for Flask. Luckily, I didn’t find any so I decided to make my own.

A paginated API is page-based API. This approach is used as the API data can be very large sometimes and pagination can help to break it into small chunks. The Paginated API built in the Open Event project looks like this –

{
    "start": 41,
    "limit": 20,
    "count": 128,
    "next": "/api/v2/events/page?start=61&limit=20",
    "previous": "/api/v2/events/page?start=21&limit=20",
    "results": [
    	{
    		"data": "data"
    	},
    	{
    		"data": "data"
    	}
    ]
}

Let me explain what the keys in this JSON mean –

  1. start – It is the position from which we want the data to be returned.
  2. limit – It is the max number of items to return from that position.
  3. next – It is the url for the next page of the query assuming current value of limit
  4. previous – It is the url for the previous page of the query assuming current value of limit
  5. count – It is the total count of results available in the dataset. Here as the ‘count’ is 128, that means you can go maximum till start=121 keeping limit as 20. Also when you get the page with start=121 and limit=20, 8 items will be returned.
  6. results – This is the list of results whose position lies within the bounds specified by the request.

Now let’s see how to implement it. I have simplified the code to make it easier to understand.

from flask import Flask, abort, request, jsonify
from models import Event

app = Flask(__name__)

@app.route('/api/v2/events/page')
def view():
	return jsonify(get_paginated_list(
		Event, 
		'/api/v2/events/page', 
		start=request.args.get('start', 1), 
		limit=request.args.get('limit', 20)
	))

def get_paginated_list(klass, url, start, limit):
    # check if page exists
    results = klass.query.all()
    count = len(results)
    if (count < start):
        abort(404)
    # make response
    obj = {}
    obj['start'] = start
    obj['limit'] = limit
    obj['count'] = count
    # make URLs
    # make previous url
    if start == 1:
        obj['previous'] = ''
    else:
        start_copy = max(1, start - limit)
        limit_copy = start - 1
        obj['previous'] = url + '?start=%d&limit=%d' % (start_copy, limit_copy)
    # make next url
    if start + limit > count:
        obj['next'] = ''
    else:
        start_copy = start + limit
        obj['next'] = url + '?start=%d&limit=%d' % (start_copy, limit)
    # finally extract result according to bounds
    obj['results'] = results[(start - 1):(start - 1 + limit)]
    return obj

Just to be clear, here I am assuming you are using SQLAlchemy for the database. The klass parameter in the above code is the SqlAlchemy db.Model class on which you want to query upon for the results. The url is the base url of the request, here ‘/api/v2/events/page’ and it used in setting the previous and next urls. Other things should be clear from the code.

So this was how to implement your very own Paginated API framework in Flask (should say Python). I hope you found this post interesting.

Until next time.

Ciao


{{ Repost from my personal blog http://aviaryan.in/blog/gsoc/paginated-apis-flask.html }}

Continue ReadingPaginated APIs in Flask

Getting Signed Release apk’s from the command line


View at Medium.com

If anyone of you has deployed an application on the play store, you may have most probably used Android Studio’s built in Generate signed apkoption.

The generate apk option in android studio

Recently while making the Open Event Apk generator, I had to make release apk’s, so that they could be used by an event organiser to publish their app, plus apk’s had to be signed because if they were not signed, it would be impossible to upload due to checks by Google.

Error shown on the developers console

So since I was building the app using the terminal and I didn’t have the luxury of signing the app using Android studio and I had to look for alternatives. Luckily I found two of them :

  1. Using the Signing configs offered by gradle
  2. Using the Oracle sun jarsigner

First of all the signing configs in gradle is a great way to do this. Most Open source apps use this as a way to put their code out for everyone to view and sucessfully hide any private keys and password.

You just need to add few lines of code in your app level build.gradle file and create a file called keystore.properties

In your keystore.properties, we just need to store the sensitive info and this file will be accessible only to people who are part of the project.

storePassword=myStorePassword
keyPassword=mykeyPassword
keyAlias=myKeyAlias
storeFile=myStoreFileLocation

Next we go to the build.gradle and add these lines to read the keystore.properties file and it’s variables

// Create a variable called keystorePropertiesFile, and initialize it to your
// keystore.properties file, in the rootProject folder.
def keystorePropertiesFile = rootProject.file("keystore.properties")

// Initialize a new Properties() object called keystoreProperties.
def keystoreProperties = new Properties()

// Load your keystore.properties file into the keystoreProperties object.
keystoreProperties.load(new FileInputStream(keystorePropertiesFile))

Next we can add the signingConfigs task and reference the values we got above over there

android {
    signingConfigs {
        config {
            keyAlias keystoreProperties['keyAlias']
            keyPassword keystoreProperties['keyPassword']
            storeFile file(keystoreProperties['storeFile'])
            storePassword keystoreProperties['storePassword']
        }
    }
    ...
  }

So As you see this is as simple as this but according to my requirements this seemed a bit tedious since a person setting up the apk generator had to make a keystore file, then find the build.gradle and change the path of the keystore file according to the server directories. So this does the trick but this can be so tedious for someone with no technical experience, so I researched on other solutions and then I got it : Jarsigner and Zipalign

First of all,the jarsigner and zipalign are 2 great tools and the best part about them is that both of them work perfectly with a just one line commands. For signing the app :

jarsigner -keystore <keystore_file> -storepass <storepassword> <apknameTosigned> <alias>

and then zipaligning :

zipalign -v 4 <unaligned-apk-location> <path-to-generated-aligned-apk>

So this is it, we finally used these 2 commands to sign and zipalign an apk and it works perfectly fine. Please test and share comments of the demo live @ http://192.241.232.231. Ciao !

Continue ReadingGetting Signed Release apk’s from the command line

Working with Absolute Positioning

During the past week, I have done a lot of work for making the feature that allow the users to view the schedule of events according to track and time. The toughest part was to have a headstart to think of the mockup that fulfills this criterion.

After the mockup, I started coding it and realized that I have to add CSS by using Javascript. The frontend needs to calculate the top of each pop-up that appears when the track is hovered and to append the box just below it.

a

The interesting part was to calculate the top each time the element is hovered and to place the box at the right position by using jQuery.

Position Absolute 

The difficulty becomes maximum when we use “position : absolute “. As, it takes the element out of the layer. The element with absolute positioning is difficult to handle when it comes to responsiveness. Here also the pop-overs showing the speakers are to be made with absolute positioning.

The code snippet shows the calculation for exact position of the pop-up box.

$(document).ready(function(){

 $('.pop-box').hide();
 $('.item').hover(function (event) {

 event.preventDefault();
 event.stopPropagation();
 var track = $(event.target);
 var link = track.children(0);
 var offset =$(link).offset();

 var position= offset.top-link.height()-30;
 if( $(window).width()<600){
 var position= offset.top-link.height()-48; 
 }
 if(offset.top){
 
 $('.pop-box').hide();
 var p=$(this);
 $(p).next().show();
 var posY = event.pageY;
 nextOfpop=$(p).next();
 
 var toptrack = position ;

 $(nextOfpop).css({'top':toptrack
                 });

 $(document).mouseup(function (e)
 {
 var container = $(".pop-box");

  if (!container.is(e.target) 
  && container.has(e.target).length === 0 && (e.target)!=$('html').get(0)) 
   {
   container.hide();
   }
   });
  });
 })

This code sets the value of top of the pop-over in the variable position and copy it to toptrack that is passed to CSS to adjust the top dynamically.

Responsiveness for top

I was struggling a whole day to find out the best possible way for the responsiveness of track page. Obviously, the difficult part was the recalculation of top with the screen-size. Currently I have used $window.width() to check the width of screen and adjust the top on mobile. But, it will include more complexity when it is done for other screen sizes rather than mobile.

 if( $(window).width()<600){
 var position= offset.top-link.height()-48; 
 }

The tracks page is ready now with both light and dark theme.

10.png

That’s how the position absolute is handled with jQuery. To remove the complexity, all the CSS except the calculation of top is written with SASS.

Continue ReadingWorking with Absolute Positioning

Adding Notifications, Volunteer Shifts and DB Export in Engelsystem

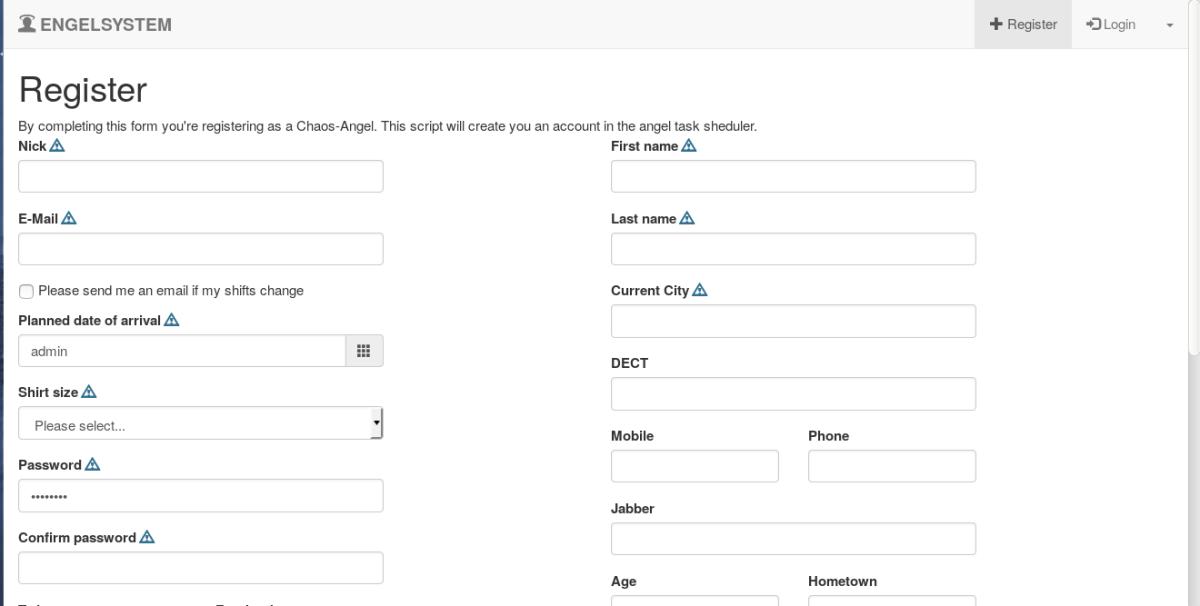
Admin can change the display message in registration form

The present system doesn’t allow to change the display message in register form. When the system is used for different events it would be useful if the admin is able to change the display message in registration form . I have added feature were admin can change the display message

settings page

By changing the message in the message box admin can change the display message.Now the message looks like this.

register page

Implementation of changing display message.

Adding display_msg field to User Table so that the display_msg can be accessed through the database any where through the code and can be changed easily

ALTER TABLE `User` 
   ADD `display_msg` varchar(255) DEFAULT "By completing this form you're registering as a Chaos-Angel. This script will create you an account in the angel task scheduler.";

Next step is to update the field whenever it is changed by admin

sql_query("UPDATE `User` SET `display_msg`='" . sql_escape($display_message) . "' WHERE  `UID`='" . sql_escape($user['UID']) . "'");

Copy/ Duplicate function for creating new shifts from existing shifts

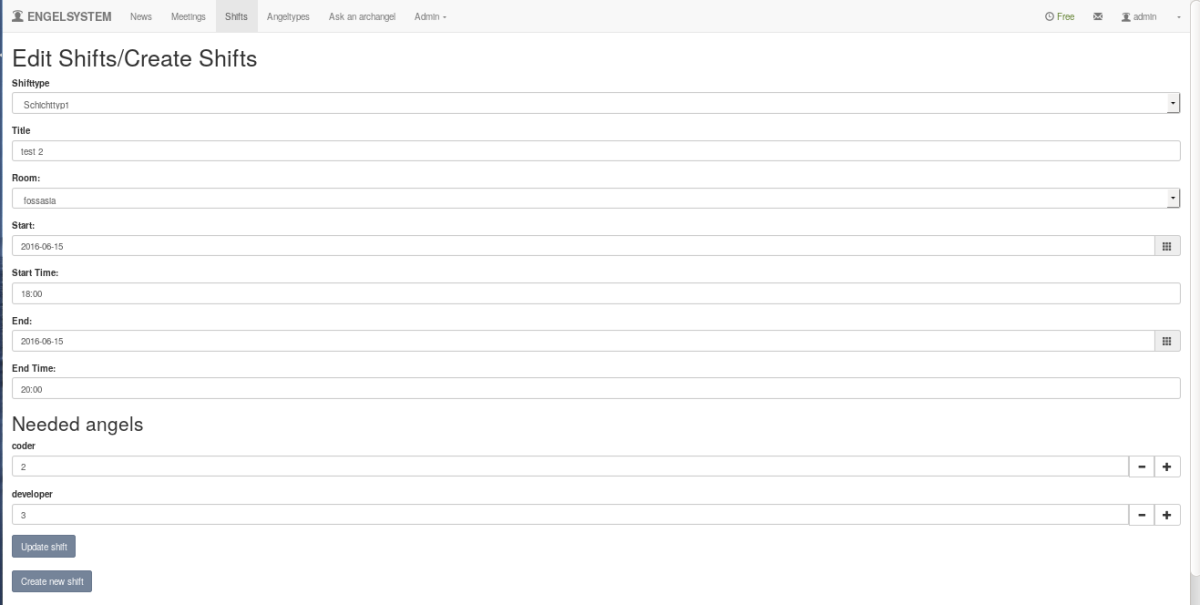
The present system doesn’t allow admin to edit an existing shift and create a new shift from the existing data of already created shifts . I have created a copy shift option where admin can edit the shift and create a new shift

create new shifts

In this page admin can create new shift or update the existing shift . Admin can change the date , time , no of angels etc as admin used to create shifts.

Implementation of copy shifts function

Once the admin selects create new shifts button , we need to use the same data so we need to store the values in variables. once admin selects the option we need to do all the error handling and create new shifts .

    if (isset($_REQUEST['shifttype_id'])) {
      $shifttype = ShiftType($_REQUEST['shifttype_id']);
      if ($shifttype === false)
        engelsystem_error('Unable to load shift type.');
      if ($shifttype == null) {
        $ok = false;
        error(_('Please select a shift type.'));
      } else
        $shifttype_id = $_REQUEST['shifttype_id'];
    } else {
      $ok = false;
      error(_('Please select a shift type.'));
    }
    
    $title = strip_request_item('title');
    // check for errors
    if (isset($_REQUEST['rid']) && preg_match("/^[0-9]+$/", 
    $_REQUEST['rid']) && isset($room_array[$_REQUEST['rid']]))
      $rid = $_REQUEST['rid'];
    else {
      $ok = false;
      $rid = $rooms[0]['RID'];
      error(_('Please select a location.'));
    }
    
    if (isset($_REQUEST['start']) && $tmp = 
    DateTime::createFromFormat("Y-m-d", trim($_REQUEST['start'])))
      $start = $tmp->getTimestamp();
    else {
      $ok = false;
      error(_('Please select a start date.'));
    }
    
    if (isset($_REQUEST['end']) && 
    $tmp = DateTime::createFromFormat("Y-m-d", trim($_REQUEST['end'])))
      $end = $tmp->getTimestamp();
    else {
      $ok = false;
      error(_('Please select an end date.'));
    }

    if (isset($_REQUEST['start_time']) &&
  $tmp = DateTime::createFromFormat("H:i", trim($_REQUEST['start_time'])))
      $start_time = $tmp->getTimestamp();
    else {
      $ok = false;
      error(_('Please select an start time.'));
    }

    if (isset($_REQUEST['end_time']) && 
    $tmp = DateTime::createFromFormat("H:i", trim($_REQUEST['end_time'])))
      $end_time = $tmp->getTimestamp();
    else {
      $ok = false;
      error(_('Please select an end time.'));
    }
    
    if (strtotime($_REQUEST['start']) > strtotime($_REQUEST['end'])) {
      $ok = false;
      error(_('The shifts end has to be after its start.'));
    }
    if (strtotime($_REQUEST['start']) == strtotime($_REQUEST['end'])) {
      if (strtotime($_REQUEST['start_time']) > 
                                     strtotime($_REQUEST['end_time'])) {
        $ok = false;
        error(_('The shifts end time  has to be after its start time.'));
      }
    }
    if (strtotime($_REQUEST['start']) == strtotime($_REQUEST['end'])) {
      if (strtotime($_REQUEST['start_time']) == 
                                 strtotime($_REQUEST['end_time'])) {
        $ok = false;
        error(_('The shifts start and end at same time.'));
      }
    }
    $angelmode = 'manually';
    foreach ($types as $type) {
      if (isset($_REQUEST['type_' . $type['id']]) && 
      preg_match("/^[0-9]+$/", trim($_REQUEST['type_' . $type['id']]))) {
        $needed_angel_types[$type['id']] = 
                       trim($_REQUEST['type_' . $type['id']]);
      } else {
        $ok = false;
        error(sprintf(_('Please check the needed angels for team %s.'), 
                                              $type['name']));
      }
    }
    if (array_sum($needed_angel_types) == 0) {
      $ok = false;
      error(_('There are 0 angels needed. 
                         Please enter the amounts of needed angels.'));
    }
    if (isset($_REQUEST['back']))
      $ok = false;

    if ($ok) {
      $shifts = array();
      $start = DateTime::createFromFormat("Y-m-d H:i",
                    date("Y-m-d", $start) . date("H:i", $start_time));
      $start = $start->getTimestamp();
      $end = DateTime::createFromFormat("Y-m-d H:i", 
                        date("Y-m-d", $end) . date("H:i", $end_time));
      $end = $end->getTimestamp();  
      $shifts[] = array(
          'start' => $start,
          'end' => $end,
          'RID' => $rid,
          'title' => $title,
          'shifttype_id' => $shifttype_id   
        );
      $shifts_table = array();
      foreach ($shifts as $shift) {
      $shifts_table_entry = [
          'timeslot' => '<span class="glyphicon glyphicon-time"></span> ' . 
date("Y-m-d H:i", $shift['start']) . ' - ' . date("H:i", $shift['end']) . 
'<br />' . Room_name_render(Room($shift['RID'])),
          'title' => ShiftType_name_render(ShiftType($shifttype_id)) . 
           ($shift['title'] ? '<br />' . $shift['title'] : ''),
            'needed_angels' => '' 
        ];
        foreach ($types as $type)
          if (isset($needed_angel_types[$type['id']]) 
          && $needed_angel_types[$type['id']] > 0)
            $shifts_table_entry['needed_angels'] .= '<b>' . 
AngelType_name_render($type) . ':</b> ' . $needed_angel_types[$type['id']]. '<br />';
        
        $shifts_table[] = $shifts_table_entry;
      }

Display shifts in map view .

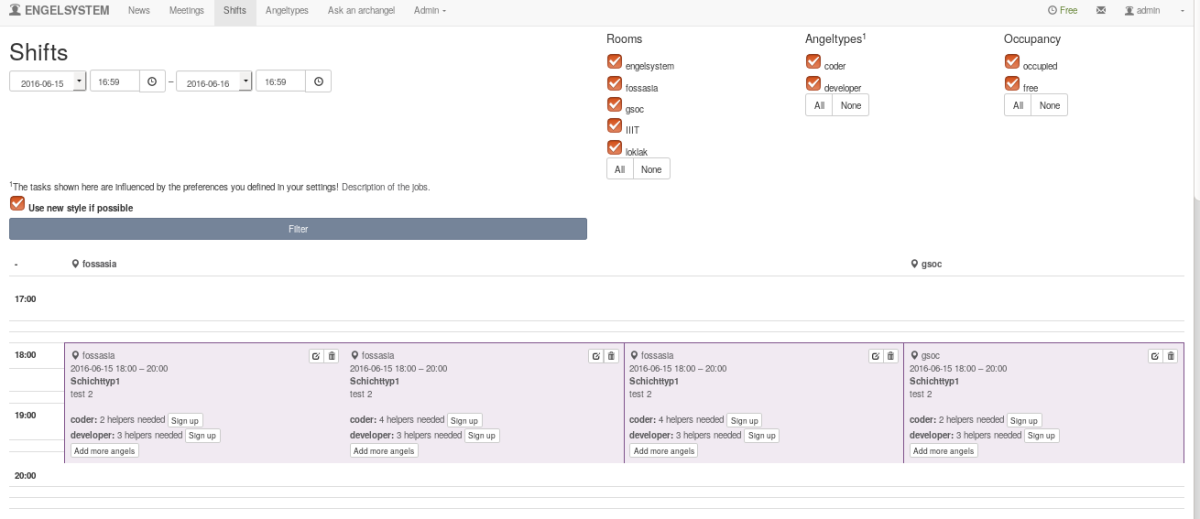
Map view makes the user/admin easy to view the shifts and easy to sign-up for shifts.Initially was not able to view the shifts but now the shifts can be viewed in both map view and normal view

shifts view

Implementation of map view .

Map view is very nice way of representing events with dates on Y – axis and rooms on X-axis. We need to make blocks and map the key

$_SESSION['user_shifts'][$key] = array_map('get_ids_from_array', $$key);

Here we map the ids and keys and then we need to print the keys against the id’s

Exporting database of user

In a system like this . It would be better if we could get all the user data who want to volunteer so that they can be contacted for other events also.

export database

Here is the code which can be useful for exporting database of any mysql database

function export_xls(){
// filename
$xls_filename = 'export_'.date('Y-m-d').'.xls'; // Define Excel (.xls) file name
// selecting the table user
$sql = "SELECT * FROM `User`";
//enter your mysql root password here
$Connect = @mysql_connect("localhost", "root", "") or die("Failed to connect to MySQL.You need to enter the password:<br />" . mysql_error() . "<br />" . mysql_errno());
// Select database
$Db = @mysql_select_db($databasename, $Connect) or die("Failed to select database:<br />" . mysql_error(). "<br />" . mysql_errno());
// Execute query
$result = @mysql_query($sql,$Connect) or die("Failed to execute query:<br />" . mysql_error(). "<br />" . mysql_errno());

// Header info settings
header("Content-Type: application/xls");
header("Content-Disposition: attachment; filename=$xls_filename");
header("Pragma: no-cache");
header("Expires: 0");
 
// Define separator (defines columns in excel &amp; tabs in word)
$separator = "\t";
 
// Start of printing column names as names of MySQL fields
for ($i = 0 ; $i < mysql_num_fields($result) ; $i++) {
  echo mysql_field_name($result, $i) . "\t";
}
print("\n");
 
// Start while loop to get data
while($row = mysql_fetch_row($result))
{
  $schema= "";
  for( $j=0 ; $j < mysql_num_fields($result) ; $j++)
  {
    
    if(!isset($row[$j])) {
      $schema .= "NULL".$separator;
    }
    elseif ($row[$j] != "") {
      $schema .= "$row[$j]".$separator;
    }
    else {
      $schema .= "".$separator;
    }
  }
  $schema = str_replace($seperator."$", "", $schema);
  $schema = preg_replace("/\r\n|\n\r|\n|\r/", " ", $schema);
  $schema.= "\t";
  print(trim($schema));
  print "\n";
}
}

Coding standards

Coding standards are a set of guidelines, best practices, programming styles and conventions that developers adhere to when writing source code for a project. All big software companies have them.

For our system we use drupal coding standards.

Development: https://github.com/fossasia/engelsystem

Issues/Bugs:Issues

Continue ReadingAdding Notifications, Volunteer Shifts and DB Export in Engelsystem

Migrations make us crazy!

Our Open Event team is not small, so problems with migrations occur very often. I’d like to describe how to solve these common problems and avoid Contributors frustration. Because more of us didn’t know how to solve this problems at the beginning so we wasted a lot of time to find a source of problem.

The most common mistake is that we forget run migration on Heroku. Developer is sometimes surprised because something works for him but he forgets to run migration on server. These small mistakes lead to huge problems and at that time our app throws a lots of bugs related to database. We can often see “Internal server error”.Screen Shot 2016-06-17 at 22.55.25.png So if developer changes table he has to run migration!

vagrant@vagrant-ubuntu-trusty-64:/vagrant$ python manage.py db migrate

But above command Quite often doesn’t solve our problem, because We face other problems while updating DB for example

alembic.util.exc.CommandError: Multiple head revisions are present for given argument ‘head’; please specify a specific target revision, ‘<branchname>@head’ to narrow to a specific head, or ‘heads’ for all heads

this problem is caused by two developers which push code to Github with migrations without merging two heads to achieve one head.

So to solve this problem you only have to know ids of two heads

vagrant@vagrant-ubuntu-trusty-64:/vagrant$ python manage.py db heads

e38935822969 (head)
f55fde3d62b1 (head)

Then you have to merge it

vagrant@vagrant-ubuntu-trusty-64:/vagrant$ python manage.py db merge e38935822969 f55fde3d62b1

Generating /vagrant/migrations/versions/ecb671d1eb4b_.py … done

Upgrade DB

vagrant@vagrant-ubuntu-trusty-64:/vagrant$ python manage.py db upgrade

INFO [alembic.runtime.migration] Context impl PostgresqlImpl.
INFO [alembic.runtime.migration] Will assume transactional DDL.
INFO [alembic.runtime.migration] Running upgrade 00ea66754d06 -> d84f976530e1, empty message
INFO [alembic.runtime.migration] Running upgrade d84f976530e1 -> 1b3e4f5f56bd, empty message
INFO [alembic.runtime.migration] Running upgrade 1b3e4f5f56bd -> e38935822969, empty message
INFO [alembic.runtime.migration] Running upgrade e38935822969, f55fde3d62b1 -> ecb671d1eb4b, empty message

And finally run migrations

vagrant@vagrant-ubuntu-trusty-64:/vagrant$ python manage.py db migrate
INFO [alembic.runtime.migration] Context impl PostgresqlImpl.
INFO [alembic.runtime.migration] Will assume transactional DDL.
INFO [alembic.ddl.postgresql] Detected sequence named ‘role_id_seq’ as owned by integer column ‘role(id)’, assuming SERIAL and omitting
INFO [alembic.ddl.postgresql] Detected sequence named ‘microlocation_id_seq’ as owned by integer column ‘microlocation(id)’, assuming SERIAL and omitting….

Continue ReadingMigrations make us crazy!

File Uploading in Flask

Last week I took up an issue of adding upload functionality to the open-event server. I had to implement the upload in 3 places – one in the sponsor table to upload images, another in the user profile page and the third is to upload slides in the session form. However the basic function behind it remains the same. File upload makes use of the inbuilt werkzeug FileStorage class. A code snippet will help understand how it works:

Capture.PNG

So  on selecting the file it gets stored in the request.files object. It is temporarily stored in the FileStorage in werkzeug. Now we access the file’s name using request.files[‘files’] and then using the inbuilt save()  function in flask it gets saved to the folder specified by us. There are some frameworks available for file uploading in Flask but all this can be done using the standard libraries also and there is no such need of the frameworks.

However instead of storing just the direct name of the file we make use of the secure_filename of werkzeug to save it.Capture2.PNG

Thus the secure_filename stores the file in the format given in the image and makes uploading easier by converting the long url/image path to an easier one.

Continue ReadingFile Uploading in Flask

Open Event Organizer’s Server: Custom Forms

As we know, open event organizer’s server provides a means of creating events. And an important part of events is sessions and speakers of sessions. But different events have different details required for sessions and speakers of sessions. Some might feel that only Name and Email-ID of speaker is enough, while others may require their Github, Facebook, etc. links. So the best way to solve this is to make a custom form so that the organizers get to select what all fields they want in the forms. But how to do this? Well, thanks to JSON

In the Step-5 of Event Creation Wizards, we have option (or switches) to include and require various fields available for the session form and speaker form for applying in a particular Session Form. Here is how it looks:
custom_form.png

As we can see, each field has 2 options – Include and Require. On clicking the Include switch the Require switch is enabled through jQuery. The Include switch means that the field is included in the form while the Require switch signifies that the field will be a compulsory field in the form.

Storing Options

We create a javascript array containing a single object. This object in turn is made up of objects with field names as keys and another object as value. This object in turn contains the keys include and require. The value of include and require is 0 by default. On selecting, their value is changed to 1. An example structure of the array is like:

[{
    "title": {
        "include": 1,
        "require": 1
    },
    "subtitle": {
        "include": 0,
        "require": 0
    },
    "short_abstract": {
        "include": 1,
        "require": 0
    },
    "long_abstract": {
        "include": 0,
        "require": 0
    },
    "comments": {
        "include": 1,
        "require": 0
    },
    "track": {
        "include": 0,
        "require": 0
    },
    "session_type": {
        "include": 0,
        "require": 0
    },
    "language": {
        "include": 0,
        "require": 0
    },
    "slides": {
        "include": 1,
        "require": 0
    },
    "video": {
        "include": 0,
        "require": 0
    },
    "audio": {
        "include": 0,
        "require": 0
    }
}]

This array is then converted to string format using JSON.stringify, submitted through form and stored in database in the form of a string.

Rendering Forms

Now, we have already stored the options as selected by the organizer. But now we need to render the forms based on the JSON string stored in the database. Firstly, in the server side we convert the string to JSON object in python using json.loads . Then we send these JSON objects to the templates.

In the templates, we create form elements based on the values of the include and require of each form element. A sample element HTML is like this:

Screenshot from 2016-06-17 22:38:40

We use a loop to iterate over the JSON object and thus add the elements which have  “include = 1”  . The final form looks something like this:

session-form

Continue ReadingOpen Event Organizer’s Server: Custom Forms

Why Coding Standards Matter

Coding standards are a set of guidelines, best practices, programming styles and conventions that developers adhere to when writing source code for a project. All big software companies have them.

A coding standards document tells developers how they must write their code. Instead of each developer coding in their own preferred style, they will write all code to the standards outlined in the document. This makes sure that a large project is coded in a consistent style — parts are not written differently by different programmers. Not only does this solution make the code easier to understand, it also ensures that any developer who looks at the code will know what to expect throughout the entire application.

When you start sharing code or start reading code shared by others, you begin to realize that not everybody writes their code they way you do. You see that other, ugly coding style, and think “everybody needs to write in the same style so that things are easier for me to understand.”

Thus, it is natural that everybody wants their own habits turned into the standard, so they don’t have to change their habits. They’re used to reading code a certain way (their own way) and get irritated when they see the code in a different format. The thing about defining a coding style standard is that there are no objective means by which to judge one style as “better” or “more-right” than another. Sure, we can talk about “readability” and “consistency” but what is readable is different for each coder (depending on what they’re used to) and consistency follows automatically because, well, why would you use another style?

Other than in the broadest outlines, defining a coding standard is an exercise in arbitrariness. Who says that a 75 character line is better than 72, or 80? Who says putting braces in one place is better than putting them elsewhere? And who are they to say; by what standard do they judge?

The point of a coding style standard is not to say one style is objectively better than another in the sense of the specific details (75 characters and one-true-brace convention, for example). Instead, the point is to set up known expectations on how code is going to look.

For example, my project Engelsystem,it is a project written by more than one person. If you examine some Script A and see one coding style, then examine Script B and see another, the effect is very jarring; they don’t look like they belong to the same project. Similarly, when I, a Developer, (who uses one coding style) attempts to patch or add to a separate project from other Developer (who uses another coding style) the mix-and-match result in the same project (or even the same file!) is doubly jarring.

Another example that I can think of: a manager who insisted on being part of every major code review. During the reviews, he would flag formatting issues, that were almost always a matter of his own preference, as “errors”. The worst part of the story is that he hadn’t written down his coding standards anywhere! I guess he thought developers would learn his style through osmosis. Sometimes, it felt as if he made up rules on the fly. As I mentioned in my post on conducting effective code reviews, it is useless arguing over formatting issues if you don’t have coding standards.

As Open Source PHP developers, we need to define and adhere to a coding style not because one is better than another but because we need a standard by which to collaborate/contribute. In that sense, coding style is very important; not for itself, but for the social effects generated by adherence to defined standards.

It is for this reason that I abandoned “my” coding style to adopt the Drupal coding standard for my Google Summer of Code project (Engelsystem). Sometimes you need to give up a small thing to gain a greater thing; by giving up my coding style, I had to change my habits; but now, anybody familiar with the Drupal standard can read my code and add to it in a recognizable way.

Why Designers Should Care About Coding Standards

For many web designers, matters of code standards and style are often left in the hands of their fellow developers. You give developers their deserved space to wield their magic to turn your designs into functional products that people love to use. The team’s coding standards are often the last thing on your mind. So why should you and other designers care?

Tech debt steals time away from new features and enhancements

The next time you are ready to go with a newly designed feature, you might find its development gets stuck behind a mountain of tech debt. Addressing tech debt at a reasonable pace throughout the life of a product can prevent it from piling up to a point where feature work gets put on hold. Better yet, if these issues are caught during initial development, that tech debt might be avoided in the first place.

It can be in your best interest to encourage developers to address issues in the code as they arise, rather than focusing only on design. Failing to fix these issues will cost you in future sprints.

Get better at your own craft

Understanding what it takes to build great software ultimately makes you a better designer. Whether you want to improve how you write your own front-end code if that’s your thing or gain a better appreciation of the time and effort it takes to build products, your practical experience will allow you gauge future work and effort.

A lot of similarities exist between coding standards and design standards. Just as you wouldn’t want a designer to go off-brand, developers have the same standards they want to maintain their code.

Code should look good too

Steve Jobs was famously renowned for being picky about both the externals as well as the internals of Apple products. Your beautiful UI work can only go so far if it isn’t built on a solid foundation of code. Pushing through a feature without appreciating the work to build it properly can lead to bugs later. The right amount of time and attention at the initial development cycle can reduce these mistakes.

Designers can be champions for well-written code. Just as you appreciate the details in designing great user interfaces and experiences, appreciation of the time and effort it takes to build those properly goes a long way.

In the later weeks, other developers and I would be working on adding more features to the system(Engelsystem), following the coding standard, as mentioned above. Anyone who would like to work in the project is welcome. Developers can feel free to take up any issues they would like to work on just like any other open source projects.

Development: https://github.com/fossasia/engelsystem                                           Issues/Bugs:https://github.com/fossasia/engelsystem/issues

Continue ReadingWhy Coding Standards Matter