Bower Dependency & Configure .bowerrc to use Proxy

2 weeks into GSOC 2016, the project has really started to grow at a rapid pace. There have been a lot of issues related to UI as well as other different bugs. As we use more and more libraries for the user interface of the dashboard, we added bower dependencies to install the libraries.

Why Use Bower?

Some of the benefits of using bower dependencies are:

  • Simplify what might be called declarative dependency management; i.e. you declare your dependencies in bower.json so that other things can determine them easily
  • No need to commit dependencies to version control
  • Semantic versioning is used to help define a range of acceptable versions for a dependency, which makes it easy to update to newer versions within the defined range
  • No need to locate various builds (debug, minified, etc)
  • Simple to use different builds of a dependency for dev vs. prod
  • Bower lets you easily search and install libraries even locking to a specific version. Bower makes it easy to list and update dependencies.
  • You can distribute the bower.json file and everyone can get up to speed with a simple “bower install”

Prerequisites

There are some things you’ll need before you can start working with Bower:

  • The command line.
  • Node and NPM.
  • Git.
  • Global Installation. .

To install Bower globally:

$ npm install -g bower

bower.json

The `bower.json` file looks a lot like Node’s `package.json`. It is a manifest file that allows you to specify the various packages you want to download along with their version number and various features. This is how the `bower.json` looks for the open-event-orga-server project.Screenshot from 2016-06-04 05:25:08.png

.bowerrc

The `.bowerrc` file can be seen as a configure file for bower which dictates various rules to it. Though mostly this file is ignored and is used mainly to specify the directory where the libraries are to be installed instead of the default `bower_components`, however it can be used to do a lot more than that.

Screenshot from 2016-06-04 05:29:50.png

For example, one of the biggest problem you might face while installing using bower is if your organization/institute has a proxy network through all network connections pass. In that case bower install might not be able to install the libraries. However we can configure the .bowerrc to work via proxy.

Configure .bowerrc to use Proxy

To use http proxy, we can add 2 properties to .bowerrc which will make bower search and install libraries using the proxy. The properties are “proxy” and “https-proxy”. This 2 properties dictate that both http:// and https:// links are to be searched via the proxy. So, to make this settings, we can configure the .bowerrc something like this:
Screenshot from 2016-06-04 05:35:13.png

This should then fix your problem of proxy and will install your libraries as desired.

Continue ReadingBower Dependency & Configure .bowerrc to use Proxy

Promises, REST API’s & Angular JS

week2gsoc1

Before breaking it down, to all those who don’t know what REST API’s are :

“REST is acronym for REpresentational State Transfer. It is architectural style for distributed hypermedia systems ans was first presented by Roy Fielding in 2000 in his famous dissertation.”

Source : “restfulapi.net”

So what is a Promise ?

Generally promises are representation of a value that which might not be available to us as of now but at some point eventually it will be available. Observe the below image to understand how promises work.

week2gsoc2

So how is this better than callbacks ?

Generally if you are using callbacks in your codebase then at some point of time either for i/o’s or file buffers or something might come in your way and makes you write nested callbacks. Writing nested callbacks is difficult and an alternative to that is promise.

week2gsoc3

REST API’s, promises what are you about to explain ?

Angular has this beautiful service called $q which is helpful for creating promises and using them in your angular applications. Generally many people have concerns over $q but $q is tightly integrated with the scope life cycle. So be it any task it contains all the necessary features needed by most of the heavy duty asynchronous tasks.

Now to start off angular can be really powerfull with the $http Service provided the fact that it has immense potential in allowing us to create heavy duty REST ful API’s, CRUD operation based web applications etc. So let us understand the $http service first before using promises for creating a REST ful API.

$http
|_____ .success()
For a success(), callback is called asynchronously when the request completes and the response arrives from the server
|_____ .error()
For an error(), the error callback is fired

Callbacks which are accpeted by above methods are :

  • data: It is a response obtained from server.
  • status: HTTP status codes 100x, 200x, 300x, 400x, etc which returned from server.
  • config: Object used for generating the request.
  • headers: Headers sent by the server.
  • statusText: HTTP status text of the status code.

Promise Chaining

Chaining is one of the most important aspects of promises. Here the basic idea is that promises can be composed through chaining. This means you can trigger a specified task only after previous promise has been resolved.

Handling errors by designing a promise that always rejects

No API is complete without writing a handler or a middleware that takes care of all the requests which are generally errored. Designing this will be useful if we want to tell a user about the occurrence of an error in terms of a promise rather than a simple value.

week2gsoc4

NOTE : Generally while using $http Service there are somethings which one should have knowledge of, If we happen to send a JS object as POST data in a POST/PUT request, it’s serialized to JSON before getting sent. Similarly, if the server responds with a JSON string it’s parsed into a JavaScript object and passed to the success callback attached to the promise.

Thats it folks,
Happy Hacking !!

Continue ReadingPromises, REST API’s & Angular JS

Engelsystem – Implementing Localization

This post is on how to make your website available in different languages.The main reason of localization is that it can be used by different people knowing different languages across the world and help them to understand the system better .

The tools used in implementing localization are poedit where we create the .po files .

Steps to download poedit and Run it.

sudo apt-get install poedit

On ubuntu/linux this can be used

On Mac/Windows

The executable can be downloaded at https://poedit.net/download

Steps to run poedit in Linux/Windows/Mac

choose File → New Catalog.Enter the details in Translation properties like your email . Source code charset should be selected as UTF-8.Now the source path should be selected as (.) dot to tell Poedit to search for PHP files in the same folder.

Screenshot from 2016-06-04 17:23:39

In the source keywords there are three options ‘_’ , ‘gettext’ and ‘gettext_noop’.Make sure all necessary functions are added and press OK.

Now we can see list of strings and their translated strings comes like this.we need to install the necessary dictionary for this.

Screenshot from 2016-06-04 17:44:25

If we save it we get a .po and .mo files if it passing all the validation.which can be used to implement localization in the project.

How to Use .po and .mo files

In our engelsystem.we need to add the list of languages we would like to implement in the file internationalization_helper.php

$locales = array(
     'de_DE.UTF-8' => "Deutsch",
     'hi_IN.UTF-8' => "Hindi", 
     'sp_EU.UTF-8' => "Spanish",
     'en_US.UTF-8' => "English" 
 );

these are list of languages currently implemented.

function make_langselect() {
   global $locales;
   $URL = $_SERVER["REQUEST_URI"] . (strpos($_SERVER["REQUEST_URI"], "?") > 0 ? '&' : '?') . "set_locale=";
   
   $items = array();
   foreach ($locales as $locale => $name)
     $items[] = toolbar_item_link(htmlspecialchars($URL) . $locale, '', '<img src="pic/flag/' . $locale . '.png" alt="' . $name . '" title="' . $name . '"> ' . $name);
   return $items;
 }

This function renders a language selection.

Development: https://github.com/fossasia/engelsystem

Issues/Bugs:Issues

Continue ReadingEngelsystem – Implementing Localization

Engelsystem: Enhancing security in registration form

My first impression when looking at the PHP application (Engelsystem) was that it is a well-built MVC app. It seems to have everything an event manager could want. But the security implemented in the registration form was not good.

Registration forms are a great way to follow up people’s interest in what you are offering on your website and with these tools you are able to make sure it is done right. Unfortunately, registration forms can be a large source of a sender acquiring bounced addresses and Spam Traps which could cause your business to spam a hosts mailbox without proper validation of addresses. This can reflect poorly in your SendGrid internal reputation as well as reflect poorly upon your business. Fortunately, there are many helpful techniques that can help a sender avoid many of the issue that can come up through their registration form.

A registration from should ask for complete information about the user to ensure that the user registering for the service is not fake.

Sometimes in the registration process, a person makes a mistake in entering their email such as person@domain.coom or person@@domain.com. By entering the email address twice and having a system in place that checks that the addresses match up, the person entering their email address has a much smaller chance of accidentally entering an invalid address.

A good technique in protecting your registration form from bots is placing a required Captcha in the form:

04

A Captcha is a test to ensure that form is filled out by a human being as opposed to a bot. The image is not replicable by a bot but easily replicated by a human being.

One common issue that arises with email registration forms is people registering false or fake addresses. To prevent this, the form can say that the service is not granted unless they confirm via email that they would like the service. This can be done with a Double Opt-In Email, confirming that their address exists. A double opt-in email not only helps ensure that there is an actual human being registering but also validates that the recipient did indeed sign up for your registration.
There are many great techniques available to protect your registration form but a balance must be created between user friendliness and security. Some forms have many required fields in registering as well as checks to make sure that the form is filled out correctly. Too many fields can drive away potential interest in your site or product. One way to balance out the registration process is to have other information about the person be collected on a landing page after the registration form is done. This serves to be both user friendly as well as allow you to collect valuable information.

In my first week, I enhanced the registration form, adding new fields and marking some fields as important.

05

Development: https://github.com/fossasia/engelsystem                                           Issues/Bugs:https://github.com/fossasia/engelsystem/issues

Continue ReadingEngelsystem: Enhancing security in registration form

One step at a time – The beginnings of CommonsNet

The beginnings

If you have been accepted to a serious project like Google Summer of Code is, you can feel lost and scared. I think it’s nothing special and probably everyone experiences it. You can feel that pressure because you want to fulfill all expectations, follow your obligations and to do your best, but working in such project is something different from working on your own, private and small one.  Your organisation and mentors require something from you, and they can even provide you with a detailed guideline how to behave but doubts may occur anyway.

My advice is not to give up and go through that tought period in order to experience the joy of results and sense of satisfaction, and to learn something to be better in the future. I am going to tell about my beginnings and to provide you with some tips  from my own experience

CommonsNet

CommonsNet (feel free to see it) is a new project of FOSSASIA. It focuses on providing users with transparent information about WiFi they may use in public places like hotels, restaurants, stations. The thing is that for now, if you go to a new place, and want to connect to Internet, you look for a free WIFI sign and as soon as you find it you try to connect. But think about it, how much do you know about this connection? Is is safe for your private data? How fast is it? Does the Internet connection have any legal restrictions?  I suppose that you answer ‘no’ to all these questions. But what if you know? Or if you can compare details of different WIFI available in a specific public place and connect to more suitable for your needs. I am sure you will appreciate it. I hope to run this project successfully and I am going to tell you more about it in next posts.

How to start?

Due to the fact that CommonsNet is a new project as I have mentioned before, and for now apart from mentor @agonarch and FOSSASIA leaders @mariobehling @hpdang, I am an only contributor, I am in a good position to tell you what are my steps. Remember not to think about all at once. It will make you crazy.

So first of all – prepare your work. Try to get to know about your project as much as possible. Follow group chat, GitHub repositories, do research in Internet about the subject of area of your project or don’t be afraid to ask your team member. That’s what I have done at first. I have prepared a Google Doc about all WiFi details. I  have tried to get to know as much as possible and to gather this information in a clear, easy-to-understand way.

project details

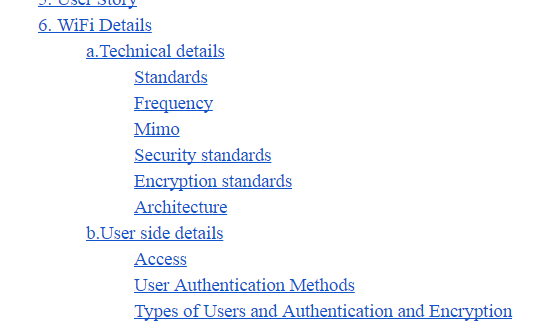
I need it because I will be preparing a wizard form for users to let them provide all important details about their WiFi. I need to think seriously which data are important and have to be used to do it. It is not finished yet and will be changing (yes, I am going to share it with you and update you about changes!) but for now I want you to follow my view about it, how am I going to use the gathered information. wizard-ui

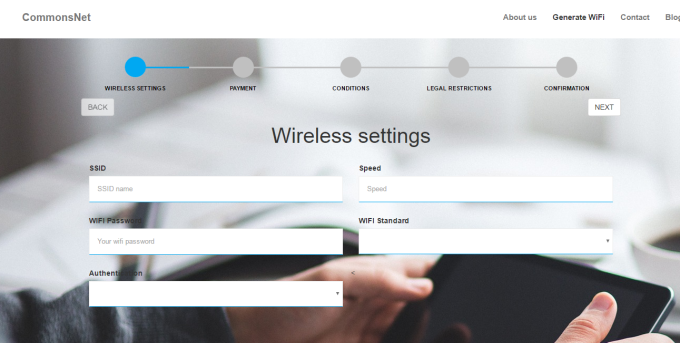
Next step is to prepare user stories. I think it’s a crucial point before you start to implement your project. I think there is no point of developing something until you think who will your user be. You need to imagine him/her and try to predict what he or she may expect from your app. Remeber – even if app is well coded it’s useless until somebody wants to use it. You can find many tutorials how to write a good user story in Internet. Just type ‘user stories’ in Google search. Some of them are here;

http://www.romanpichler.com/blog/10-tips-writing-good-user-stories/

https://www.mountaingoatsoftware.com/agile/user-stories

You can also see my user stories created for CommonsNet .

Furthermore, I have prepared a mockups to visualize my ideas. I think it’s also an important part of running your project. It will help you to express and concretize your ideas and let the whole team discuss about it. And there is no doubt that it’s easier to change a simple draft of mockups than coded views. You can see my mockups here: CommonsNet MockupsScreen Shot 2016-06-23 at 12.38.20

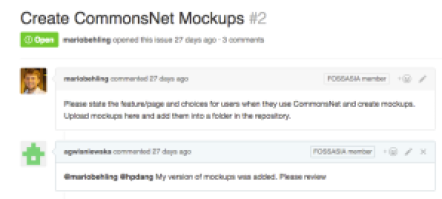
As soon as you finish all these activities is a high time to start creating issues on GitHub. Yes, of course, you probably have already started, so have I, but I am talking about further issues which help you to take control over your progress and work, discuss on specific subject and share it with other.

Lost on GitHub?

Is is possible at all? I suppose we all know and use GitHub. It’s a perfect place of working to all programmers. Its possibilities seems to be unlimited. But maybe some of you experience the difficulties which I have experienced at first, because just like me you have used GitHub so far only for your private aims and simply just pushed code and have not worried about creating issues, following discussions and  organizing your work step by step . Let me to explain you why and how to follow GitHub flow.

GitHub issues let you and your team take control over your work. It’s really important to create bigger, let’s say main issues, and then subissues, which help you to divide your work into small parts. Remember – only one step at a time! Using my mockups first I have created some issues which present main tasks like ‘deploying app to Heroku’ or different pages in my app like ‘Home’, ‘About us’. And then I have created many smaller issues – subissues to present what tasks I have to do in each section like ‘Home’ -> ‘Impementing top menu’, ‘Implementing footer’, ‘Implementing big button’. It helps me to control where I am, what have been done, and what do I need to do next. And I think the smaller the tasks are, the more fruitful the discussion and work can be, because you can simply refine each detail. Please feel free to see CommonsNet issues. It’s not finished yet, and while working I am going to add further issues but it presents the main idea I am talking about.

Screen Shot 2016-06-23 at 12.57.48.png

I hope these tips help you to run your work and to go through harder time – easier. And remember even the longest journey starts from the first step!

Please follow CommonsNet webiste https://commonsnet.herokuapp.com/ to be updated about progress, latest news and tips how to resolve programming problems you may experience.

Feel free to follow us on social media Facebook https://web.facebook.com/CommonsNetApp/  Twitter https://twitter.com/Commons_Net

Continue ReadingOne step at a time – The beginnings of CommonsNet

The Official Beginning

This blog marks the start of the coding period for Google Summer of Code. I will start by talking about the community bonding period and then my plan to begin the summer.

Community bonding was an interesting and intense period. Managing college, assignments, exams and working on the project all at the same time. I think this is the capability that sets us apart. We had started out with fixing small issues in the steam-shell. Steam-shell is a command line interface that allows the user certain limited set of commands to interact with the server. I will list down the issues I solved and the improvements I made.

My first task was to improve the display of commands like ‘look’. This command lists out the gates/files/documents/rooms/conatiners present in the current room. The old display showed one entry in one line. I improved this to make it something similar to the ls command of linux. I used sprintf(“%#-80s”,<variable>) to give the output a structure.

Next I worked on the create command. I found a bug that this command was not working for containers and documents. I fixed it by adding the required conditions in the code and then I worked upon to improve the functionality of the command as suggested by my mentor Trilok. I added the feature to enter the destination where the new object is to be created and a ‘.’ to create it in the present directory. Initially this feature was only for Rooms and Containers, later I extended this to all kinds of objects.

After this I spent a few days studying the COAL protocol. I have already written in detail about this in my previous blog. Though I was not successful in completely understanding the protocol but this gave me an idea of the client-server architecture. This was towards the end of the community bonding period and I decided to spend the rest of my time with steam-shell itself.

Now as the coding period begins officially I will be working to fix the edit command. Currently the edit command opens the file on a vi/vim/emac instance. The vi and vim opens in the same window and it misbehaves. Then I will be extending the feature for multiple documents and in the next week move on to work on COAL again.

Continue ReadingThe Official Beginning

Integrate sTeam-shell into Vi and Indentation of output

(ˢᵒᶜⁱᵉᵗʸserver) aims to be a platform for developing collaborative applications.
sTeam server project repository: sTeam.

Indentation of sTeam-shell output

The Indentation of the output in the look command in steam-shell is formatted to be displayed in the way the output is displayed when the ls command is executed in a terminal window.

The module reference provided by the pike language is used for formatting.
The pike reference module can be found at Pike Ref module

The screen-width of the the user is calculated using the command tput rows.
This value is then passed as an argument to the write function to display it in the form of output of an ls command.
The example of this can be seen in the modref by Pike.

Issue. Github Issue Github PR
Indentation of output in steal-shell. Issue-24 PR-42

Example:

write("%-$*s\n", screen_width,"Given a\nlist of\nslosh-n\nseparated\n'words',\nthis option\n"+ "creates a\ntable out\nof them\nthe number of\ncolumns\n"+"be forced\nby specifying a\npresision.\nThe most obvious\n"+"use is for\nformatted\nls output.");

Output:

 Given a          list of          slosh-n
 separated        'words',         this option
 creates a        table out        of them
 the number of    columns          be forced
 by specifying a  precision.       The most obvious
 use is for       formatted        ls output.

The following changes have been made in order to incorporate the changes:

IndentationCodeChange

Integration of sTeam-shell into Vi

For integration of sTeam-shell.pike into the Vi, the steam-shell is made compatible to be run when a command is passed as an argument to it. The changes have been made in steam-shell.pike and the applauncher.pike. Also a new file called as VisTeam.pike is created. When this is executed it validates the user and opens two vi buffers. One for typing the command and the other to display the log/ output of the executed command.

A steam-shell.vim vi plugin is created so as to be able to run the Steam function in vi. Whenever this function is executed the selected text in the vi visual mode will be executed.

The results are displayed in the log buffer in a new tab. Since the already existing vim scripts Goldenratio.vim and watchforchanges.vim divide the command buffer and the log buffer in the ration 2:1, the output is not visible in the logs. Thus a newtab consisting of the logs is opened.

Issue. Github Issue Github PR
Integrate sTeam-shell into Vi. Issue-37 PR-41

InsertIntoVI
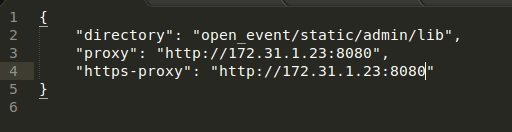
Execute the command:

ExecuteCommandsTeam

Display the output:

DisplayTheOutput

Checkout the FOSSASIA Idea’s page for more information on projects supported by FOSSASIA.

Continue ReadingIntegrate sTeam-shell into Vi and Indentation of output

Factories, Services and Controllers

week1gsoc1

So before I start the blog post, it is better if you know more about what sTeam web interface is and what are the capabilites of sTeam. Click here.

So what is a Controller ?

It is simply a a constructor function which is instantiated by AngularJS when it encounters ng-controller directive in HTML.

So what is a Factory ?

In Angular Js a factory is an injectable type which helps us in encapsulating repetitive logic.

How are they helpful for sTeam web interface ?

So as my first week of work started of for GSOC, the core concentration has been on primarily working with the controllers of the workarea and integrating them with the respective views. In an attempt i started of with adding a :

commentsCtrl

: Used for adding comments to the web interface

workspaceeditorCtrl

: Used for integrating textAngular to the web interface

Things apart, in a broader aspect here what should be understood is about how things should be implemented using controllers, factories and services. Let me illustrate how it should be properly done in angular js.

To start off

How are controllers really helpful in Angular and how should they be used ?

Generally we should understand that controllers responsible for augmenting the scope which is done by attaching models and functions to it that are subsequently accessed in the view. There are some things which are to be understood while writing controllers. Lets go one by one,

  • A Straight “No” for all the DOM manipulation. This must be achieved only with directives
  • If you are having a situation where you are about to write repeatable code, then don’t do it with controllers, instead encapsulate them in services.
  • If you are trying to expose the whole controller instance then it isn’t a good idea. In fact the scope object exists in order to clear separation of concern between controller and view .

So what about Factories ?

“Services, factories, and providers are all injectable types. We must understand that Factories in angular Js are just another example for an injectable type. It looks almost the same as Service but when it comes to implementation you can decide and determine what to instantiate and return from the factory”

scribes by hector | Akhil Pandey

Let me give you a small example before i wrap up, Have a look at the below image,

week1gsoc2

Observe broadcastItem, prepForBroadcast. If you look keenly essentially what i am doing there is creating an injectable type which enables me to change the message that which has to be printed depending on the broadcast item.

One more key thing about factories is that a factory can also depend on other services or factories. Also there is one more point to grab which is we are returning an object from the factory function, so we absolutely have the freedom to determine what should be the object which is to be returned, going further we can base it on certain parameters as well.

Thats it folks,
Happy Hacking !!

Continue ReadingFactories, Services and Controllers

Enhancing Open Event Organizer Server

Today, the coding phase of GSoC 2016 starts and marks the beginning of the implementation of all the prototypes and brainstormed ideas. Open Event Organizer Server as explained previously is the backend server for the organizers to create events, sessions, mark tracks, add social links, date/time, etc. It acts as the dashboard for creating data which then gets displayed through the client side apps , i.e open event webapp and android app. Sounds perfect. But as we know there is always scope for improvement.

So, this year we focus on making the server even better. The purpose is not only to make it more useful and powerful with added features but also to make it intuitive for the organizer so that the app can be used to its fullest benefits. A lot of brainstorming by a lot many students and mentors of this project have resulted in a final protoype to be implemented with some features and a better UI.

Some of the features that we have decided to add are:

  • API authentication to provide proper permissions. This helps in improving the overall security.
  • Oauth authentications. No more registration required. The organizer can straightaway use their google, fb and other login credentials to login and create events.
  • Social Links. The organizer can now add social links for their events such as google plus event link, facebook event link, hashtag values, etc.
  • Schedule UI. Now the organizer can directly add the events in calendar and get notified on that particular day. One can also export it in different formats.
  • Overall UI Improvement. We aim to make the UI much more intuitive and easier to use for the organizer so that all the features can be used to its fullest advantage.

This is briefly the aim for making open event organizer server bigger, better and more useful. With this aim, we start our coding today and try to provide a great product by the end of GSoC 2016. A product so good that every event organizer starts using this. Looking forward to making it a success.

Continue ReadingEnhancing Open Event Organizer Server

Deploy Engelsystem on Your Local Server

Today, I decided to set up Engelsystem on a clean local server as a task for Google Summer of Code. My first impression when looking at the PHP application was that it is a well-built MVC app. It seems to have everything an event manager could want. When I looked at the README, all the instructions were in German, but I decided to follow the gist of it anyways. I will be telling you how to setup the application step by step in English on Ubuntu 15.10  x64.

Instructions for Setup

Step 1: Setup LAMP and install GIT

The first you want to do is to setup LAMP stack (linux, apache, mysql, and php). Please follow the tutorial here on how to set up LAMP on Ubuntu 15.10 x64. If you are running this app on a different operating system, a quick Google search will provide you with installation steps.

Afterwards, you may install git by these commands:

apt-get update
apt-get install git -y

Step 2: Clone the Repository and Setup Database

First, clone the repository (the recursive parameter allows us to clone the submodules):

git clone --recursive https://github.com/engelsystem/engelsystem.git

Note the absolute path of the Engelsystem directory. For example, mine is /root.

Next, configure your MySQL Engelsystem database:

mysql -u root -p
[Enter your password]
CREATE DATABASE engelsystem;
use engelsystem;
source [path to engelsystem]/engelsystem/db/install.sql;
source [path to engelsystem]/engelsystem/db/update.sql;
exit;

Go to engelsystem/config and copy the default config into config.php. Modify the new file to match your MySQL credentials so that the system could access the database on the localserver.

Step 3: Test That App is Working

Move the app to your /var/www/html/ directory by typing mv ./engelsystem /var/www/html (alternatively create a symlink to your current directory). Go to your browser and type in [serverhost]/engelsystem/public to see the application in action.

01

To login, type use the following credentials:

Username: admin
Password: asdfasdf

Be sure to change your password for security reasons. You can generate a strong password here.

02

Step 4: Modify Apache to Use Server for Production

We must make sure to point our apache2 document root to the Engelsystem directory to prevent any user from accessing anything other than the public/ directory for security reasons. Do this by modifying the apache2 configuration file (assuming you are running this on a server hosting no other sites):

apt-get install nano -y
nano /etc/apache2/sites-available/000-default.conf

Change DocumentRoot /var/www/html into DocumentRoot /var/www/html/engelsystem/public. Restart apache by typing service apache2 restart. See the result of your page by going to your host in your browser.

03

If you made it this far without any issues, congratulations! You have successfully set up Engelsystem on your localserver and can use it to manage your event.

Continue ReadingDeploy Engelsystem on Your Local Server