Angular API testing with frisby and jasmine-node

week9gsoc1

sTeam-web-UI is an application written in angular. So the application relies on sTeam's existing REST api which is written in pike. Since there are a lot of API calls and actions involved ensuring that the application is making proper API calls and getting proper responses is crucial. In order to go ahead with the API testing there are two important things to be know about first.

  • frisby
  • jasmine

What is frisby ?

“Frisby is a REST API testing framework built on node.js and Jasmine that makes testing API endpoints easy, fast, and fun. Read below for a quick overview, or check out the API documentation.”

What is Jasmine ?

“Jasmine is a Behavior Driven Development testing framework for JavaScript. It does not rely on browsers, DOM, or any JavaScript framework. Thus it’s suited for websites, Node.js projects, or anywhere that JavaScript can run.”

The api methods present in frisby can be categorized into :

  • Expectations
  • Helpers
  • Headers
  • Inspectors

So let me show couple of tests that are written with the help of frisby for the sTeam's web interface.

Checking the Home directory of the user :


frisby.create('Request `/home` returns proper JSON')
  .get(config.baseurl + 'rest.pike?request=/home')
  .expectStatus(200)
  .expectJSON({
    'request': '/home',
    'request-method': 'GET',
    'me': objUnit.testMeObj,
    'inventory': function (val) {
      val.forEach(function (e) {
        objUnit.testInventoryObj(e)
      })
    }
  })
.toss()

Checking the container of the user :


frisby.create('Request `/home/:user` returns proper JSON')
  .get(config.baseurl + 'rest.pike?request=/home/akhilhector/container')
  .expectStatus(200)
  .expectJSON({
    'request': '/akhilhector',
    'request-method': 'GET',
    'me': objUnit.testMeObj,
    'inventory': function (val) {
      val.forEach(function (e) {
        objUnit.testInventoryObj(e)
      })
    }
  })
.toss()

Accessing the file in the user’s workarea :


frisby.create('Request `/home/:user/:container/:filename` returns proper JSON')
  .get(config.baseurl + 'rest.pike?request=//home/akhilhector/playground-hector/icon1.png')
  .expectStatus(200)
  .expectJSON({
    'request': '/akhilhector/playground-hector/icon1.png',
    'request-method': 'GET',
    'me': objUnit.testMeObj,
    'inventory': function (val) {
      val.forEach(function (e) {
        objUnit.testInventoryObj(e)
      })
    }
  })
.toss()

Observing the above three modules, each of them are different from one another. We have to understand that depending on the API the request payload must be sent. So for suppose the API needs authentication headers to be sent then we need to use the proper helper methods of frisby in order to send the same.
The .get() can be substituted with put, post, delete. Basically all the frisby tests start with frisby.create with a description of the test followed by one of get, post, put, delete, or head, and ending with toss to generate the resulting response.
Apart from the request payload there is an interesting thing with the helper method expectJSON, it is used for testing the given path or full JSON response of the specified length. In order to use expectJSON we must pass the path as the primary argument and the JSON as the second argument.
The expectStatus helper method is pretty straightforward. It helps us in determining the HTTP Status code equivalent of the request so made.

NOTE While writing the tests it is better to put all the config in one place and use that config variable for all the operations.

Thats it folks,
Happy Hacking !!

Continue ReadingAngular API testing with frisby and jasmine-node

The new AYABInterface module

One create knit work with knitting machines and the AYAB shield. Therefore, the computer communicates with the machine. This communication shall be done, in the future, with this new library, the AYABInterface.

Here are some design decisions:

Complete vs. Incomplete

The idea is to have the AYAB seperated from the knittingpattern format. The knittingpattern format is an incomplete format that can be extended for any use case.  In contrast, the AYAB machine has a complete instruction set. The knittingpattern format is a means to transform these formats into different complete instruction sets. They should be convertible but not mixed.

Desciptive vs. Imperative

The idea is to be able to pass the format to the AYABInterface as a description. As much knowledge about the behavior is capsuled in the AYABInterface module. With this striving, we are less prone to intermix concerns across the applications.

Responsibilty Driven Design

I see these separated responsibilities:

  • A communication part focusing on the protocol to talk and the messages sent across the wire. It is an interpreter of the protocol, transforming it from bytes to objects.
  • A configuration that is passed to the interface
  • Different Machines types supported.
  • Actions the user shall perform.

Different Representations

I see these representations:

  • Commands are transferred across the wire. (PySerial)
  • For each movement of a carriage, the needles are used and put into a new position, B or D. (communication)
  • We would like to knit a list of rows with different colors. (interface)
    • Holes can be described by a list of orders in which meshes are moved to other locations, i.e. on needle 1 we can find mesh 1, on needle 2 we find mesh 2 first and then mesh 3, so mesh 2 and mesh 3 are knit together in the following step
  • The knitting pattern format.

Actions and Information for the User

The user should be informed about actions to take. These actions should not be in the form of text but rather in the form of an object that represents the action, i.e. [“move”, “this carriage”, “from right to left”]. This way, they can be adequately represented in the UI and translated somewhere central in the UI.

Summary

The new design separates concerns and allows testing. The bridge between the machine and the knittnigpattern format are primitive, descriptive objects such as lists and integers.

Continue ReadingThe new AYABInterface module

sTeam API Endpoint Testing

(ˢᵒᶜⁱᵉᵗʸserver) aims to be a platform for developing collaborative applications.
sTeam server project repository: sTeam.
sTeam-REST API repository: sTeam-REST

sTeam API Endpoint Testing using Frisby

sTeam API endpoint testing is done using Frisby.  Frisby is a REST API testing framework built on node.js and Jasmine that makes testing API endpoints very easy, speedy and joyous.

Issue. Github Issue Github PR
sTeam-REST Frisby Test for login Issue-38 PR-40
sTeam-REST Frisby Tests Issue-41 PR-42

Write Tests

Frisby tests start with frisby.create with a description of the test followed by one of get, post, put, delete, or head, and ending with toss to generate the resulting jasmine spec test. Frisby has many built-in test helpers like expectStatus to easily test HTTP status codes, expectJSON to test expected JSON keys/values, and expectJSONTypes to test JSON value types, among many others.

// Registration Tests
frisby.create('Testing Registration API calls')
.post('http://steam.realss.com/scripts/rest.pike?request=register', {
email: "ajinkya007.in@gmail.com",
fullname: "Ajinkya Wavare",
group: "realss",
password: "ajinkya",
userid: "aj007"
}, {json: true})
.expectStatus(200)
.expectJSON({
"request-method": "POST",
"request": "register",
"me": restTest.testMe,
"__version": testRegistrationVersion,
"__date": testRegistrationDate
})
.toss();
The testMe, testRegistrationVersion and testRegistrationDate are the functions written in the rest_spec.js.

The frisby API endpoint tests have been written for testing the user login, accessing the user home directory, user workarea, user container, user document, user created image,  groups and subgroups.

The REST API url’s used for testing are described below. A payload consists of the user id and password.

Check if the user can login.

http://steam.realss.com/scripts/rest.pike?request=aj007

Test whether a user workarea exists or not. Here aj workarea has been created by the user.

http://steam.realss.com/scripts/rest.pike?request=aj007/aj

Test whether a user created container exists or not.

http://steam.realss.com/scripts/rest.pike?request=aj007/container

Test whether a user created document exists or not.

http://steam.realss.com/scripts/rest.pike?request=aj007/abc.pike

Test whether a user created image(object of any mime-type) inside a container exists or not.

http://steam.realss.com/scripts/rest.pike?request=aj007/container/Image.jpeg

Test whether a user created document exists or not. The group name and the subgroups can be queried.
eg. GroupName: groups, Subgroup: test.
The subgroup should be appended using “.” to the groupname.

http://steam.realss.com/scripts/rest.pike?request=groups.test

Here “groups” is a Groupname and “gsoc” is a subgroup of it.

http://ngtg.techgrind.asia/scripts/rest.pike?request=groups.gsoc

FrisbyTests

FrisbyTestCount

Unit Testing the sTeam REST API

The unit testing of the sTeam REST API is done using the karma and the jasmine test runner. The karma and the jasmine test runner are set up in the project repository.

The karma test runner : The main goal for Karma is to bring a productive testing environment to developers. The environment being one where they don’t have to set up loads of configurations, but rather a place where developers can just write the code and get instant feedback from their tests. Because getting quick feedback is what makes you productive and creative.

The jasmine test runner: Jasmine is a behavior-driven development framework for testing JavaScript code. It does not depend on any other JavaScript frameworks. It does not require a DOM. And it has a clean, obvious syntax so that you can easily write tests.

The karma and jasmine test runner were configured for the project and basic tests were ran. The angular js and angular mocks version in the local development repository was different. This had resulted into a new error been incorporated into the project repo.

Angular Unit-Testing: TypeError ‘angular.element.cleanData is not a function’

When angular and angular-mocks are not of the same version, these error occurs while running the tests. If the versions of the two javascript libraries don’t match your tests will be testing to you.

The jasmine test runner can be accessed from the browser. The karma tests can be performed from the command line. These shall be enhanced further during the course of work.

Feel free to explore the repository. Suggestions for improvements are welcomed.

Checkout the FOSSASIA Idea’s page for more information on projects supported by FOSSASIA.

Continue ReadingsTeam API Endpoint Testing

Testing Hero

Our sTeam code base had no tests written and therefore we were facing a lot of issues and were not able to merge our code easily. My next task dealt with this problem. I had to write test cases for the function calls to COAL commands. On some basic research I found out that the only testing framework available for pike is used for testing the pike interpreter itself. This includes a set of scripts. mktestsuite is one of the scripts and is responsible for generating the tests. The problem with this is that the tests should have a particular syntax and since it is used to test interpreter is assumes each line of pike code is a test. This prevented us from writing multiple line tests and also from setting up the client.

Issue:

https://github.com/societyserver/sTeam/issues/104 (Establish testing framework),

https://github.com/societyserver/sTeam/issues/107 (Add tests for create)

My first approach to the problem was to try using the scripts available to write the tests, however this didn’t turn out very well and tests written were very confusing and out of context. The lines written for setting up the client was also being counted as tests and there was no continuation that is variables defined in one line was not accessible in the next. I realized that this is not going to work out and decided to write my own testing framework. I started by writing a simple testing structure.

The framework has a central script called test.pike. This script is used to run all the test cases. This script uses the the scripts called move.pike and create.pike which are the scripts containing the actual test cases. These scripts contain various functions each of which is a test case and return 1 on passing the case and 0 on failing. test.pike, the central node, is responsible for looping through this functions and calling each of these and recording the result. The framework then outputs the total number of cases passed or failed. Again implementing this became simple as we can import pike scripts as objects and also extract the functions from them.

test
Running tests for move
test1
Running test for create (Earlier version of framework)

test.pike involved initialization for various variables. It establishes a connection to the server and initializes _Server and me, which are then passed to all the test cases. move.pike has various test cases involving moving things around. Moving user into a room, into a container or to an non existential location and moving a room inside a container. I also got my first failing test case which is moving user into a non existential location. This shouldn’t have been allowed but is not throwing any error and incorrectly writes the trail.

create.pike involved cases creating various kinds of objects and also attempting to create objects for classes that do not exist. As I went along writing these cases I also kept improving the central test.pike. I added the code for creation of a special room for testing while initializing and also clearing this room before destroying the object and exiting.

Solution:

 https://github.com/societyserver/sTeam/pull/105 (Establish testing framework),

https://github.com/societyserver/sTeam/pull/108 (Add tests for create)

Continue ReadingTesting Hero

WordPress Upgrade Process

Have you ever wondered how WordPress handles the automated core, plugin, and theme upgrades? Well, it’s time for some quick education!

WordPress is an Open Source project, which means there are hundreds of people all over the world working on it. (More than most commercial platforms.)

There are mainly 2 kinds of Automatic upgrades for WordPress:

  • The main Core’ upgrades
  • The ‘Child’ upgrades, that works for themes and plugins that are being used in your WordPress.

We all see the plugin and theme installer while installing any theme or specific plugin required by the user, where it downloads the plugin to /wp-content/upgrade/ , extracts the plugin, deletes the old one (if an old one exists), and copies the new one. It is used every time we install a theme or a plugin to the WordPress.

Since this is used more often than the core updater (most of the time as many different plugins are used), it’s the sort of upgrade we’re all used to and familiar with. And we think ‘WordPress deletes before upgrading, sure.’ This makes sense. After all, you want to make sure to clean out the old files, especially the ones that aren’t used anymore.

But that not how the WordPress Core updates work.

Core updates are available when there is a new version of WordPress is available with new features or some solved bugs.

Core updates are subdivided into three types:

  1. Core development updates, known as the “bleeding edge”
  2. Minor core updates, such as maintenance and security releases
  3. Major core release updates

By default, every site has automatic updates enabled for minor core releases and translation files. Sites already running a development version also have automatic updates to further development versions enabled by default.

The WordPress updates can be configured by 2 ways:

  • defining constants in wp-config.php,
  • or adding filters using a Plugin

Let’s discuss for both the methods.

Configuration via wp-config.php

We can configure the wp-config.php to, disable automatic updates, and the core updates can be disabled or configured based on update type.

To completely disable all types of automatic updates, core or otherwise, add the following to your wp-config.php file:

define( 'AUTOMATIC_UPDATER_DISABLED', true );

To enable automatic updates for major releases or development purposes, the place to start is with the WP_AUTO_UPDATE_CORE constant. Defining this constant one of three ways allows you to blanket-enable, or blanket-disable several types of core updates at once.

define( 'WP_AUTO_UPDATE_CORE', true );

WP_AUTO_UPDATE_CORE can be defined with one of three values, each producing a different behavior:

  • Value of true – Development, minor, and major updates are all enabled
  • Value of false – Development, minor, and major updates are all disabled
  • Value of 'minor' – Minor updates are enabled, development, and major updates are disabled


Configuration via Filters using Plugins

Using filters allows for fine-tuned control of automatic updates.

The best place to put these filters is a must-use plugin.

Do not add add_filter() calls directly in wp-config.php. WordPress isn’t fully loaded and can cause conflicts with other applications such as WP-CLI.

We can also enable/disable all automatic updates by changing the values in the following filter:

add_filter( 'update_val', '__return_true' );

We can set the parameters update_val as mentioned below:

  • To disable the automatic updates we can set update_val to automatic_updater_disabled
  • To enable the automatci updates we can set update_val to different values as mentioned below:
    • auto_update_core to enable all the updates
    • allow_dev_auto_core_updates to enable the devlopement updates
    • allow_minor_auto_core_updates to enable minor updates
    • allow_major_auto_core_updates to enable the major updates

WordPress has a magnificent auto-update system that notifies you when new versions of the WordPress core, installed plugins or themes are available. The notifications are displayed in the Admin Bar and also on the plugins page where you can get more details about the new version.

To install the new version, you simply hit the “Update automatically” button. WordPress will automatically download the new package, extract it and replace the old files. No FTP, removing old files, and uploading is required.

img01

There is also a dedicated page for updates which can be reached from the dashboard menu. It’s helpful when you want to do bulk updates of multiple plugins instead of updating each one separately. It also has a “Check Again” button which checks for new updates. By default, WordPress does this check every 12 hours.

img02

In the later weeks, we will be applying this WordPress like update system to Engelsystem. Developers who are interested to contribute can work with us.

Development: https://github.com/fossasia/engelsystem             Issues/Bugs:https://github.com/fossasia/engelsystem/issues


Continue ReadingWordPress Upgrade Process

Dockerizing PHP and Mysql application

Docker Introduction

Docker is based on the concept of building images which contain the necessary software and configuration for applications. We can also build distributable images that contain pre-configured software like an Apache server, Caching server, MySQL server, etc. We can share our final image on the Docker HUB to make it accessible to everyone.

First we need to install docker on our local machine. Steps to install docker for ubuntu

Prerequisites

  • Docker requires a 64-bit installation regardless of your Ubuntu version.
  • Your kernel must be 3.10 at minimum. The latest 3.10 minor version or a newer maintained version are also acceptable.

To check your current kernel version, open a terminal and use uname -r to display your kernel version:

$ uname -r
3.11.0-15-generic

Update your apt sources

Docker’s APT repository contains Docker 1.7.1 and higher. To set APT to use packages from the new repository:

  1. Log into your machine as a user with sudo or root privileges.
  2. Open a terminal window.
  3. Update package information, ensure that APT works with the https method, and that CA certificates are installed.
     $ sudo apt-get update
     $ sudo apt-get install apt-transport-https ca-certificates
    
  4. Add the new GPG key.
    $ sudo apt-key adv --keyserver hkp://p80.pool.sks-keyservers.net:80 --recv-keys 58118E89F3A912897C070ADBF76221572C52609D
    
  5. Open the /etc/apt/sources.list.d/docker.list file in your favorite editor.If the file doesn’t exist, create it.
  6. Remove any existing entries.
  7. Add an entry for your Ubuntu operating system
  8. On Ubuntu Trusty 14.04 (LTS)
    deb https://apt.dockerproject.org/repo ubuntu-trusty main
    
  • Save and close the /etc/apt/sources.list.d/docker.list file.
  • Update the APT package index.
    $ sudo apt-get update

For Ubuntu Trusty, Wily, and Xenial, it’s recommended to install the linux-image-extra kernel package. The linux-image-extra package allows you use the aufs storage driver.

Install both the required and optional packages.

$ sudo apt-get install linux-image-generic-lts-trusty

INSTALL

Log into your Ubuntu installation as a user with sudo privileges.

  1. Update your APT package index.
    $ sudo apt-get update
    
  2. Install Docker.
    $ sudo apt-get install docker-engine
    
  3. Start the docker daemon.
    $ sudo service docker start
    
  4. Verify docker is installed correctly.
    $ sudo docker run hello-world
    

    This command downloads a test image and runs it in a container. When the container runs, it prints an informational message. If it runs successfully then docker is installed.

Docker Images

Docker images are the basis of containers. An image can be considered a class definition. We define its properties and behavior. To browse the available images, we can visit the Docker HUB and run docker pull <image> to download them to the host machine.

Listing images on the host

$ docker images

REPOSITORY          TAG                 IMAGE ID            CREATED             SIZE
ubuntu              14.04               1d073211c498        3 days ago          187.9 MB
busybox             latest              2c5ac3f849df        5 days ago          1.113 MB
training/webapp     latest              54bb4e8718e8        5 months ago        348.7 MB

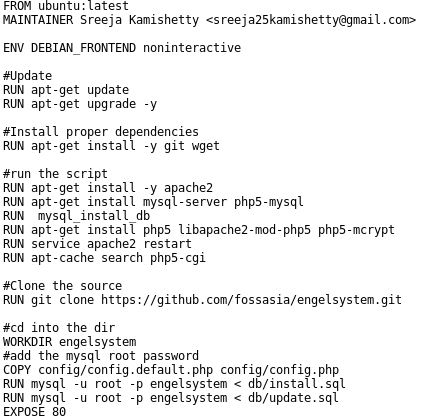
Working with Dockerfile

Create a Dockerfile in your PHP project. This is the docker file for engelsystem.

Our Dockerfile is now complete and ready to be built:

Screenshot from 2016-07-18 09:08:52

Building the Image

The docker build . command will build the Dockerfile inside the current directory:

Our image is now labeled and tagged. The final step is to push it to the Docker HUB. This step is optional, but it’s still useful if we’re planning on sharing the image and and helping others with their development environment.

Continue ReadingDockerizing PHP and Mysql application

Implementing Database Migrations

Database Migrations Using Phinx

Database migrations can transform your database in many ways such as creating new tables, inserting rows, adding indexes and modifying columns. It avoids the use of writing MYSQL by hand and instead offers a powerful API for creating migrations using PHP code.

Advantages of using Phinx

  • Phinx keeps track of which migrations have been run so you can worry less about the state of your database and instead focus on building better software
  • Each migration is represented by a PHP class in a unique file. We can write our migrations using the Phinx PHP API, or raw SQL.
  • Phinx has an easy installation process and easy to use command line instructions and easy to Integrate with various other PHP tools (Phing, PHPUnit) and web frameworks.

Installating Phinx

Phinx should be installed using Composer. Composer is a tool for dependency management in PHP. We need to require the dependency in composer.json.

php composer.phar require robmorgan/phinx

Then run Composer:

php composer.phar install --no-dev

Now Create a folder in your database directory called migrations with adequate permissions. It is where we write our migrations. In engelsystem it is created in db directory

Phinx can now be executed from within your project:

php vendor/bin/phinx init

Writing Migrations For SQL files

Creating a New Migration

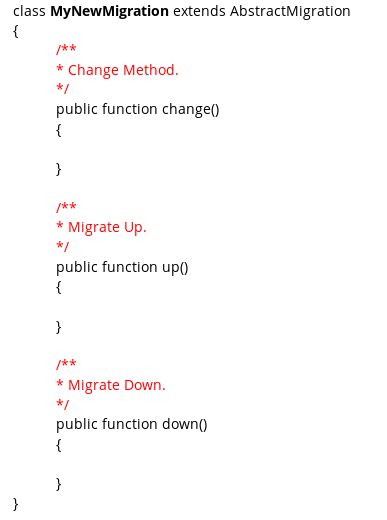
Let’s start by creating a new Phinx migration. Run Phinx using the create command. This will create a new migration in the format YYYYMMDDHHMMSS_my_new_migration.php where the first 14 characters are replaced with the current timestamp down to the second. This will create a skeleton file with a single method.

$ php vendor/bin/phinx create MyNewMigration

The File looks something like this

Screenshot from 2016-07-18 08:22:42

Explaining the File

The AbstractMigration Class

Abstraction class provides the necessary support to create your database migrations. All Phinx migrations extend from the AbstractMigration class. Phinx provides different methods in the abstraction class like change, up and down method.

The Change Method

This is the default migration method. I will explain how to write the change method for an example MYSQL query. For example following MYSQL query can also be executed using Phinx change method.

MYSQL Query

ALTER TABLE `AngelTypes` ADD `requires_driver_license` BOOLEAN NOT NULL;

Equivalent change method

public function change()
 {
   $table = $this->table('AngelTypes');
   $table->addColumn('requires_driver_license', 'boolean', array('null' => 'false'))
               ->update();
 }

The Up Method

We should use the up method to transform the database with your intended changes. For example following MYSQL query to create a new settings table can be executed using equivalent up method.

MYSQL Query

DROP TABLE IF EXISTS `Settings`;
 CREATE TABLE IF NOT EXISTS `Settings` (
    `event_name` varchar(255) DEFAULT NULL,
   `buildup_start_date` int(11) DEFAULT NULL,
   `event_start_date` int(11) DEFAULT NULL,
   `event_end_date` int(11) DEFAULT NULL,
   `teardown_end_date` int(11) DEFAULT NULL,
   `event_welcome_msg` varchar(255) DEFAULT NULL
    ) ENGINE=InnoDB DEFAULT CHARSET=utf8 ;

Equivalent up method

public function up()
 {
 $table = $this->table('Settings');
 $table->addColumn('event_name', 'string', array('limit' => 255))
 ->addColumn('buildup_start_date', 'integer', array('limit' => 11))
 ->addColumn('event_start_date', 'integer', array('limit' => 11))
 ->addColumn('event_end_date', 'integer', array('limit' => 11))
 ->addColumn('teardown_end_date', 'integer', array( 'limit' => 11))
 ->addColumn('event_welcome_msg', 'string', array('limit' => 255))
 ->save();
 }We have now created a table. Now we will learn to insert data into the tables using migrations.MYSQL QueryINSERT INTO `Privileges` (`id`, `name`, `desc`) VALUES (39, 'admin_settings', 'Admin Settings');
 INSERT INTO `GroupPrivileges` (`id`, `group_id`, `privilege_id`) VALUES (218, -4, 39);public function up()
{
    // inserting into Privileges
   $Rows = [
     [
     'id'   => 39,
     'name' => 'admin_settings',
     'desc' => 'Admin Settings'
     ]
   ];
  $this->insert('Privileges', $Rows);
  // inserting into GroupPrivileges.
   $rows = [
    [
    'id'    => 218,
    'group_id'  => -4,
    'privilege_id' => 39                                                 
  ]
   ];
  $this->insert('GroupPrivileges', $rows);
}

The Down Method

The down method is automatically run by Phinx when you are migrating down. We should use the down method to reverse/undo the transformations described in the up method.

MYSQL Query

DELETE * FROM  `Users`;

Equivalent Down method

public function down()
    {
        $this->execute('DELETE FROM Users');
    }

Since we have learned how to write migrations. Now we will execute the created migrations.

Configuring phinx.yml

When you initialize your project using the init command, Phinx creates a default file called phinx.yml.We can edit the database name, environment. We need to add the password for mysql user. The file looks something like this.Screenshot from 2016-07-18 07:56:13

Executing the migrations

To Migrate the database we use Migrate command. It runs over all the available migrations. Command to migrate for development environment is:

$ phinx migrate -e development

To migrate to a specific version we use the --target parameter or -t for short.

$ phinx migrate -e development -t 20110103081132

To know whether all your migrations have run successfully we use the status command

$ phinx status -e development

After migrating the database for engelsystem. The status command gives the following output.

88114b3e-4753-11e6-9afa-207e55650c1e

Continue ReadingImplementing Database Migrations

Transcript from the Python Toolbox 101

At the Python User Group Berlin, I lead a talk/discussion about free-of-charge tools for open-source development based on what we use GSoC. The whole content was in an Etherpad and people could add their ideas.

Because there are a lot of tools, I thought, I would share it with you. Maybe it is of use. Here is the talk:


Python Users Berlin 2016/07/14 Talk & Discussion


START: 19:15
Agenda 1min END: 19:15
======
– Example library
– What is code
– Version Control
  – Python Package Index
– …, see headings
– discussion: write down, what does not fit into my structure
Example Library (2min)  19:17
======================
What is Code (2min) 19:19
===================
.. note:: This frames our discussion
– Source files .py, .pyw
– tests
– documentation
– quality
– readability
– bugs and problems
– <3
Configurationsfiles plain Text for editing
Version Control (2min) 19:21
======================
.. note:: Sharing and Collaboration
– no Version Control:
  – Dropbox
  – Google drive
  – Telekom cloud
  – ftp, windows share
– Version Control Tools:
  – git
    – gitweb own server
    – 
  – mecurial
  – svn
  – perforce (proprietary)


Python Package Index (3min) 19:24
—————————
.. note:: Shipping to the users
hosts python packages you develop.
Example: “knittingpattern” package
pip
Installation from Pypi:
    $ python3 -m pip install knittingpattern # Linux
    > py -3.4 -m pip install knittingpattern # Windows
Documentation upload included!
Documentation (3min) 19:27
====================
.. note:: Inform users
I came across a talk:
Documentation can be:
– tutorials
– how to
– introduction to the community/development process
– code documentation!!!
– chat
– 
Building the documentation (3min)  19:30
———————————
Formats:
– HTML
– PDF
– reRST
– EPUB
– doc strings in source code
– test?
Tools:
– Sphinx
– doxygen
– doc strings
  – standard how to put in docstrings in Python
    – 
Example: Sphinx  3min 19:33
~~~~~~~~~~~~~~~
– Used for Python
– Used for knittingpattern
Python file:
Documentation file with sphinx.ext.autodoc:
Built documentation:
    See the return type str, Intersphinx can reference across documentations.
    Intersphinx uses objects inventory, hosted with the documentation:
Testing the documentation:
    – TODO: link
      – evertying is included in the docs
      – everything that is public is documented
      
      syntax
      – numpy 
      – google 
      – sphinx
Hosting the Documentation (3min) 19:36
——————————–
Tools:
– pythonhosted
  only latest version
– readthedocs.io
  several branches, versions, languages
– wiki pages
– 
Code Testing 2min 19:38
============
.. note:: Tests show the presence of mistakes, not their absence.
What can be tested:
– features
– style: pep8, pylint, 
– documentation
– complexity
– 
Testing Features with unit tests 4min 19:42
——————————–
code:
    def fib(i): …
Tools with different styles
– unittest
  
    import unittest
    from fibonacci import fib
    class FibonacciTest(unittest.TestCase):
        def testCalculation(self):
            self.assertEqual(fib(0), 0)
            self.assertEqual(fib(1), 1)
            self.assertEqual(fib(5), 5)
            self.assertEqual(fib(10), 55)
            self.assertEqual(fib(20), 6765)
    if __name__ == “__main__”: 
        unittest.main()
 
– doctest
    import doctest
    def fib(n):
        “”” 
        Calculates the n-th Fibonacci number iteratively  
        >>> fib(0)
        0
        >>> fib(1)
        1
        >>> fib(10) 
        55
        >>> fib(15)
        610
        >>> 
        “””
        a, b = 0, 1
        for i in range(n):
            a, b = b, a + b
        return a
    if __name__ == “__main__”: 
        doctest.testmod()
– pytest (works with unittest)
    import pytest
    from fibonacci import fib
    
    @pytest.mark.parametrize(“parameter,value”,[(0, 0), (1, 1), (10, 55), (15, 610)])
    def test_fibonacci(parameter, value):
        assert fib(parameter) == value
– nose tests?
– …
– pyhumber
– assert in code,  PyHamcrest
– Behaviour driven development
  – human test
Automated Test Run & Continuous Integration 2min 19:44
===========================================
.. note:: 
Several branches:
– production branch always works
– feature branches
– automated test before feature is put into production
Tools running tests 6min 19:50
——————-
– Travis CI for Mac, Ubuntu
– Appveyor for Windows
Host yourself:
– buildbot
– Hudson
– Jenkins
– Teamcity
– circle CI
  + selenium for website test
– 
– …?????!!!!!!
Tools for code quality 4min 19:54
———————-
– landscape
  complexity, style, documentation
  – libraries are available separately
    – flake8
    – destinate
    – pep257
– codeclimate
  code duplication, code coverage
  – libraries are available separately
– PyCharm
  – integrated what landscape has 
  – + complexity
Bugs, Issues, Pull Requests, Milestones 4min 19:58
=======================================
.. note:: this is also a way to get people into the project
1. find bug
2. open issue if big bug, discuss
3. create pull request
4. merge
5. deploy
– github
  issue tracker
– waffle.io – scrumboard
  merge several github issues tracker
– Redmine
JIRA
– trac 
– github issues + zenhub integrated in github
– gitlab
– gerrit framework that does alternative checking https://www.gerritcodereview.com/
  1. propose change
  2. test
  3. someone reviews the code
      – X people needed
  QT company uses it
Localization 2min 20:00
============
crowdin.com
    Crowdsourced translation tool:
    
Discussion
– spellchecker is integrated in PyCharm
  – character set
  – new vocabulary
  – not for continuous integration (CI)
– Emacs
  – 
– pylint plugin 
   – not all languages?
– readthedocs
  – add github project, 
  – hosts docs
– sphinx-plugin?
– PyCon testing talk:
    – Hypothesis package
      – tries to break your code
      – throws in a lot of edge cases (huge number, nothing, …)
      -> find obscure edge cases
      
Did someone create a Pylint plugin
– question:
    – cyclomatic code complexity
    – which metrics tools do you know?
    –
Virtual Environment:
    nobody should install everything in the system
    -> switch between different python versions
    – python3-venv
      – slightly different than virtual-env(more mature)
Beginners:
    Windows:
        install Anaconda
Continue ReadingTranscript from the Python Toolbox 101

Google Maps Api

OpenEvent uses it everywhere. Let me explain it.

The first problem that we faced was user current location.

We wanted to get location based on geolocation method then display this results on the map.

To get geolocation we use HTML5. Take a look on geolocate() function


function geolocate() {

        if (navigator.geolocation) {

            navigator.geolocation.getCurrentPosition(function (position) {

            }

        }

    }


From variable position you can get longitude and latitude params. These values allow us to move marker on the map on right position and get the name of user current location. Based on these data we are able to find the closest events and display it in a distance order.

To get information about city or country location you have to execute a simple GET request to google MAPS. In that case you need:


curl http://maps.googleapis.com/maps/api/geocode/json?latlng=17.0112,15.06


above result returns json file where you can find name of location: Nguigmi, Niger


Then, we faced a new challenge- we had to choose which map would be better for OpenEvent – Open Street Map or Google Maps. Finally we have chosen google maps because it wa more comfortable for our team.


OpenEvent simple searching engine is based on latitude and longitude params. So we transform all requests which contain city or country names to longitude and latitude params using Google Api. It allows us to avoid having problems with different locations’ names which occur in different nationalities.


Continue ReadingGoogle Maps Api

Adding Client Side validation to Login and Registration Forms

Its very important to have a client side validation apart from a server side validation. The server side validation only helps the developers but not the clients. Thus it was necessary to add a client side validation to the Login page and its other components so that the users  would be comfortable in this.

I had never before done this and was looking at how to achieve this using jQuery or JavaScript when I cam to know that we were already using an amazing validation tool : Bootstrap Validator

It just involves wrapping the form in the html with the validator plugin and all the checks are automatically carried out by it.


1.png

As you can see in the above image, we have just added a data-toggle=”validator” line to the form which automatically wraps the form with the plugin. The above form is the Create New Password form which checks whether the new password and the password entered again are matching or not. If not then the line ,

data-match="#new_password"

checks it with the password in the new_password field and gives an error on the page to the client defined by the following,

data-error="Passwords do not match

Thus adding such checks to the form becomes very simple rather than using jQuery for it. Similarly it was important to add validation to the Register page.

 <input type="email" name="email" class="form-control" id="email" 
 placeholder="Email" data-remote="{{ url_for('admin.check_duplicate_email') }}"
 data-remote-error="Email Address already exists" required="">

This is the validation for the email field. Apart from checking whether the text entered by the user is an email id or not it was also important to check whether the email entered by the user exists in the database or not.

data-remote="{{ url_for('admin.check_duplicate_email')

This line calls a view function to check whether the email entered by the user is duplicate or unique. Here is the function

2.png

This function takes the email value from the request.args and then performs a simple check in the db to check for duplicate email. If the user doesnt exist then the validator receives a simple string “200 OK”. If the error is 404 then it gives the error defined by,

data-remote-error="Email Address already exists"

However this error only for the data-remote part. If the error is something else then it is handled by ,

class="help-block with-errors"

Thus without the hassle of using Ajax and JQuery we can easily add validation to the forms using Bootstrap Validator.

Continue ReadingAdding Client Side validation to Login and Registration Forms