Demystifying a travis.yml file

In this blog post, we are going to demystify a travis.yml file. For reference, we will be using the travis configuration used in the  SUSI skill CMS project. But before delving into it, I would like to just give a brief introduction about Continuous Integration (CI) and Travis CI.

What is CI and Travis ?

Continuous Integration represents the practice of integrating a piece of work as early as possible instead of later so that one can receive immediate and frequent feedback on things that are wrong.

“ Continuous Integration is the practice of merging all developer working copies to a shared mainline several times a day.

-Wikipedia

Travis CI is a hosted continuous integration platform that is free for all open source projects hosted on Github. With just a file called .travis.yml containing some information about our project, we can trigger automated builds with every change to our code base in the master branch, other branches or even a pull request.

sudo: required
dist: trusty
language: node_js

node_js:
  - 6

script:
  - npm test

after_success:
 - bash ./pr_deploy.sh
 - bash ./deploy.sh

cache:
  directories:
    - node_modules

branches:
  only:
    - master

Travis configuration file of susi_skill_cms

Part-wise explanation of the file

  • When specifying sudo: required, Travis CI runs each build in an isolated Google Compute Engine virtual machine that offer a vanilla build environment for every build. This has the advantage that no state persists between builds, offering a clean slate and making sure that the tests run in an environment built from scratch. Builds have access to a variety of services for data storage and messaging, and can install anything that’s required for them to run.
  • The keyword dist represents the virtualization environment that is being used. trusty here refers to the distribution of the Linux environment used.
  • The keyword language represents the programming language that is be used for the project. The language used for the project is nodeJs.
  • Then follows the version details of node_js that is to be used. The node_js version used is 6.
  • This is the step where Travis runs the test script. Unless otherwise specified, it runs the default for the set language. In the case of node, it does node_js. The script stands for the build script that would be executed during the build process. The default build script for nodeJs is npm test. The result of execution of npm test can be found from the package.json file. It executes the npm run lint && react-scripts test –env=jsdom command, which is responsible for checking the linting issues and runs various unit and snapshot tests. We can add multiple lines of command to be executed.
  • The after_success block runs after the entire script is done. It’s the last step in the normal build process has been executed successfully. It has 2 commands to be executed –
    • bash ./pr_deploy.sh : Responsible for making a surge deployment of each PR
    • bash ./deploy.sh : Responsible for making a deployment to master branch
  • Travis CI can cache content that does not often change, to speed up the build process. The cache setting caches the node_modules directory, without the need to install the dependencies repeatedly.
  • We can specify certain branches to run, either by specifying a white list (using only keyword) or a black list (using except keyword). Here, the configuration mentions to run the build only for PRs to master branch.

Resources

Continue ReadingDemystifying a travis.yml file

Auto Deployment of SUSI Web Chat on gh-pages with Travis-CI

SUSI Web Chat uses Travis CI with a custom build script to deploy itself on gh-pages after every pull request is merged into the project. The build system auto updates the latest changes hosted on chat.susi.ai. In this blog, we will see how to automatically deploy the repository on gh pages.

To proceed with auto deploy on gh-pages branch,

  1. We first need to setup Travis for the project.
  2. Register on https://travis-ci.org/ and turn on the Travis for this repository.

Next, we add .travis.yml in the root directory of the project.

# Set system config
sudo: required
dist: trusty
language: node_js

# Specifying node version
node_js:
  - 6

# Running the test script for the project
script:
  - npm test

# Running the deploy script by specifying the location of the script, here ‘deploy.sh’ 

deploy:
  provider: script
  script: "./deploy.sh"


# We proceed with the cache if there are no changes in the node_modules
cache:
  directories:
    - node_modules

branches:
  only:
    - master

To find the code go to https://github.com/fossasia/chat.susi.ai/blob/master/.travis.yml

The Travis configuration files will ensure that the project is building for every change made, using npm test command, in our case, it will only consider changes made on the master branch.

If one wants to watch other branches one can add the respective branch name in travis configurations. After checking for build passing we need to automatically push the changes made for which we will use a bash script.

#!/bin/bash

SOURCE_BRANCH="master"
TARGET_BRANCH="gh-pages"

# Pull requests and commits to other branches shouldn't try to deploy.
if [ "$TRAVIS_PULL_REQUEST" != "false" -o "$TRAVIS_BRANCH" != "$SOURCE_BRANCH" ]; then
    echo "Skipping deploy; The request or commit is not on master"
    exit 0
fi

# Save some useful information
REPO=`git config remote.origin.url`
SSH_REPO=${REPO/https:\/\/github.com\//git@github.com:}
SHA=`git rev-parse --verify HEAD`

ENCRYPTED_KEY_VAR="encrypted_${ENCRYPTION_LABEL}_key"
ENCRYPTED_IV_VAR="encrypted_${ENCRYPTION_LABEL}_iv"
ENCRYPTED_KEY=${!ENCRYPTED_KEY_VAR}
ENCRYPTED_IV=${!ENCRYPTED_IV_VAR}
openssl aes-256-cbc -K $ENCRYPTED_KEY -iv $ENCRYPTED_IV -in deploy_key.enc -out ../deploy_key -d

chmod 600 ../deploy_key
eval `ssh-agent -s`
ssh-add ../deploy_key

# Cloning the repository to repo/ directory,
# Creating gh-pages branch if it doesn't exists else moving to that branch
git clone $REPO repo
cd repo
git checkout $TARGET_BRANCH || git checkout --orphan $TARGET_BRANCH
cd ..

# Setting up the username and email.
git config user.name "Travis CI"
git config user.email "$COMMIT_AUTHOR_EMAIL"

# Cleaning up the old repo's gh-pages branch except CNAME file and 404.html
find repo/* ! -name "CNAME" ! -name "404.html" -maxdepth 1  -exec rm -rf {} \; 2> /dev/null
cd repo

git add --all
git commit -m "Travis CI Clean Deploy : ${SHA}"

git checkout $SOURCE_BRANCH

# Actual building and setup of current push or PR.
npm install
npm run build
mv build ../build/

git checkout $TARGET_BRANCH
rm -rf node_modules/
mv ../build/* .
cp index.html 404.html

# Staging the new build for commit; and then committing the latest build
git add -A
git commit --amend --no-edit --allow-empty

# Deploying only if the build has changed
if [ -z `git diff --name-only HEAD HEAD~1` ]; then

  echo "No Changes in the Build; exiting"
  exit 0

else
  # There are changes in the Build; push the changes to gh-pages
  echo "There are changes in the Build; pushing the changes to gh-pages"

  # Actual push to gh-pages branch via Travis
  git push --force $SSH_REPO $TARGET_BRANCH
fi

This bash script will enable Travis CI user to push changes to gh pages, for this we need to store the credentials of the repository in encrypted form.

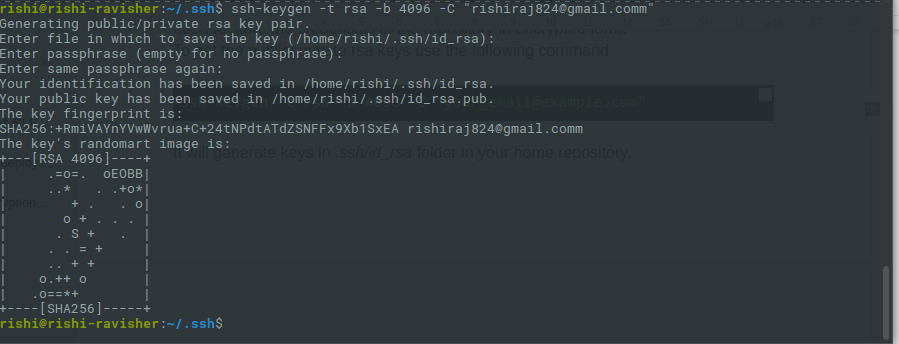
1. To get the public/private rsa keys we use the following command

ssh-keygen -t rsa -b 4096 -C "your_email@example.com"

2.  It will generate keys in .ssh/id_rsa folder in your home repository.

  1. Make sure you do not enter any passphrase while generating credentials otherwise Travis will get stuck at the time of decryption of the keys.
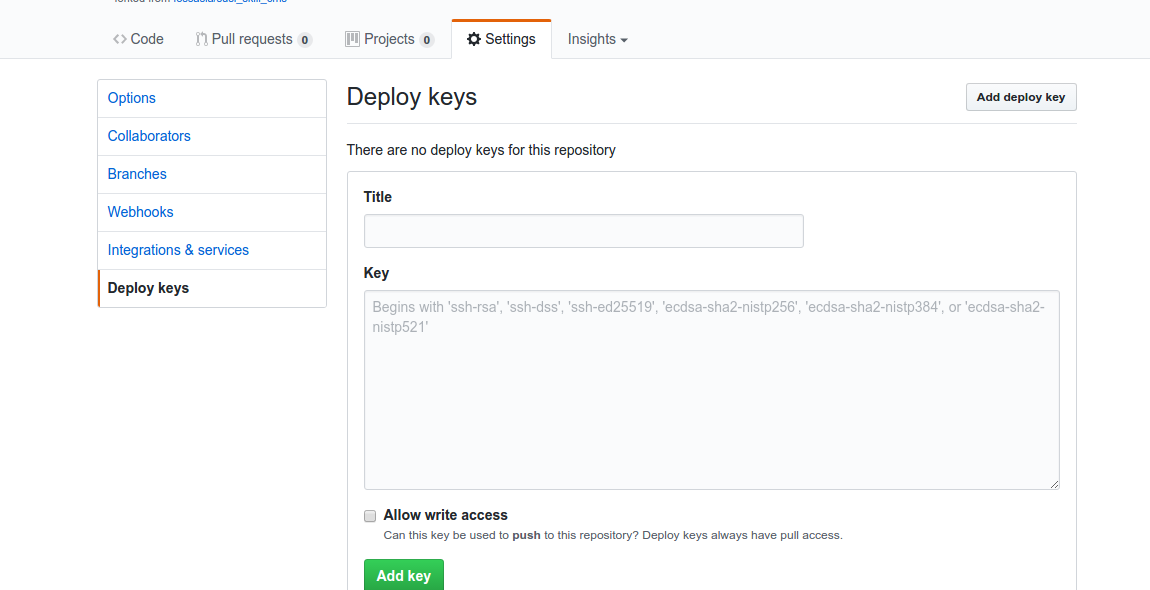
  2. Copy the public key and deploy the key to repository by visiting  

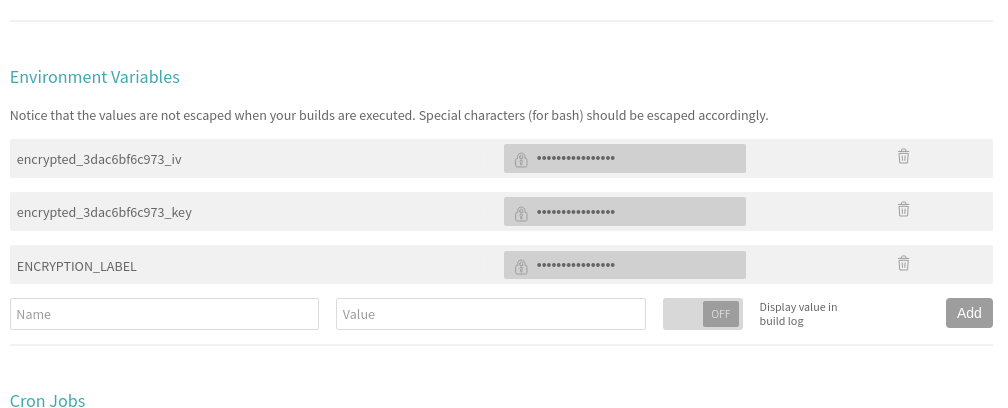
5. We also need to set the environment variable ENCRYPTED_KEY in Travis. Here’s a screenshot where to set it in the Travis repository dashboard.

6. Next, install Travis for encryption of keys.

sudo apt install ruby ruby-dev
sudo gem install travis

7. Make sure you are logged in to Travis, to login use the following command.

travis login

8. Make sure you have copied the ssh to deploy_key and then encrypt your private deploy_key and add it to root of your repository, use command –

travis encrypt-file deploy_key

9. After successful encryption, you will see a message

Please add the following to your build script (before_install stage in your .travis.yml, for instance):

openssl aes-256-cbc -K $encrypted_3dac6bf6c973_key -iv $encrypted_3dac6bf6c973_iv -in deploy_key.enc -out ../deploy_key -d
  1. Add the above-generated deploy_key in Travis and push the changes on your master branch. Do not push the deploy_key only the encryption file i.e., deploy_key.enc
  1. Finally, push the changes and create a Pull request and merge it to test the deployment. Visit Travis logs for more details and debugging.

Resources

Continue ReadingAuto Deployment of SUSI Web Chat on gh-pages with Travis-CI

How Meilix Generator sends Email Notifications with SendGrid

We wanted to notify the users once the build was ready for download. To solve this we attempted making an email server on Meilix Generator but that can send email when it starts but it would take around 20 minutes to get the build ready so we thought of checking the deploy link status and send email whenever the link status was available (200) but the problem with this method was that the link can be pre available if ISO is rebuilt for same event.

Then, we attempted sending mail by Travis CI but the problem in that was closed SMTP ports (they have a strict policy about that) then we thought that Travis CI can trigger the Sendgrid which can send email to the user with the help of API.

We will use this code so that once the deployment of ISO by Travis CI is done it can execute the email script which requests Sendgrid to send email to the user.

after_deploy:
  - ./mail.py


We can create code using code generation service of Sendgrid we are going to choose python as it is easier to manipulate strings in python and we are going to use email as an environment variable.

After generation of python 3 code from the sendgrid website we are going to edit the message and email and hide the API key as an environment variable and create an authorization string to be used there too.

The URL will be generated by the below script as the body of url remains same only two things will change the TRAVIS_TAG which is event name and date.

date = datetime.datetime.now().strftime('%Y%m%d')
url="https://github.com/xeon-zolt/meilix/releases/download/"+os.environ["TRAVIS_TAG"]+"/meilix-zesty-"+date+"-i386.iso"


We can use this to hide the api key and use it as an environment variable because if the api key is visible in logs anyone can use it to exploit it and use it for spamming purpose.

authorization = "Bearer " + os.environ["mail_api_key"]
headers = {
    'authorization': authorization,


The main thing left to edit in the script is the message which is in the payload and is a string type so we are going to use the email received by Meilix generator as an environment variable and concatenate it with the payload string the message sent is in the value which is in the HTML format and we add the generated URL in similar way we added email variable to string.

payload = "{\"personalizations\":[{\"to\":[{\"email\":\"" + os.environ["email"] + "\"}],\"subject\":\"Your ISO is Ready\"}],\"from\":{\"email\":\"xeon.harsh@gmail.com\",\"name\":\"Meilix Generator\"},\"reply_to\":{\"email\":\"xeon.harsh@gmail.com\",\"name\":\"Meilix Generator\"},\"subject\":\"Your ISO is ready\",\"content\":[{\"type\":\"text/html\",\"value\":\"<html><p>Hi,<br>Your ISO is ready<br>URL : "+url+"<br><br>Thank You,<br>Meilix Generator Team</p></html>\"}]}"


The sent email looks like this

References

Continue ReadingHow Meilix Generator sends Email Notifications with SendGrid

Auto deployment of SUSI Skill CMS on gh pages

Susi Skill CMS is a web application framework to edit susi skills. It is currently in development stage, hosted on http://skills.susi.ai. It is built using ReactJS . In this blogpost we will see how to automatically deploy the repository on gh pages.
Setting up the project
Fork susi_skill_cms repository and clone it to your desktop, make sure you have node and npm versions greater than 6 and 3 respectively. Next go to cloned folder and install all the dependencies by running :

:$ npm install

Next run on http://localhost:3000 by running the command

:$ npm run start

To auto deploy changes on gh-pages branch, we need to setup Travis for the project. Register yourself on https://travis-ci.org/ and turn on the Travis for this repository. Next add .travis.yml in the root directory of the source folder.  

sudo: required
dist: trusty
language: node_js
node_js:
  - 6

before_install:
  - export CHROME_BIN=chromium-browser
  - export DISPLAY=:99.0
  - sh -e /etc/init.d/xvfb start

before_script:
  - npm run build

script:
  - npm run test

after_success:
  - bash ./deploy.sh

cache:
  directories: node_modules

# safelist
branches:
  only:
  - master 

Source: https://github.com/fossasia/susi_skill_cms/blob/master/.travis.yml

The travis configuration files will ensure that the project is building for every changes made, using npm run test command, in our case it will only consider changes made on master branch , if you want to watch other branches to add the respective branch name in travis configurations. After checking for build passing we need to automatically push the changes made for which we will use a bash script.

#!/bin/bash

SOURCE_BRANCH="master"
TARGET_BRANCH="gh-pages"

# Pull requests and commits to other branches shouldn't try to deploy.
if [ "$TRAVIS_PULL_REQUEST" != "false" -o "$TRAVIS_BRANCH" != "$SOURCE_BRANCH" ]; then
    echo "Skipping deploy; The request or commit is not on master"
    exit 0
fi

# Save some useful information
REPO=`git config remote.origin.url`
SSH_REPO=${REPO/https:\/\/github.com\//git@github.com:}
SHA=`git rev-parse --verify HEAD`

ENCRYPTED_KEY_VAR="encrypted_${ENCRYPTION_LABEL}_key"
ENCRYPTED_IV_VAR="encrypted_${ENCRYPTION_LABEL}_iv"
ENCRYPTED_KEY=${!ENCRYPTED_KEY_VAR}
ENCRYPTED_IV=${!ENCRYPTED_IV_VAR}
openssl aes-256-cbc -K $encrypted_2662bc12c918_key -iv $encrypted_2662bc12c918_iv -in deploy_key.enc -out ../deploy_key -d
chmod 600 ../deploy_key
eval `ssh-agent -s`
ssh-add ../deploy_key

# Cloning the repository to repo/ directory,
# Creating gh-pages branch if it doesn't exists else moving to that branch
git clone $REPO repo
cd repo
git checkout $TARGET_BRANCH || git checkout --orphan $TARGET_BRANCH
cd ..

# Setting up the username and email.
git config user.name "Travis CI"
git config user.email "$COMMIT_AUTHOR_EMAIL"

# Cleaning up the old repo's gh-pages branch except CNAME file and 404.html
find repo/* ! -name "CNAME" ! -name "404.html" -maxdepth 1  -exec rm -rf {} \; 2> /dev/null
cd repo

git add --all
git commit -m "Travis CI Clean Deploy : ${SHA}"

git checkout $SOURCE_BRANCH

# Actual building and setup of current push or PR.
npm install
npm run build
mv build ../build/

git checkout $TARGET_BRANCH
rm -rf node_modules/
mv ../build/* .
cp index.html 404.html

# Staging the new build for commit; and then committing the latest build
git add -A
git commit --amend --no-edit --allow-empty

# Deploying only if the build has changed
if [ -z `git diff --name-only HEAD HEAD~1` ]; then

  echo "No Changes in the Build; exiting"
  exit 0

else
  # There are changes in the Build; push the changes to gh-pages
  echo "There are changes in the Build; pushing the changes to gh-pages"

  # Actual push to gh-pages branch via Travis
  git push --force $SSH_REPO $TARGET_BRANCH
fi

Source : Bash script for automatic deployment

This bash script will enable travis ci user to push changes to gh pages, for this we need to store the credentials of the repository in encrypted form. To get the public/ private rsa keys use the following command

ssh-keygen -t rsa -b 4096 -C "your_email@example.com"

It will generate keys in .ssh/id_rsa folder in your home repository.

Make sure you do not enter any passphrase while generating credentials otherwise travis will get stuck at time of decrypting the keys. Copy the public key and deploy the key to repository by visiting  https://github.com/<your name>/<your repo>/settings/keys


Next install travis for encryption of keys.

sudo apt install ruby ruby-dev
sudo gem install travis

Encrypt your private deploy_key and add it to root of your repository using command

travis encrypt-file deploy_key

After successful encryption, you will see a message

Please add the following to your build script (before_install stage in your .travis.yml, for instance):

openssl aes-256-cbc -K $encrypted_2662bc12c918_key -iv $encrypted_2662bc12c918_iv -in deploy_key.enc -out ../deploy_key -d

Add the above generated script in travis and push the changes on your master branch. Do not push the deploy_key only the encryption file deploy_key.enc
Finally, add the deploy link of gh pages in package.json of your using key “homepage”.

 "homepage": "http://skills.susi.ai/"

And in scripts of package.json add

"deploy": "gh-pages -d build",

Commit and push your changes and from now onward all your changes will be automatically pushed to gh pages branch. For contribution visit Susi_Skill_CMS.

Resources

Continue ReadingAuto deployment of SUSI Skill CMS on gh pages