Change Text-to-Speech Voice Language of SUSI in SUSI iOS

SUSI iOS app now enables the user to change the text-to-speech voice language within the app. Now, the user can select any language of their choice from the list of 37 languages list. To change the text-to-speech voice language, go to, Settings > Change SUSI’s Voice, choose the language of your choice. Let see here how this feature implemented.

Apple’s AVFoundation API is used to implement the text-to-speech feature in SUSI iOS. AVFoundation API offers 37 voice languages which can be used for text-to-speech voice accent. AVFoundation’s AVSpeechSynthesisVoice API can be used to select a voice appropriate to the language of the text to be spoken or to select a voice exhibiting a particular local variant of that language (such as Australian or South African English).

To print the list of all languages offered by AVFoundation:

import AVFoundation

print(AVSpeechSynthesisVoice.speechVoices())

Or the complete list of supported languages can be found at Languages Supported by VoiceOver.

When the user clicks Change SUSI’s voice in settings, a screen is presented with the list of available languages with the language code.

Dictionary holds the list of available languages with language name and language code and used as Data Source for tableView.

var voiceLanguagesList: [Dictionary<String, String>] = []

When user choose the language and click on done, we store language chosen by user in UserDefaults:

UserDefaults.standard.set(voiceLanguagesList[selectedVoiceLanguage][ControllerConstants.ChooseLanguage.languageCode], forKey: ControllerConstants.UserDefaultsKeys.languageCode)
UserDefaults.standard.set(voiceLanguagesList[selectedVoiceLanguage][ControllerConstants.ChooseLanguage.languageName], forKey: ControllerConstants.UserDefaultsKeys.languageName)

Language name with language code chosen by user displayed in settings so the user can know which language is currently being used for text-to-speech voice.

To select a voice for use in speech, we obtain an AVSpeechSynthesisVoice instance using one of the methods in Finding Voices and then set it as the value of the voice property on an AVSpeechUtterance instance containing text to be spoken.

Earlier stored language code in UserDefaults shared instance used for setting the text-to-speech language for AVSpeechSynthesisVoice.

if let selectedLanguage = UserDefaults.standard.object(forKey: ControllerConstants.UserDefaultsKeys.languageCode) as? String {
speechUtterance.voice = AVSpeechSynthesisVoice(language: selectedLanguage)
}

AVSpeechUtterance is responsible for a chunk of text to be spoken, along with parameters that affect its speech.

Resources –

  1. UserDefaults: https://developer.apple.com/documentation/foundation/userdefaults
  2. AVSpeechSynthesisVoice: https://developer.apple.com/documentation/avfoundation/avspeechsynthesisvoice
  3. AVFoundation: https://developer.apple.com/av-foundation/
  4. SUSI iOS Link: https://github.com/fossasia/susi_iOS
Continue ReadingChange Text-to-Speech Voice Language of SUSI in SUSI iOS

STOP action implementation in SUSI iOS

You may have experienced, you can stop Google home or Amazon Alexa during the ongoing task. The same feature is available for SUSI too. Now, SUSI can respond to ‘stop’ action and stop ongoing tasks (e.g. SUSI is narrating a story and if the user says STOP, it stops narrating the story). ‘stop’ action is introduced to enable the user to make SUSI stop anything it’s doing.

Video demonstration of how stop action work on SUSI iOS App can be found here.

Stop action is implemented on SUSI iOS, Web chat, and Android. Here we will see how it is implemented in SUSI iOS.

When you ask SUSI to stop, you get following actions object from server side:

"actions": [{"type": "stop"}]

Full JSON response can be found here.

When SUSI respond with ‘stop’ action, we create a new action type ‘stop’ and assign `Message` object `actionType` to ‘stop’.

Adding ‘stop’ to action type:

enum ActionType: String {
... // other action types
case stop
}

Assigning to the message object:

if type == ActionType.stop.rawValue {
message.actionType = ActionType.stop.rawValue
message.message = ControllerConstants.stopMessage
message.answerData = AnswerAction(action: action)
}

A new collectionView cell is created to respond user with “stoped” text.

Registering the stopCell:

collectionView?.register(StopCell.self, forCellWithReuseIdentifier: ControllerConstants.stopCell)

Add cell to the chat screen:

if message.actionType == ActionType.stop.rawValue {
if let cell = collectionView.dequeueReusableCell(withReuseIdentifier: ControllerConstants.stopCell, for: indexPath) as? StopCell {
cell.message = message
let message = ControllerConstants.stopMessage
let estimatedFrame = self.estimatedFrame(message: message)
cell.setupCell(estimatedFrame, view.frame)
return cell
}
}

AVFoundation’s AVSpeechSynthesizer API is used to stop the action:

func stopSpeakAction() {
speechSynthesizer.stopSpeaking(at: AVSpeechBoundary.immediate)
}

This method immediately stops the speak action.

Final Output:

Resources – 

  1. About SUSI: https://chat.susi.ai/overview
  2. JSON response for ‘stop’ action: https://api.susi.ai/susi/chat.json?timezoneOffset=-330&q=susi+stop
  3. AVSpeechSynthesisVoice: https://developer.apple.com/documentation/avfoundation/avspeechsynthesisvoice
  4. AVFoundation: https://developer.apple.com/av-foundation/
  5. SUSI iOS Link: https://github.com/fossasia/susi_iOS
  6. SUSI Android Link: https://github.com/fossasia/susi_android
  7. SUSI Web Chat Link: https://chat.susi.ai/
Continue ReadingSTOP action implementation in SUSI iOS

Implementing Text To Speech Settings in SUSI WebChat

SUSI Web Chat has Text to Speech (TTS) Feature where it gives voice replies for user queries. The Text to Speech functionality was added using Speech Synthesis Feature of the Web Speech API. The Text to Speech Settings were added to customise the speech output by controlling features like :

  1. Language
  2. Rate
  3. Pitch

Let us visit SUSI Web Chat and try it out.

First, ensure that the settings have SpeechOutput or SpeechOutputAlways enabled. Then click on the Mic button and ask a query. SUSI responds to your query with a voice reply.

To control the Speech Output, visit Text To Speech Settings in the /settings route.

First, let us look at the language settings. The drop down list for Language is populated when the app is initialised. speechSynthesis.onvoiceschanged function is triggered when the app loads initially. There we call speechSynthesis.getVoices() to get the voice list of all the languages currently supported by that particular browser. We store this in MessageStore using ActionTypes.INIT_TTS_VOICES action type.

window.speechSynthesis.onvoiceschanged = function () {
  if (!MessageStore.getTTSInitStatus()) {
    var speechSynthesisVoices = speechSynthesis.getVoices();
    Actions.getTTSLangText(speechSynthesisVoices);
    Actions.initialiseTTSVoices(speechSynthesisVoices);
  }
};

We also get the translated text for every language present in the voice list for the text – `This is an example of speech synthesis` using google translate API. This is called initially for all the languages and is stored as translatedText attribute in the voice list for each element. This is later used when the user wants to listen to an example of speech output for a selected language, rate and pitch.

https://translate.googleapis.com/translate_a/single?client=gtx&sl=en-US&tl=TARGET_LANGUAGE_CODE&dt=t&q=TEXT_TO_BE_TRANSLATED

When the user visits the Text To Speech Settings, then the voice list stored in the MessageStore is retrieved and the drop down menu for Language is populated. The default language is fetched from UserPreferencesStore and the default language is accordingly highlighted in the dropdown. The list is parsed and populated as a drop down using populateVoiceList() function.

let voiceMenu = voices.map((voice,index) => {
  if(voice.translatedText === null){
    voice.translatedText = this.speechSynthesisExample;
  }
  langCodes.push(voice.lang);
  return(
    <MenuItem value={voice.lang}
              key={index}
              primaryText={voice.name+' ('+voice.lang+')'} />
  );
});

The language selected using this dropdown is only used as the language for the speech output when the server doesn’t specify the language in its response and the browser language is undefined. We then create sliders using Material UI for adjusting speech rate and pitch.

<h4 style={{'marginBottom':'0px'}}><Translate text="Speech Rate"/></h4>
<Slider
  min={0.5}
  max={2}
  value={this.state.rate}
  onChange={this.handleRate} />

The range for the sliders is :

  • Rate : 0.5 – 2
  • Pitch : 0 – 2

The default value for both rate and pitch is 1. We create a controlled slider saving the values in state and using onChange function to record change in values. The Reset buttons can be used to reset the rate and pitch values respectively to their default values. Once the language, rate and pitch values have been selected we can click on `Play a short demonstration of speech synthesis`  to listen to a voice reply with the chosen settings.

{ this.state.playExample &&
  (
    <VoicePlayer
       play={this.state.play}
       text={voiceOutput.voiceText}
       rate={this.state.rate}
       pitch={this.state.pitch}
       lang={this.state.ttsLanguage}
       onStart={this.onStart}
       onEnd={this.onEnd}
    />
  )
}

We use the VoicePlayer by passing the required props to get the speech output. onStart and onEnd functions are triggered at the beginning and ending of the speech synthesis and are used to control the state from the parent component. Chosen language, rate, pitch and translated text are passed as props to VoicePlayer which creates a new SpeechSynthesisUtterance() with the passed props and plays the speech output.

On saving these settings and then using the Mic button to get voice replies we see that the voice output is controlled according to the selected settings.

Finally, we have to store the selected settings on the server and ensure that these are pulled when the app is initialized. The format in which these settings are stored in the server is :

Speech Rate

- Used to control rate of speech output.
- SETTING_NAME :  `speechRate`
- SETTING_VALUE : `0.5 - 2`
- DEFAULT_VALUE : `1`
 
Speech Pitch

- Used to control pitch of speech output.
- SETTING_NAME :  `speechPitch`
- SETTING_VALUE : `0 - 2`
- DEFAULT_VALUE : `1`
 
TTS Language

- Used to set the language for Text-To-Speech used when the response from server doesnt specify language and the browser language is also undefined.
- SETTING_NAME :  `ttsLanguage`
- SETTING_VALUE : `Language Code (string)`
- DEFAULT_VALUE : `en-US`

This is how the Text To Speech Settings were implemented in SUSI Web Chat. The complete code can be found at SUSI Web Chat Repository.

PS: To test whether your browser supports Text To Speech, open your browser console and try the following :

  • var msg = new SpeechSynthesisUtterance(‘Hello World’);
  • window.speechSynthesis.speak(msg)

If you get a speech output then the Web API Speech Synthesis is supported by your browser and Text To Speech features of SUSI Web Chat will work. The Web Speech API has support for all latest Chrome browsers as mentioned in the Web Speech API Mozilla docs.However there are few bugs with some Chromium versions please check out more on how to fix them locally here in this link.

Resources:


Continue ReadingImplementing Text To Speech Settings in SUSI WebChat

Adding EditText With Google Input Option While Sharing In Phimpme App

In Phimpme Android App an user can share images on multiple platforms. While sharing we have also included caption option to enter description about the image. That caption can be entered by using keyboard as well Google Voice Input method. So in this post, I will be explaining how to add edittext with google voice input option.

Let’s get started

Step-1 Add EditText and Mic Button in layout file

<ImageView
       android:layout_width="20dp"
       android:id="@+id/button_mic"
       android:layout_height="20dp"
       android:background="?android:attr/selectableItemBackground"
       android:background="@drawable/ic_mic_black"
       android:scaleType="fitCenter" />
</RelativeLayout>


Caption Option in Share Activity in Phimpme

In Phimpme we have material design dialog box so right now I am using getTextInputDialogBox(). It will prompt the material design dialog box to enter caption to share image on multiple platform.

Step-2

Now we can get caption from edittext easily using the following code.

if (!captionText.isEmpty()) {
  caption = captionText;
  text_caption.setText(caption);
  captionEditText.setSelection(caption.length());
} else {
  caption = null;
  text_caption.setText(caption);
}


Step – 3 (Now add option Google Voice input option)

To use google input option I have added a global function in Utils class. To use that method just call that method with proper arguments.

public static void promptSpeechInput(Activity activity, int requestCode, View parentView, String promtMsg) {
  Intent intent = new Intent(RecognizerIntent.ACTION_RECOGNIZE_SPEECH);
  intent.putExtra(RecognizerIntent.EXTRA_LANGUAGE_MODEL, RecognizerIntent.LANGUAGE_MODEL_FREE_FORM);
  intent.putExtra(RecognizerIntent.EXTRA_LANGUAGE, Locale.getDefault());
  intent.putExtra(RecognizerIntent.EXTRA_PROMPT, promtMsg);
  try {
      activity.startActivityForResult(intent, requestCode);
  } catch (ActivityNotFoundException a) {
      SnackBarHandler.show(parentView,activity.getString(R.string.speech_not_supported));
  }

}

Just pass the request code to receive the speech text in onActvityResult() method and passs promt message which will be visible to user.

Step – 4 (Set text to caption )

if (requestCode == REQ_CODE_SPEECH_INPUT && data!=null){
       ArrayList<String> result = data.getStringArrayListExtra(RecognizerIntent.EXTRA_RESULTS);
       String voiceInput = result.get(0);
       text_caption.setText(voiceInput);
       caption = voiceInput;
       return;

}

Now we can set the text in caption string right now I am adding text in existing caption i.e If the user enter some text using edittext and after that user clicked on mic button then the extra text will be added after the previous text.

So this is how I have used Google voice input method and made the function globally.

Resources:

Continue ReadingAdding EditText With Google Input Option While Sharing In Phimpme App

Adding IBM Watson TTS Support in Susi Assistant on Raspberry Pi

Susi Hardware project aims at creating a smart assistant for your home that you can run on your Raspberry Pi or similar Development Boards.
I previously wrote a blog on choosing a perfect Text to Speech engine for Susi AI and had used Flite as the solution for it. While Flite is an Open Source solution that can run locally on a client, it does not provide the same quality of voice and speed as cloud providers. We always crave for a more natural voice for better interaction with our assistant. It is always good to have more options. We, therefore, added IBM Watson Text to Speech API in SUSI Hardware project.

IBM Watson TTS can be added to a Python Project easily using the IBM Watson Developer SDK.

For using the IBM Watson Developer SDK for Text to Speech, first of all, we need to sign up for Bluemix
https://console.bluemix.net/registration/

After that, we will get the empty dashboard without any service added currently. We need to create a Text to Speech Service. To do so, click on Create Watson Service button


Select Watson on the left pane and then select Text to Speech service from the list.

Select the standard plan from the options and then click on create button.

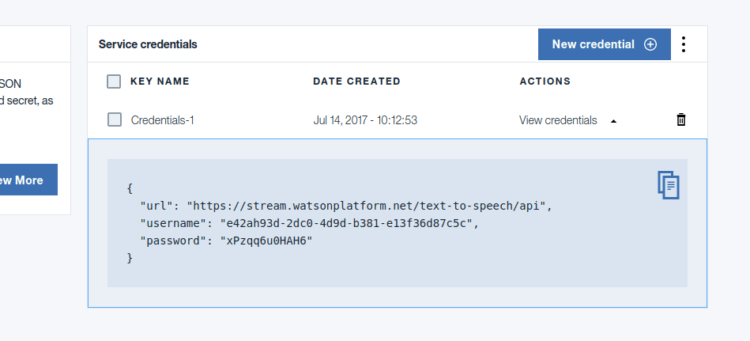
You will get service credentials for your newly created text to speech service. Save it for future reference.

After that, we need to add Watson developer cloud python package.

sudo pip3 install watson-developer-cloud

On Ubuntu with Python 3.5 watson-developer-cloud has some extra dependencies. Install them using the following command.

sudo apt install libssl-dev

Now we can add Text to Speech to our project. For that, we need to first import TextToSpeechV1 library. It can be added using following import statement.

from watson_developer_cloud import TextToSpeechV1

Now we need to create a new TextToSpeechV1 object using the Service Credentials we created earlier.

text_to_speech = TextToSpeechV1(
   username='API_USERNAME',
   password='API_PASSWORD')

We can now perform synthesis of a text input and write the incoming speech stream from IBM Watson API to a file.

with open('output.wav', 'wb') as audio_file:
   audio_file.write(
       text_to_speech.synthesize(text, accept='audio/wav’, voice='en-US_AllisonVoice'))

In the above code snippet,  we are opening an output file ‘output.wav’ for writing. We then write the binary audio data returned by text_to_speech.synthesize method. IBM Watson provides many free voices. We supply an argument specifying which voice we need to use. We are using English female ‘en-US_AllisonVoice’. You may test out more voices in the online demo here and select the voice that you find best.

We can play the ‘output.wav’ file using the play command from SoX. To do so, we need to install SoX binary.

sudo apt install sox libsox-fmt-all

We can play the file easily now using the following code.

import os
os.system('play output.wav')

The above code invokes the ‘play’ command from the SoX package to play the audio file. We can also use PyAudio to play the audio file but it would require us to manage the audio thread separately. Thus, SoX is a better solution.

Resources:

Continue ReadingAdding IBM Watson TTS Support in Susi Assistant on Raspberry Pi

Implementing Text to Speech on SUSI Web Chat

SUSI Web Chat now gives voice replies while chatting with it similar to SUSI Android and SUSI iOS clients. To test the Voice Output on Chrome,

  1. Visit chat.susi.ai
  2. Click on the Mic input button.
  3. Say something using the Mic when the Speak Now View appears

The simplest way to add text-to-speech to your website is by using the official Speech API currently available for Chrome Browser. The following steps help to achieve it in ReactJS.

  1. Initialize state defaults in a component named, VoicePlayer.
const defaults = {
      text: '',
      volume: 1,
      rate: 1,
      pitch: 1,
      lang: 'en-US'
    } 

There are two states which need to be maintained throughout the component and to be passed as such in our props which will maintain the state. Thus our state is simply

this.state = {
      started: false,
      playing: false
    }
  1. Our next step is to make use of functions of the Web Speech API to carry out the relevant processes.
  1. speak() – window.speechSynthesis.speak(this.speech) – Calls the speak method of the Speech API
  2. cancel() – window.speechSynthesis.cancel() – Calls the cancel method of the Speech API
  1. We then use our component helper functions to assign eventListeners and listen to any changes occurring in the background. For this purpose we make use of the functions componentWillReceiveProps(), shouldComponentUpdate(), componentDidMount(), componentWillUnmount(), and render().
  1. componentWillReceiveProps() – receives the object parameter {pause} to listen to any paused action
  2. shouldComponentUpdate() simply returns false if no updates are to be made in the speech outputs.
  3. componentDidMount() is the master function which listens to the action start, adds the eventListener start and end, and calls the speak() function if the prop play is true.
  4. componentWillUnmount() destroys the speech object and ends the speech.

Here’s a code snippet for Function componentDidMount()

componentDidMount () {
  
    const events = [
      { name: 'start', action: this.props.onStart }
    ]
    // Adding event listeners
    events.forEach(e => {
      this.speech.addEventListener(e.name, e.action)
    })

    this.speech.addEventListener('end', () => {
      this.setState({ started: false })
      this.props.onEnd()
    })

    if (this.props.play) {
      this.speak()
    }
  }
  1. We then add proper props validation in the following way to our VoicePlayer component.
VoicePlayer.propTypes = {
  play: PropTypes.bool,
  text: PropTypes.string,
  onStart: PropTypes.func,
  onEnd: PropTypes.func
};
  1. The next step is to pass the props from a listener view to the VoicePlayer component. Hence the listener here is the component MessageListItem.js from where the voice player is initialized.
  1. First step is to initialise the state.
this.state = {
      play: false,
    }
  onStart = () => {
    this.setState({ play: true });
  }
  onEnd = () => {
    this.setState({ play: false });
  }
  1. Next, we set play to true when we want to pass the props and the text which is to be said and append it to the message lists which have voice set as `true`
 { this.props.message.voice &&
      (<VoicePlayer
             play
             text={voiceOutput}
             onStart={this.onStart}
             onEnd={this.onEnd}
 />)}

Finally, our message lists with voice true will be heard on the speaker as they have been spoken on the microphone. To get access to the full code, go to the repository https://github.com/fossasia/chat.susi.ai or on our chat channel at gitter.im/fossasia/susi_webchat

Resources

  1. Speak-easy-synthesis repository http://mdn.github.io/web-speech-api/speak-easy-synthesis
  2. Web-speech-api repository https://github.com/mdn/web-speech-api/
Continue ReadingImplementing Text to Speech on SUSI Web Chat