Displaying of Images using Picasso Library in SUSI.AI Android App

Displaying images is not so easy in an Android app without using a third-party library. Picasso is one of the most popularly used third-party libraries for android that is used to display images. It is a very simple and powerful library for image downloading and caching. SUSI.AI is a smart assistant app. We need the use of Picasso a lot to answer the queries put up by the users. Suppose if the user asks to show some pictures, we need to display it. In such a case we find Picasso very handy. So let’s know how to implement it, by going through the code base present in SUSI.AI android app.

Why use Picasso or another third-party library?

You might be thinking that why we should use a 3rd party library. You can achieve your task without using a 3rd party API as well. But if you will use the core method then it would take a larger amount of code. But if we will use a 3rd party library like Picasso then we will achieve our goal in fewer lines of code.  Also, we can easily cache the images using this libraries. Caching is really an important feature to speed up the application.

Adding Picasso Library to the Gradle file

Adding Picasso android library to your project is very easy. You just need to add the following line in the dependency block of your build.gradle file and replace ${rootConfiguration.picassoVersion} with the latest version of Picasso(for example 2.71828). Now sync your Gradle file. I am assuming that you have already added NETWORK permission in your project.

The simplest way of loading image is:
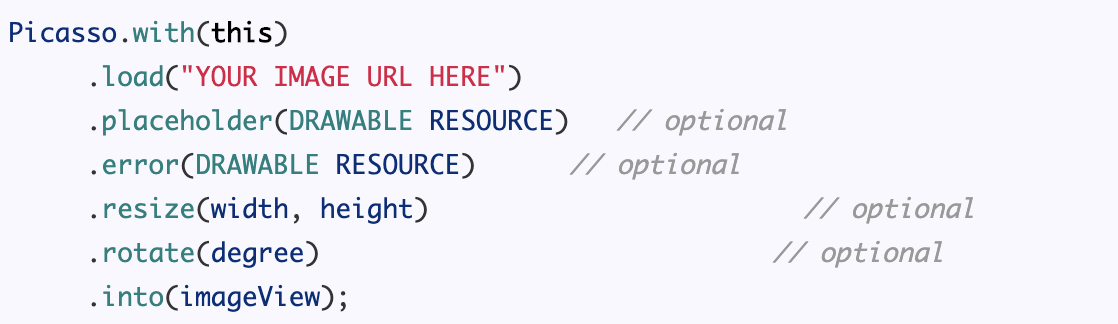
Picasso.with(this)
   .load("YOUR IMAGE URL HERE")
   .into(imageView);

Here, imageView is the reference to the imageView where you want to display the image.

This is how it is being implemented in the susi app. Here imageUrl is the URL of the image to be loaded. ImageView is the place where we need to display the loaded image. Now there is a chance that the imageUrl is actually not a URL of the image, or suppose Picasso fails to load the image due to some errors. In all such cases, a dummy image would be shown in the imageView. This dummy image is added by calling the error function of Picasso class and passing the reference of the image to it. The placeholder function displays a static image present inside the app until the actual image is being loaded.

Re-sizing and Rotating

We can also resize and rotate the image very easily.

Resources: 

Documentation: Picasso, Glide vs Picasso

Tutorial: Picasso Youtube Video

Library source code: Picasso Library source code

SUSI.AI Android App: PlayStore GitHub

Tags: SUSI.AI Android App, Kotlin, SUSI.AI, FOSSASIA, GSoC, Android, Picasso, Image loader..

Continue ReadingDisplaying of Images using Picasso Library in SUSI.AI Android App

Display image responses in SUSI.AI Android app

SUSI.AI Android app has many response functionalities ranging from giving simple ANSWER type responses to complex TABLE and MAP type responses. Although, even after all these useful response types there were some missing action types all related to media. SUSI.AI app was not capable of playing any kind of image responses.So, to do this the links received in the response were used to fetch the corresponding image stored in the link.

Since, the app now has two build flavors corresponding to the F-Droid version and PlayStore version respectively it had to be considered that while adding the feature to display images any proprietary software was not included with the F-Droid version.

The JSON response from the server whenever a query for was asked gave the link to the image.  For eg : on querying : “Image of cat “ the server gave the response as :

Actions”: [

       {

         “language”: “en”,

         “type”: “answer”,

         “expression”: “https://pixabay.com/get/e830b1072ef5023ed1584d05fb1d4790e076e7d610ac104496f0c77ea0e9bcbf_640.jpg”

       }

So in the android app just like the usual answer type response a message was displayed with the link to the image present in the message.

Catching IMAGE response :

The image responses are of the type “answer” as seen in the server response above. So we a method had to be devised so that the responses which display the images are caught and displayed. In the file ChatFeedRecyclerAdapter.java a separate code to detect the IMAGE response was added as :

private static final int IMAGE = 17;

Next we must specify that what type of view that is to be used whenever an IMAGE response is encountered by the app. Since the action type is “answer” a specification was required to choose the type of the viewholder. Since the images are only displayed through the pixabay the URL of the images end with either “.jpg” or “.png”. So in the expression of the response if we check that it is a link and also it ends with either “.jpg” or “.png” it will be certain that the response given from the server is an image.

The code to identify the view type :

@Override
public int getItemViewType(int position) {
  ChatMessage item = getItem(position);

  if (item.getId() == -404) return DOTS;
  else if (item.getId() == -405) return NULL_HOLDER;
  else if (item.isDate()) return DATE_VIEW;
  else if (item.getContent().endsWith(“.jpg”) || item.getContent().endsWith(“.png”))
      return IMAGE;

Inflating the layout of type IMAGE

Now after determining that the response will be an image we have to inflate the layout of the viewholder to support images in the onCreateViewHolder() method . The layout  of the image response was inflated as follows :

case IMAGE:
  view = inflater.inflate(R.layout.image_holder, viewGroup, false);
  return new ImageViewHolder(view, clickListener);

Here ImageViewHolder is the view holder that is used for displaying the images , we will discuss it later in the post. Also now in the onBindViewHolder() method of the ChatFeedRecyclerAdapter.java file we have to specify the instance of the view holder if it was to support the image response. It was done as follows :

else if (holder instanceof ImageViewHolder) {
  ImageViewHolder imageViewHolder = (ImageViewHolder) holder;
  imageViewHolder.setView(getData().get(position));
}

ViewHolder for Images :

Like all other viewholders for different variety responses from the server a viewholder to display the images was also needed to be included in the app. So, ImageViewHolder.java was created which handles the images to de displayed in the app. In the setView() method ChatMessage object is passed and this object is  used to get the image url so that it is used to display the image using Picasso.

public void setView(ChatMessage model) {
  this.model = model;

  if (model != null) {
      imageURL = model.getContent();
      try {
          Picasso.with(itemView.getContext())
                  .load(imageURL)
                  .placeholder(R.drawable.ic_susi)
                  .into(imageView);
      } catch (Exception e) {
          Timber.e(e);
      }
  }

And on clicking the image we can view the image on full screen using a custom chrome tab as follows  :

imageView.setOnClickListener(new View.OnClickListener() {
  @Override
  public void onClick(View view) {
      CustomTabsIntent.Builder builder = new CustomTabsIntent.Builder();
      CustomTabsIntent customTabsIntent = builder.build();
      customTabsIntent.launchUrl(itemView.getContext(), Uri.parse(imageURL));
  }
});

Conclusion :

References :

  1. Susi server response in case of images : https://api.susi.ai/susi/chat.json?timezoneOffset=-330&q=image+of+cat
  2. Pixabay is the source used for fetching images : https://pixabay.com
  3. Display images using Picasso : https://guides.codepath.com/android/Displaying-Images-with-the-Picasso-Library


Continue ReadingDisplay image responses in SUSI.AI Android app

Changing Profile Image in Open Event Android

A user can create a custom Avatar in Open Event Android. We use Picasso Library for easy image loading and caching in Open Event Android. This blog post will help you understand how its implemented in Open Event Android.

These are the steps we follow :

  • Create UI element which allows the user to pick an avatar
  • Checking and requesting Read External Storage permission
  • Compress and Encode Image
  • Use Picasso to display image on UI
  • Upload it on the server on user’s command

We will discuss the above steps in detail in the following section.

Create UI element which allows the user to pick an avatar

To display the selected avatar image as well as to fire image pick action when clicked we need a UI element. We display a placeholder in case no avatar image is provide, in this case, its ic_account_circle_grey_24dp which lies in drawable folder. Rest of the code is self explanatory.

<ImageView
       android:id=“@+id/profilePhoto”
       android:layout_width=“@dimen/item_image_view_large”
       android:layout_height=“@dimen/item_image_view_large”
       android:layout_gravity=“center_horizontal”
       android:contentDescription=“Profile Photo”
       android:padding=“@dimen/padding_large”
       app:srcCompat=“@drawable/ic_account_circle_grey_24dp” />

Once we have created the UI we need to wire it with the action to pick an image, the following code snippet does that. When this ImageView is clicked permissionGranted variable is checked which keeps a track of read external storage permission if this is true file chooser is displayed to allows user to select an image else an dialog for requesting permissions is shown.

rootView.profilePhoto.setOnClickListener { v ->
           if (permissionGranted) {
               showFileChooser()
           } else {
               requestPermissions(READ_STORAGE, REQUEST_CODE)
           }
       }

Checking and requesting Read External Storage permission

As discussed in the above section permission check is performed when ImageView is clicked and if not granted a dialog request for read external storage is displayed. Initially, the boolean permissionGranted is set to false which means clicking on ImageView fires requestPermission method with permissions array and request code and by overriding the onRequestPermissionResult method we can look at request status.

override fun onRequestPermissionsResult(requestCode: Int, permissions: Array<String>, grantResults: IntArray) {
       if (requestCode == REQUEST_CODE) {
           if (grantResults.isNotEmpty() && grantResults[0] == PackageManager.PERMISSION_GRANTED) {
               permissionGranted = true
               Toast.makeText(context, “Permission to Access External Storage Granted !”, Toast.LENGTH_SHORT).show()
               showFileChooser()
           } else {
               Toast.makeText(context, “Permission to Access External Storage Denied :(“, Toast.LENGTH_SHORT).show()
           }
       }
   }

onRequestPermissionsResult is called everytime requestPermission finishes, to check for which request it’s called we can check the Request code if it matches with the one we passed in our requestPermissions method that means the grant result carries information about our request. We can check the grantResult and if permission is granted we set our permissionGranted variable to true and display the file chooser menu.

Compress and Encode Image

Once the user picks the image from the file chooser we need to convert it into an input stream and we encode it into our JPEG format and specify the image quality. The following code snippet will help you understand how this happens.

val imageUri = intentData.data
           var imageStream: InputStream? = null
           try {
               imageStream = activity?.contentResolver?.openInputStream(imageUri)
           } catch (e: FileNotFoundException) {
               Timber.d(e, “File Not Found Exception”)
           }
w
           val selectedImage = BitmapFactory.decodeStream(imageStream)
           encodedImage = encodeImage(selectedImage)

           Picasso.get()
                   .load(imageUri)
                   .placeholder(R.drawable.ic_person_black_24dp)
                   .transform(CircleTransform())
                   .into(rootView.profilePhoto)
       }

The above code is executed after picking the image from file chooser. The image is first converted into input stream (this process is put inside a try catch because the conversion process may result in file not found exception) and then BItmapFactory’s decodeStream is called on it, all this is done so that we can convert URI into to bitmap now this bitmap is converted into JPEG format with 100 percent quality and then into a Base64 type string using the function encodeImage.

Finally, we use Picasso standard functions to load the image into UI we also specify placeholder image which is displayed if anything fails or image is loading.

Upload Image on the server on user’s command

If the user wish to keep the selected image as its avatar he can click on update button in open event android. This button fires a post request which uploads the image data to open event server followed by a patch request to add the URL to User information.

@POST(“upload/image”)
   fun uploadImage(@Body uploadImage: UploadImage): Single<ImageResponse>

This is the post request made to the server the body contains an UploadImage object which essentially caries a String type data variable containing the Base64 encoded jpeg bitmap. In response to the request, the server returns a URL which is then added to the User object and a patch request is made to update the user on the server

@PATCH(“users/{id}”)
   fun updateUser(@Body user: User, @Path(“id”) id: Long): Single<User>

References

Continue ReadingChanging Profile Image in Open Event Android

Adding TextDrawable as a PlaceHolder in Open Event Android App

The Open Event Android project has a fragment for showing speakers of the event. Each Speaker model has image-url which is used to fetch the image from server and load in the ImageView. In some cases it is possible that image-url is null or client is not able to fetch the image from the server because of the network problem. So in these cases showing Drawable which contains First letters of the first name and the last name along with a color background gives great UI and UX. In this post I explain how to add TextDrawable as a placeholder in the ImageView using TextDrawable library.

1. Add dependency

In order to use TextDrawable in your app add following dependencies in your app module’s build.gradle file.

dependencies {
	compile 'com.amulyakhare:com.amulyakhare.textdrawable:1.0.1'
}

2. Create static TextDrawable builder

Create static method in the Application class which returns the builder object for creating TextDrawables. We are creating static method so that the method can be used all over the App.

private static TextDrawable.IShapeBuilder textDrawableBuilder;

public static TextDrawable.IShapeBuilder getTextDrawableBuilder()
 {
        if (textDrawableBuilder == null) {
            textDrawableBuilder = TextDrawable.builder();
        }
        return textDrawableBuilder;
}

This method first checks if the builder object is null or not and then initialize it if null. Then it returns the builder object.

3.  Create and initialize TextDrawable object

Now create a TextDrawable object and initialize it using the builder object. The Builder has methods like buildRound(), buildRect() and buildRoundRect() for making drawable round, rectangle and rectangle with rounded corner respectively. Here we are using buildRect() to make the drawable rectangle.

TextDrawable drawable = OpenEventApp.getTextDrawableBuilder()
                    .buildRect(Utils.getNameLetters(name), ColorGenerator.MATERIAL.getColor(name));

The buildRect() method takes two arguments one is String text which will be used as a text in the drawable and second is int color which will be used as a background color of the drawable. Here ColorGenerator.MATERIAL returns material color for given string.

4.  Create getNameLetters()  method

The getNameLetters(String name) method should return the first letters of the first name and last name as String.

Example, if the name is “Shailesh Baldaniya” then it will return “SB”.

public static String getNameLetters(String name) {
        if (isEmpty(name))
            return "#";

        String[] strings = name.split(" ");
        StringBuilder nameLetters = new StringBuilder();
        for (String s : strings) {
            if (nameLetters.length() >= 2)
                return nameLetters.toString().toUpperCase();
            if (!isEmpty(s)) {
                nameLetters.append(s.trim().charAt(0));
            }
        }
        return nameLetters.toString().toUpperCase();
}

Here we are using split method to get the first name and last name from the name. The charAt(0) gives the first character of the string. If the name string is null then it will return “#”.   

5.  Use Drawable

Now after creating the TextDrawable object we need to load it as a placeholder in the ImageView for this we are using Picasso library.

Picasso.with(context)
        .load(image-url)
        .placeholder(drawable)
        .error(drawable)
        .into(speakerImage);

Here the placeholder() method displays drawable while the image is being loaded. The error() method displays drawable when the requested image could not be loaded when the device is offline. SpeakerImage is an ImageView in which we want to load the image.

Conclusion

TextDrawable is a great library for generating Drawable with text. It has also support for animations, font and shapes. To know more about TextDrawable follow the links given below.

Continue ReadingAdding TextDrawable as a PlaceHolder in Open Event Android App

Binding Images Dynamically in Open Event Orga App

In Open Event Orga App (Github Repo), we used Picasso to load images from URLs and display in ImageViews. Picasso is easy to use, lightweight, and extremely configurable but there has been no new release of the library since 2015. We were using Picasso in binding adapters in order to dynamically load images using POJO properties in the layout XML itself using Android Data Binding. But this configuration was a little buggy.

The first time the app was opened, Picasso fetched the image but it was not applied to the ImageView. When the device was rotated or the activity was resumed, it loaded just fine. This was a critical issue and we tried many things to fix it but none of it quite fit our needs. We considered moving on to other Image Loading libraries like Glide, etc but it was too heavy on the size and functionality for our needs. The last resort was to update the library to develop version using Sonatype’s snapshots Repository. Now, the Picasso v2.6.0-SNAPSHOT is very stable but not released to the maven central repository, and a newer develop version v3.0.0-SNAPSHOT was launched too. So we figured we should use that. This blog will outline the steps to include the develop version of Picasso, configuring it for our needs and making it work with Android Data Binding.

Setting up Dependencies

Firstly, we need to include the sonatype repository in the repositories block of our app/build.gradle

repositories {
   ...
   maven { url 'https://oss.sonatype.org/content/repositories/snapshots/' }
}


Then we need to replace the Picasso dependency entry to this:

compile 'com.squareup.picasso:picasso:3.0.0-SNAPSHOT'


Note that if you used Jake Wharton’s OkHttp3 Downloader for Picasso, you won’t need it now, so you need to remove it from the dependency block

And you need to use this to import the downloader

import com.squareup.picasso.OkHttp3Downloader;


Next, we set up our Picasso DI this way

Picasso providesPicasso(Context context, OkHttpClient client) {
   Picasso picasso = new Picasso.Builder(context)
       .downloader(new OkHttp3Downloader(client))
       .build();
   picasso.setLoggingEnabled(true);
   return picasso;
}


Set the singleton instance in our application:

Picasso.setSingletonInstance(picasso);


And we are ready to use it.

Creating Adapters

Circular Image Adapter

We show event logos as circular images, so we needed to create a binding adapter for that:

@BindingAdapter("circleImageUrl")
public static void bindCircularImage(ImageView imageView, String url) {
   if(TextUtils.isEmpty(url)) {
       imageView.setImageResource(R.drawable.ic_photo_shutter);
       return;
   }

   Picasso.with()
       .load(Uri.parse(url))
       .error(R.drawable.ic_photo_shutter)
       .placeholder(R.drawable.ic_photo_shutter)
       .transform(new CircleTransform())
       .tag(MainActivity.class)
       .into(imageView);
}


If the URL is empty, we just show the default photo, and otherwise we load the image into the view using standard CircleTransform

Note that there is no context argument in the with method. This was implemented in Picasso recently where they removed the need for context for loading images. Now, they use a Dummy ContentProvider to get application context, which is inspired by how Firebase does it.

Now, we can just normally use this binding in layout to load the event thumbnail like this

<ImageView
   android:layout_width="@dimen/image_small"
   android:layout_height="@dimen/image_small"
   android:contentDescription="@string/event_thumbnail"
   app:circleImageUrl="@{event.thumbnailImageUrl}" />


This gives us a layout like this:

Next we need to load the header image with a deafult image.

Default Image Adapter

For this, we write a very simple adapter without CircleTransform

@BindingAdapter(value = { "imageUrl", "placeholder" }, requireAll = false)
public static void bindDefaultImage(ImageView imageView, String url, Drawable drawable) {
   if(TextUtils.isEmpty(url)) {
       if (drawable != null)
           imageView.setImageDrawable(drawable);
       return;
   }

   RequestCreator requestCreator = Picasso.with().load(Uri.parse(url));

   if (drawable != null) {
       requestCreator
           .placeholder(drawable)
           .error(drawable);
   }

   requestCreator
       .tag(MainActivity.class)
       .into(imageView);
}


As imageUrl or placeholder can be null, we check for both, and setting correct images if they are not. We use this in our header layout with both the url and default image we need to show:

<ImageView
   android:scaleType="centerCrop"
   app:imageUrl="@{ event.largeImageUrl }"
   app:placeholder="@{ @drawable/header }"
   android:contentDescription="@string/event_background" />


And this gives us a nice dynamic header like this:

This wraps up the blog on Picasso’s latest develop version and Binding Adapters. If you want to know more about Picasso and Android Data Binding, check these links:

Continue ReadingBinding Images Dynamically in Open Event Orga App

Cache Thumbnails and Images Using Picasso in Open Event Android

In the event based Android projects like Open Event Android, we have speakers and sponsors. And these projects needs to display image of the speakers and sponsors because it affects project a lot. So instead of every time fetching image from the server it is good to store small images(thumbnails) in the cache and load images even if device is offline. It also reduces data usage.

Picasso is mostly used image loading library for Android. It automatically handles ImageView recycling and download cancellation in an adapter, complex image transformations with minimal memory use, memory and disk caching.

But one problem is Picasso caches images for only one session by default. I mean if you close the app then all by default cached image will be removed.  If you are offline then Picasso will not load cached images because of it. It will make network calls every time you open the app.

In this post I explain how to manually cache images using Picasso so that images load even if the device is offline. It will make a network call only once for a particular image and will cache image in memory.

We will use okhttp3 library for OkHttpClient.

1. Add dependency

In order to use Picasso in your app add following dependencies in your app module’s build.gradle file.

dependencies {
        compile 'com.squareup.okhttp3:okhttp:3.8.1'
        compile 'com.squareup.picasso:picasso:2.5.2'
}

2. Make static Picasso object

Make static Picasso object in the Application class so that we can use it directly from the other activity.

public static Picasso picassoWithCache;

3. Initialize cache

Create a File object with path as app specific cache and use this object to create a Cache object.

File httpCacheDirectory = new File(getCacheDir(), "picasso-cache");
Cache cache = new Cache(httpCacheDirectory, 15 * 1024 * 1024);

Here it will create a Cache object with 15MB. getCacheDir() method returns the absolute path to the application specific cache directory on the filesystem.

OkHttpClient.Builder okHttpClientBuilder = new OkHttpClient.Builder().cache(cache);

4. Initialize Picasso with cache

Now initialize picassoWithCache object using Picass.Builder(). Set downloader for picasso by adding  new OkHttp3Downloader object.

picassoWithCache = new Picasso.Builder(this).downloader(new OkHttp3Downloader(okHttpClientBuilder.build())).build();

5. Use picassoWithCache object

As it is a static object you can directly use it from any activity. All the images loaded using this picassoWithCache instance will be cached in memory.

Application.picassoWithCache().load(thumbnail/image url);


To know more how i solved this issue in Open Event Project visit this link. To learn more about Picasso features follow the links given below.

Continue ReadingCache Thumbnails and Images Using Picasso in Open Event Android