How Switch Case improve performance in PSLab Saved Experiments

PSLab android application contains nearly 70 experiments one can experiment on using the PSLab device and the other necessary circuit components and devices. These experiments span over areas such as Electronics, Electrical, Physical and High school level. All these experiments are accessible via an android adapter in the repository named “PerformExperimentAdapter”. This adapter houses a tab view with two different tabs; one for the experiment details and the other for actual experiment and resultant graphs.

The adapter extends an inbuilt class FragmentPagerAdapter;

public class PerformExperimentAdapter extends FragmentPagerAdapter

This class displays every page attached to its viewpager as a fragment. The good thing about using fragments is that they have a recyclable life cycle. Rather than creating new views for every instance of an experiment, the similar views can be recycled to use once again saving resources and improving performance. FragmentPagerAdapter needs to override a method to display the correct view on the tab select by user.

@Override
public Fragment getItem(int position) {

}

Depending on the value of position, relevant experiment documentation and the experiment implementation fragments are displayed determined using the experiment title. Performance can be critical in this place as if it takes too long to process and render a fragment, user will feel a lag.

The previous implementation was using consecutive if statements.

@Override
public Fragment getItem(int position) {
   switch (position) {
       case 0:
           if (experimentTitle.equals(context.getString(R.string.diode_iv)))
               return ExperimentDocFragment.newInstance("D_diodeIV.html");
           if (experimentTitle.equals(context.getString(R.string.zener_iv)))
               return ExperimentDocFragment.newInstance("D_ZenerIV.html");
           ...
       case 1:
           if (experimentTitle.equals(context.getString(R.string.diode_iv)))
               return ZenerSetupFragment.newInstance();
           if (experimentTitle.equals(context.getString(R.string.zener_iv)))
               return DiodeExperiment.newInstance(context.getString(R.string.half_wave_rectifier));
           ...
       default:
           return ExperimentDocFragment.newInstance("astable-multivibrator.html");
   }
}

This setup was suitable for applications where there is less than around 5 choices to chose between. As the list grows, the elements in the end of the if layers will take more time to load as each of the previous if statements need to be evaluated false in order to reach the bottom statements.

This is when this implementation was replaced using switch case statements instead of consecutive if statements. The theory behind the performance improvement involves algorithm structures; Hash Tables

Hash Tables

Hash tables use a hash function to calculate the index of the destination cell. This operation on average has a complexity of O(1) which means it will take the same time to access any two elements which are randomly positioned.

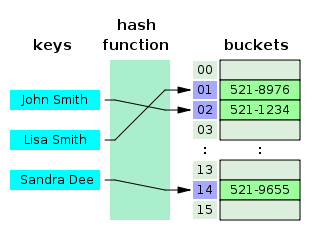
This is possible because java uses the hash code of the string to determine the index where the target is situated at. This way it is much faster than consecutive if statement calls where in the worst case it will take O(n) time to reach the statement causing a lag in the application.

Current application uses switch cases in the PerformExperimentAdapter;

@Override
public Fragment getItem(int position) {
   switch (position) {
       case 0:
           switch (experimentTitle) {
               case "Diode IV Characteristics":
                   return ExperimentDocFragment.newInstance("D_diodeIV.html");
               case "Zener IV Characteristics":
                   return ExperimentDocFragment.newInstance("D_ZenerIV.html");
               case "Half Wave Rectifier":
                   return ExperimentDocFragment.newInstance("L_halfWave.html");
           }
       case 1:
           switch (experimentTitle) {
               case "Diode IV Characteristics":
                   return ZenerSetupFragment.newInstance();
               case "Zener IV Characteristics":
                   return ZenerSetupFragment.newInstance();
               case "Half Wave Rectifier":
                   return DiodeExperiment.newInstance(context.getString(R.string.half_wave_rectifier));
           }
       default:
           return ExperimentDocFragment.newInstance("astable-multivibrator.html");
   }
}

There is one downfall in using switch case in the context. That is the inability to use string resources directly as Java requires a constant literals in the evaluation statement of a case.

Resources:

Continue ReadingHow Switch Case improve performance in PSLab Saved Experiments

Implementation of React Routers in SUSI Web Chat

When we were developing the SUSI Web Chat application we wanted to implement set of static pages with the chat application. In the start we just wanted to navigate  through different static pages and move back to the web chat application. But it takes time to load a new page when user clicks on a link. Our goal was therefore to minimize the loading time by using lazy loading. For that we used react-route .It is standard library for react js.

From the docs:

“React Router keeps your UI synced with the URL. It has a simple API with powerful features like lazy code loading, dynamic route matching, and location transition handling built right in. Make the URL your first thought, not an after-thought.” (https://www.npmjs.com/package/react-router-plus)

We need react-route to be installed in our application first. We can install it using NPM by running this command on project folder.

npm install --save react-router-dom

Next we have to set up our routes. We have two types of headers in our application. One is chat application header, second one is static page header. In static page header we have a navigation to switch between static pages.
First we need to choose the router type because there are two types of routers in react. “” and “” we can use “” in our example because our server can handle dynamic requests. If we are requesting data from static page we should use “” .
We used that in “” and made another new component called “” and used it on “index.js” like this.

import { BrowserRouter as Router } from 'react-router-dom';
Import App from .App;
 ReactDOM.render(
  	<IntlProvider locale={defaultPrefLanguage}>
		<Router> <App /> </Router>
	</IntlProvider>,
  	document.getElementById('root')  );

In “App.js” we can set up routes like this.

        <Switch>
            <Route exact path='/' component={ChatApp}/>
            <Route exact path="/overview" component={Overview} />
            <Route exact path='/blog' component={Blog} />
            <Route exact path="/logout" component={Logout} />
            <Route exact path="/settings" component={Settings} />
            <Route exact path="*" component={NotFound} />
        </Switch>

We use elements to render component when they match with the corresponding path. We use “path” to add router location that we need to match width the component. We use “exact” property to render the component if location exactly matches with the “path”. If we do not use “exact” property it renders when we have child routes after the path like “/blog/1 “ .
We used “” element to group routes.
We can’t use anchor () tags to navigate pages without reloading. We have to use tags instead of that. We have to replace all the places we have used

<a href= ‘URL’>lable name </a>

with this,

<Link to=’URL’>Lable name</Link>   

After doing above changes application will perform faster and it will load all page contents soon after you click the navigation links.

If you would like to join with FOSSASIA and contribute to SUSI Web Chat Application please fork this repository on Github.

Resources

Continue ReadingImplementation of React Routers in SUSI Web Chat

Using compression middleware in Node/Express

If you’re using ExpressJS to host your server, there’s a small performance tweak that you can do (works on universally on any kind of server – HTML templates to JSON REST APIs to image servers) – which is to enable GZIP compression.

The changed required to do it should be very simple. First install the compression npm package

 npm install --save compression

In you app.js (or wherever you start your express server), modify the code to include the compression middleware like this

var express = require('express);
var app = express();

var compression = require('compression');

app.use(compression());

// Rest of your app code
// app.get (endpoint, callback) 
// app.listen(port, callback)

This should easily reduce page loads time to the order of 15-20%.

For example, page load before compression middleware added 72f7abf2-4899-11e6-9cd5-68a7addaf3a6


And Page load time after compression is added69e6fba8-4899-11e6-9626-a25c26ea7d2b

Continue ReadingUsing compression middleware in Node/Express