Adding a Last Modified At column in Open Event Server

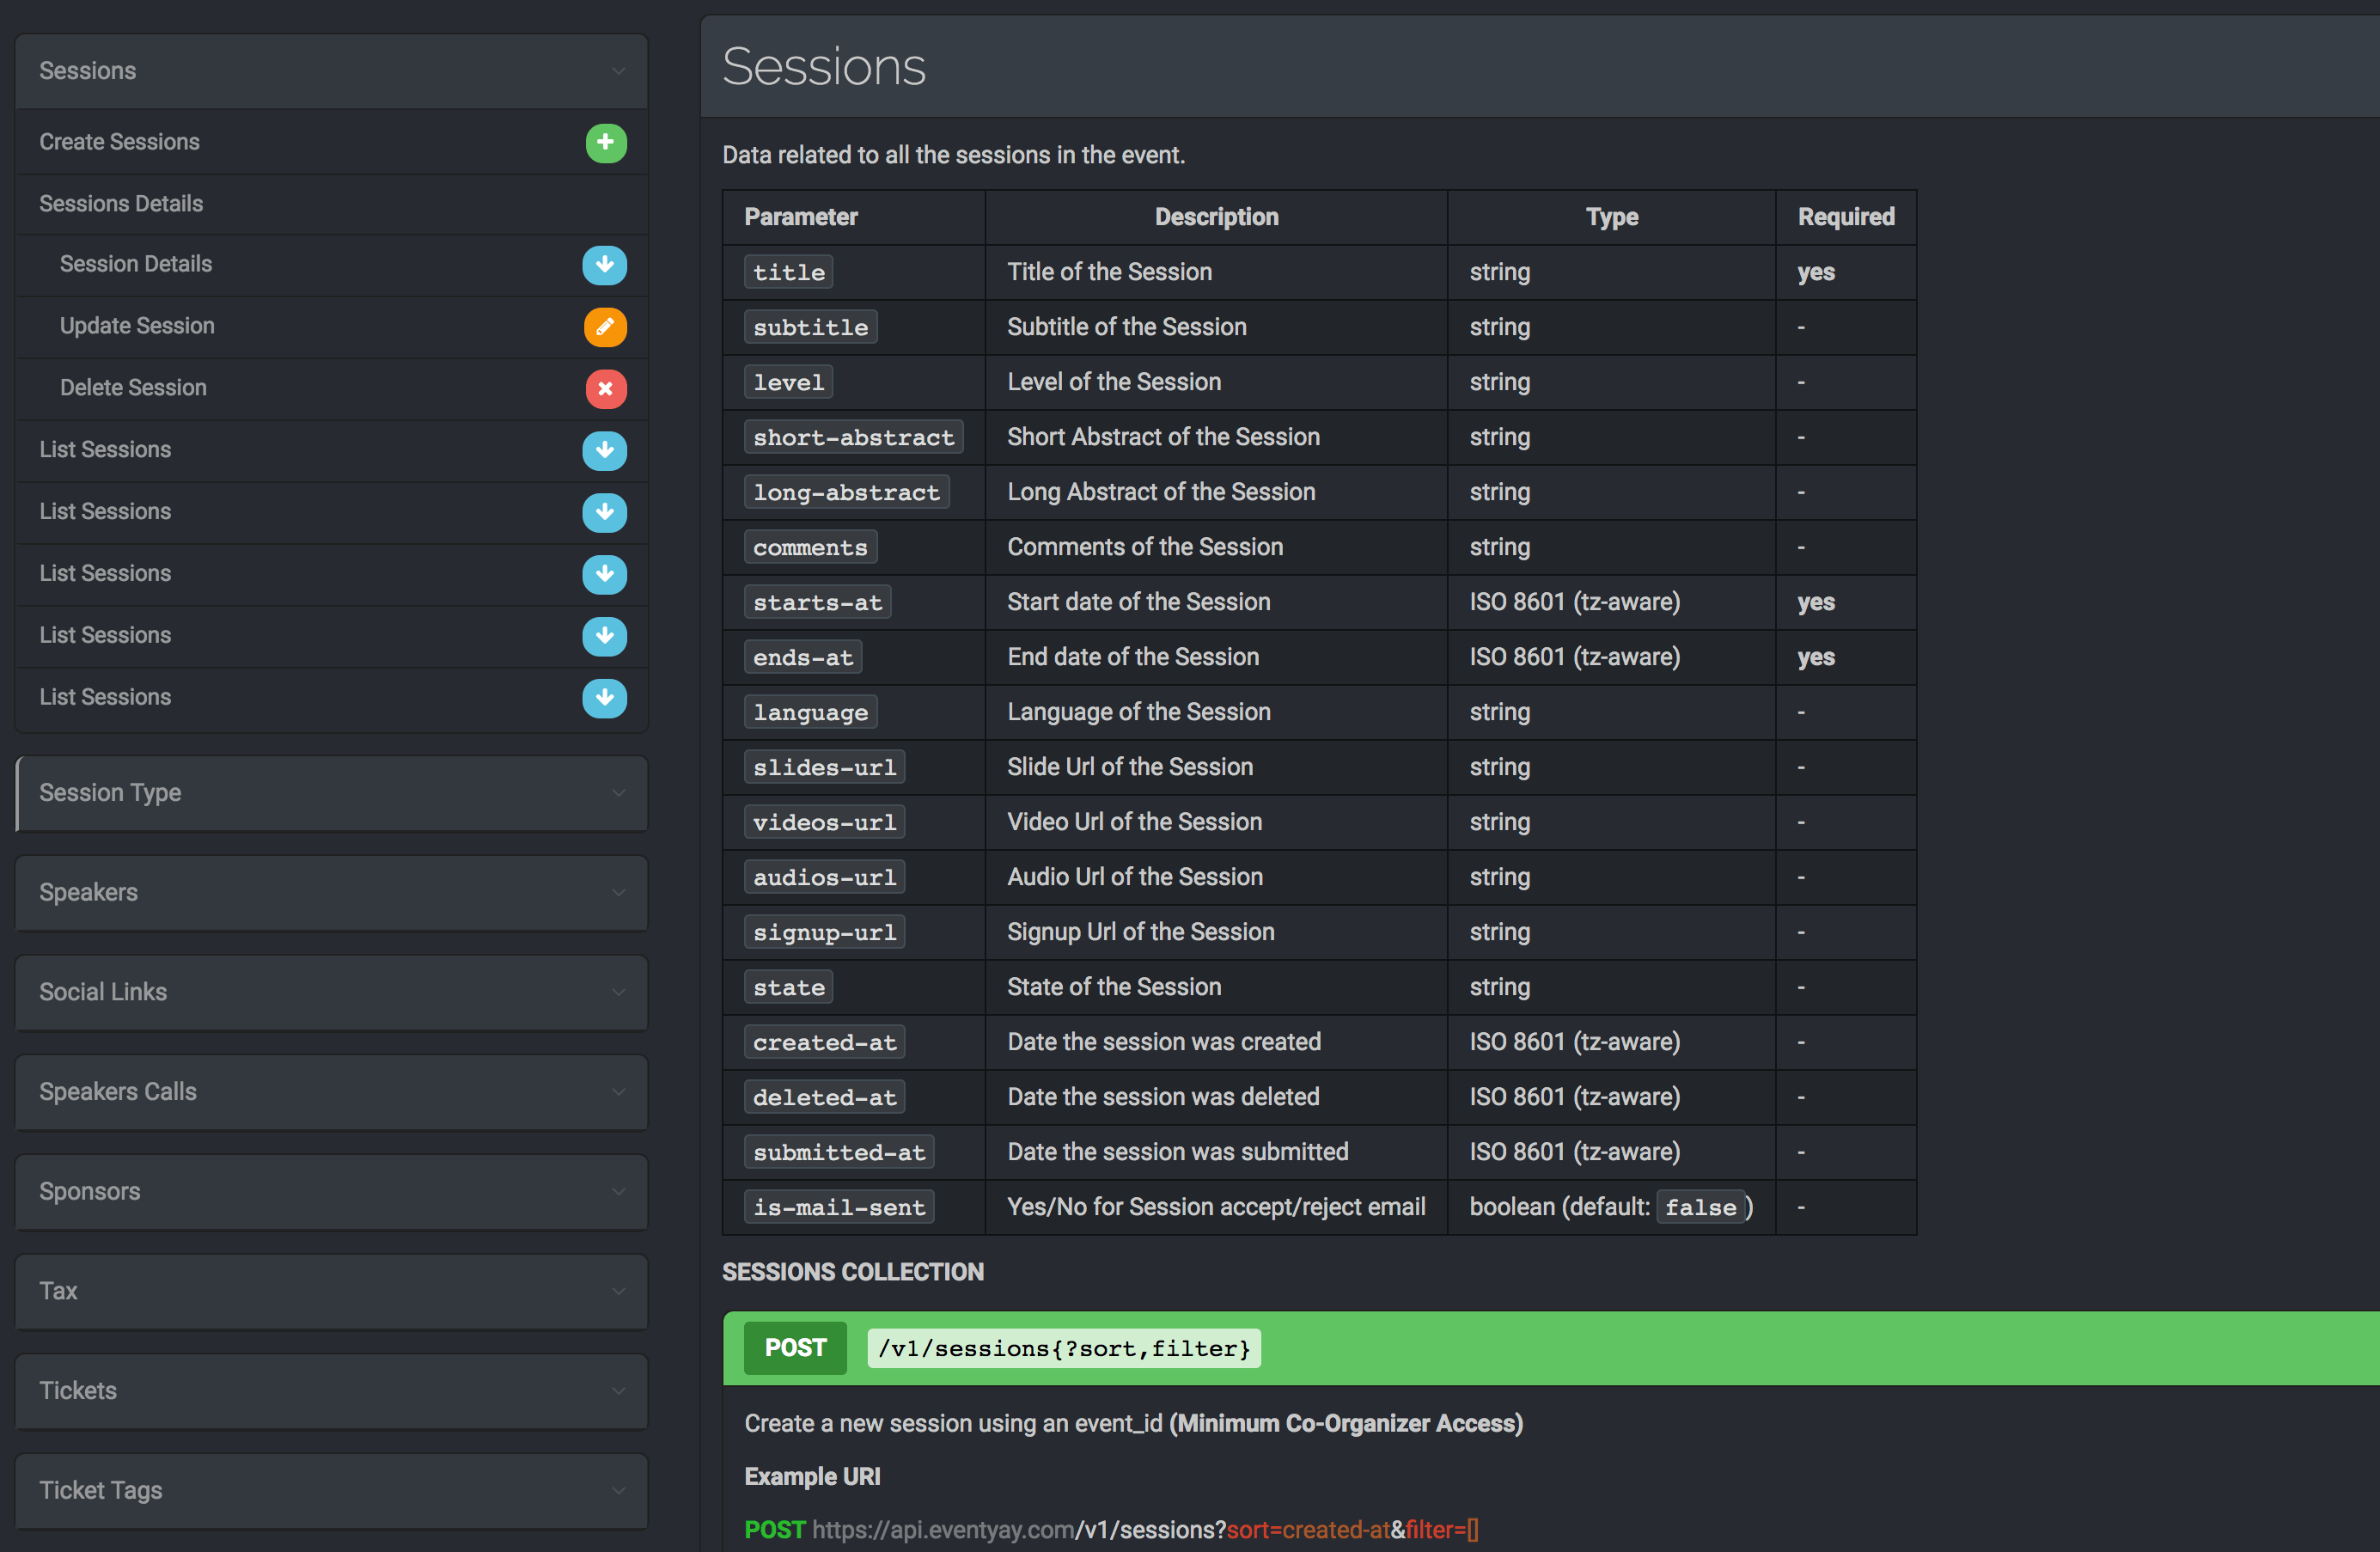
This blog article will illustrate how, with the help of SQLAlchemy, a last modified at column, with complete functionality can be added to the Open Event Server database. To illustrate the process, the blog article will discuss adding the column to the sessions api. Since last modified at is a time field, and will need to be updated each time user successfully updates the session, the logic to implement will be a slightly more complex than a mere addition of a column to the table.

The first obvious step will comprise of adding the column to the database table. To achieve the same, the column will have to be added to the model for the sessions table, as well as the schema.

In app/api/schema/sessions.py:

...
class SessionSchema(Schema):
   """
   Api schema for Session Model
   """
   ...
   last_modified_at = fields.DateTime(dump_only=True)
   ...

And in app/models/sessions.py:

import pytz
...

class Session(db.Model):
   """Session model class"""
   __tablename__ = 'sessions'
   __versioned__ = {
       'exclude': []
   }
   ...
   last_modified_at = db.Column(db.DateTime(timezone=True),   
   default=datetime.datetime.utcnow)
   def init(self, ..., last_modified_at=None))
     #inside init method
     ...
     self.last_modified_at = datetime.datetime.now(pytz.utc)
     ...

NOTE: The users for the open event organiser server will be operating in multiple time zones and hence it is important for all the times to be in sync, hence the open event database maintains all the time in UTC timezone (python’s pytz module takes care of converting user’s local time into UTC time while storing, thus unifying the timezones.) From this, it directly follows that the time needs to be timezone aware hence timezone=true is passed, while defining the column.

Next, while initialising an object of this class, the last modified time is the time of creation, and hence

datetime.now(pytz.utc) is set as the initial value which basically stores the current time in UTC timezone format.

Finally, the logic for updating the last modified at column every time any other value changes for a session record needs to be implemented. SQLAlchemy provides an inbuilt support for detecting update and insert events which have been used to achieve the goal. To quote the official SQLAlchemy Docs,  “SQLAlchemy includes an event API which publishes a wide variety of hooks into the internals of both SQLAlchemy Core and ORM.

@event.listens_for(Session, 'after_update')
def receive_after_update(mapper, connection, target):
  target.last_modified_at = datetime.datetime.now(pytz.utc)

The listens_for() decorator is used to register the event according to the arguments passed to it. In our case, it will register any event on the Session API (sessions table), whenever it updates.

The corresponding function defined below the decorator, receive_after_update(mapper, connection, target) is then called, and session model (table) is the the registered target with the event. It sets the value of the last_modified_at to the current time in the UTC timezone as expected.

Lastly, since the changes have been made to the database schema, the migration file needs to be generated, and the database will be upgraded to alter the structure.

The sequence of steps to be followed on the CLI will be

> python manage.py db migrate
> python manage.py db upgrade

Resources

Continue ReadingAdding a Last Modified At column in Open Event Server

Deployment terms in Open Event Frontend

In Open Event Frontend, once a pull request is opened, we see some tests running on for the specific pull request like ‘Codacy’, ‘Codecov’, ‘Travis’, etc. New contributors eventually get confused what the tests are about. So this blog would be a walkthrough to these terms that we use and what they mean about the PR.

Travis: Everytime you make a pull request, you will see this test running and in some time giving the output whether the test passed or failed. Travis is the continuous integration test that we are using to test that the changes that the pull request you proposed does not break any other things. Sometimes you will see the following message which indicates that your changes is breaking something else which is not intended.

Thus, by looking at the Travis logs, you can see where the changes proposed in the pull request are breaking things. Thus, you can go ahead and correct the code and push again to run the Travis build until it passes.

Codacy: Codacy is being used to check the code style, duplication, complexity and coverage, etc. When you create a pull request or update the pull request, this test runs which checks whether the code followed certain style guide or if there is duplication in code, etc. For instance let’s say if your code has a html page in which a tag has an attribute which is left undefined. Then codacy will be throwing error failing the tests. Thus you need to see the logs and go correct the bug in code. The following message shows that the codacy test has passed.

Codecov:

Codecov is a code coverage test which indicates how much of the code change that is proposed in the pull request is actually executed. Consider out of the 100 lines of code that you wrote, only 80 lines is being actually executed and rest is not, then the code coverage decreases. The following indicates the codecov report.

Thus, it can be seen that which files are affected by what percent.

Surge:

The surge link is nothing but the deployment link of the changes in your pull request.

Thus, checking the link manually, we can test the behavior of the app in terms of UI/UX or the other features that the pull request adds.

References:


Continue ReadingDeployment terms in Open Event Frontend

How the Form Mixin Enhances Validations in Open Event Frontend

This blog article will illustrate how the various validations come together in  Open Event Frontend, in a standard format, strongly reducing the code redundancy in declaring validations. Open Event Frontend, offers high flexibility in terms of validation options, and all are stored in a convenient object notation format as follows:

getValidationRules() {
return {
  inline : true,
  delay  : false,
  on     : 'blur',
  fields : {
    identification: {
      identifier : 'email',
      rules      : [
        {
          type   : 'empty',
          prompt : this.l10n.t('Please enter your email ID')
        },
        {
          type   : 'email',
          prompt : this.l10n.t('Please enter a valid email ID')
        }
      ]
    },
    password: {
      identifier : 'password',
      rules      : [
        {
          type   : 'empty',
          prompt : this.l10n.t('Please enter your password')
        }
      ]
    }
  }
};
}

Thus the validations of a form are stored as objects, where the  identifier attribute determines which field to apply the validation conditions to. The rules array contains all the rules to be applied to the determined object. Within rules, the type represents the kind of validation, whereas the prompt attribute determines what message shall be displayed in case there is a violation of the validation rule.


NOTE: In case an identifier is not specified, then the name of the rule object is itself considered as the identifier.

These validations are in turn implemented by the FormMixin. The various relevant sections of the mixin will be discussed in detail. Please check references for complete source code of the mixin.

getForm() {
return this.get($form);
}

The getForm function returns the calling component’s entire form object on which the validations are to be applied.

onValid(callback) {
this.getForm().form('validate form');
if (this.getForm().form('is valid')) {
  callback();
}
}

The onValid function serves as the boundary level function, and is used to specify what should happen when the validation is successful. It expects a function object as i’s argument. It makes use of the getForm() function to retrieve the form and using semantic UI, determines if all the validations have been successful. In case they have, it calls the callback method passed down to it as the argument.

Next transitioning into the actual implementation, certain behavioral traits of the validations are controlled by the two global variables autoScrollToErrors and autoScrollSpeed. The former is a boolean, which is set to true if the application is designed in such a way that once the user presses the submit button and a validation fails, the browser scrolls to the first field whose validation failed with a speed specified by the latter.

Next, comes the heart of the mixin. Since it needs to be continuously determined if a field’s validation has failed, the entire logic of checking is placed inside a debounce call which is supported by ember to continuously execute a function with a gap of a certain specified time (400 ms in this case). Since the validity can be checked only after all the fields have rendered, the debounce call is placed inside a didRender call. The didRender call ensures that any logic inside it is executed only after all the elements of the relevant component have been rendered and are a part of the DOM.

didRender() {
. . .
debounce(this, () => {
  const defaultFormRules = {
    onFailure: formErrors => {
      if (this.autoScrollToErrors) {
        // Scroll to the first error message
        if (formErrors.length > 0) {
          $('html,body').animate({
            scrollTop: this.$(`div:contains('${formErrors[0]}')`).offset().top
          }, this.autoScrollSpeed);
        }
      }
    }
  };
}, 400); . . .}


onFailure is an ES6 syntax function, which takes all the form errors as its arguments. And in case the autoScrollToErrors global variable is set to true, it checks if there are any errors or the length of the formErrors array is more than 0. In case there are errors, it makes a call to animate callback, and scrolls to the very first field which has an error with the speed defined by the previously discussed global autoScrollSpeed . The fact that the very first field is selected for scrolling off to, is ensured by the index 0 specified (formErrors[0]). Thus role of the mixin is to continuously check for any validations and in case there are, scroll to them.

Resources

Continue ReadingHow the Form Mixin Enhances Validations in Open Event Frontend

Structure of Open Event Frontend

In Open Event Frontend, new contributors always fall into a dilemma of identifying the proper files where they have to make changes if they want to contribute. The project structure is quite complex and which is obvious because it is a large project. So, in this blog, we will walk through the structure of Open Event Frontend.

Following are the different folders of the project explained:

Root:
The root of the project contains folders like app, config, kubernetes, tests, scripts. Our main project is in the app folder where all the files are present. The config folder in the root has files related to the deployment of the app in development, production, etc. It also has the environment setup such as host, api keys, etc. Other files such as package.json, bower.json, etc are basically to store the current versions of the packages and to ease the installation of the project.

App:
The app folder has all the files and is mainly classified into the following folder:
adapters
components
controllers
helpers
Initializers
mixins
models
routes
serializers
services
styles
templates
transforms
utils

The folders with their significance are listed below:

Adapters: This folder contains the files for building URLs for our endpoints. Sometimes it happens to have a somewhat customised URL for an endpoint which we pass through adapter to modify it.
Components: This folder contains different components which we reuse in our app. For example, the image uploader component can be used at multiple places in our app, so we keep such elements in our components. This folder basically contains the js files of all the components(since when we generate a component, a js file and a hbs template is generated).
Controllers: This folder contains the controller associated with each route. Since the main principle of ember js is DDAU i.e data down actions up, all the actions are written in the files of this folder.
Helpers: Many a time it happens that, we want to format date, time, encode URL etc. There are some predefined helpers but sometimes custom helpers are also needed. All of them have been written in helpers folder.
Initializers: This folder has a file for now called ‘blanket.js’ which basically injects the services into our routes, components. So if you want to write any service and want to inject it into routes/components, it should go in here.
Mixins: In EmberJS the Mixin class can create objects whose properties and functions can be shared amongst other classes and instances. This allows for an easy way to share behavior between objects as well as design objects that may need multiple inheritance. All of them used for the application are in the mixins folder.
Models: This folder contains the schema’s for our data. Since we are using ember data, we need to have proper skeleton of the data. All of this goes it this folder. Observing this folder will show you some models like user, event, etc.
Routes: This folder contains the js files of the routes created. Routes handle which template to render and what to return from the model, etc.
Serializers: We use serializers to modify the data that ember sends automatically in a request. Consider we want to get a user with the help of user model, and don’t want to get the password attribute present in it. We can thus omit that by defining it in a serializer.
Services: Services are the ember objects which are available throughout the running time of the application. These are used to perform tasks like getting current user model, making third party API calls etc. All such services go in this folder.
Styles: As the name infers, all the style sheets go in here.
Templates: A template is generated with generation of each route and component. All of them go here. Thus, the markup will be written over here.
Transforms: Ember Data has a feature called transforms that allow you to transform values before they are set on a model or sent back to the server. In our case, we have a transform called moment.
Utils: This folder contains some functions exported as modules which are reusable. There is some JSON data as well.

References: Ember JS official guide: https://guides.emberjs.com/v2.17.0/
Blog posts: https://spin.atomicobject.com/2015/09/17/ember-js-clean/
http://www.programwitherik.com/ember-pods/

Continue ReadingStructure of Open Event Frontend

The Road to Success in Google Summer of Code 2017

It’s the best time when GCI students can get the overview experience of GSoC and all the aspiring participant can get themselves into different projects of FOSSASIA.

I’m a Junior year undergraduate student pursuing B.Tech in Electrical Engineering from Indian Institute of Technology Patna. This summer, I spent coding in Google Summer of Code with FOSSASIA organization. It feels great to be an open-source enthusiast, and Google as a sponsor make it as icing on the cake. People can learn new things here and meet new people.

I came to know about GSoC through my senior colleagues who got selected in GSoC in the year 2016. It was around September 2016 and I was in 2nd year of my college. At that time, last year, result of GSoC was declared.

What is GSoC?

Consider GSoC as a big bowl which has lots of small balls and those small balls are open-source organizations. Google basically acts as a sponsor for the open-source organizations. A timeline is proposed according to the applied organization and then student select their favorite organization and start to contribute to it. Believe me, it’s not only computer science branch specific, anyone can take part in it and there is no minimum CPI requirement. I consider myself to be one of the examples who have an electrical branch with not so good academic performance yet successfully being part of GSoC 2017.

How to select an organization?

This is the most important step and it takes time. I wandered around 100 organizations to find where my interest actually lies. But now, I’ll describe how to sort this and find your organization a little quicker. Take a pen and paper (kindly don’t use notepad of pc) and write down your field of interest in computer science. Number every point in decreasing order of your interest. Then for each respective field write down its basic pre-requisites. Visit GSoC website, go to organization tab and there is a slide for searching working field of the organization. Select only one organization, dig out its website, see the previous project and its application. If nothing fits you, repeat the same with another organization. And if that organization interests you, then look for a project of that organization. First of all, look at that application of the project, and give that application a try and must give a feedback to the organization. Then try to find that what languages, modules, etc that project used to work and how the project works. Don’t worry if nothing goes into your mind. Find out the developers mailing list, their chat channel, their code base area. And ask developers out there for help.

First Love It:

Open-Source, it’s a different world which exists on Earth. All organizations are open-source and all their codes are open and free to view. Find things that interests you the most and start to love the work. If you don’t understand a code, learn things by doing and asking. Most of the times we don’t get favorable responses, in such times we need to carry on and have patience for the best to happen.

My Favourite part:

GSoC has been my dream since the day I came to know about it. It’s only through this that one gets a chance to explore open-source softwares, and organizations get a chance to hire on board developers. This is the great initiative taken by Google which brings hope for the developers to increase the use of open-source. This is one of the ways through which one can look into the codes of the developers and help them out and even also get helped.

GSoC is the platform through which one can implement lots of new things, meet new people, develop new softwares and see the world around in a different way. That’s what happened with me, it’s just at the end of the first phase, my love towards open-source increased exponentially. Now I see every problem in my life as a way to solve it through the open-source. Rather it’s part of arranging an event or designing an invitation, I am encouraged to use open-source tools to help me out. It becomes very easy to distribute data and convey information through open-source, so the people can reach to you much easier.

You always see a thing according to your perspective and it’s always the best but the open-source gives it a view through the perspective of the world and gets the best from them through a compilation of all the sources. One can give ideas, their views, find something that other can’t even see and increase its karma through contribution. And all these things have been made possible through GOOGLE only. I became such that I can donate the rest of my life working for open-source. GSoC is responsible for including the open-source contribution in my daily life. It made me feel really bad if my Github profile page has 0 contributions at the end of the day. Open Source opens door to another world.

Challenging part:

To conclude, I would say that GSoC made me love the challenge. I became such that the things that come easily to me don’t taste good to me at all. Specifically, GSoC’s most challenging part is to get into it that is to get selected. I still can’t believe that I was selected. Now onwards it’s just fun and learning. Each and every day, I encountered several issues, bugs, etc but just before going to bed at night, there were things which collectively made me feel that whether the bug has been solved or not, but I was able to break the upper most covering of that conch shell. And such things increases the motivation and light up the enthusiasm to tackle the problem. Open-Source not only taught me to control different snapshots of software but also of time. I learn to manage different works of day efficiently and it includes the contribution in open-source as part of my daily life.

Advice to students:

The only problem new developers have is to get started. I’ll advise them to close their eyes and dive into it without thinking whether they would be able to complete this task or not. Believe me, you will gradually find that whether the task is completed or not but you are much above the condition than you were at the time of beginning the task.

Just learn by doing the things.

Make mistakes and enlist them as “things that will not work” so one may read it and avoid it.

GSoC Project link: https://summerofcode.withgoogle.com/projects/#5560333780385792
Final Code Submission: https://gist.github.com/meets2tarun/270f151d539298831ce542be5f733c82

Continue ReadingThe Road to Success in Google Summer of Code 2017

FOSSASIA Summit 2018: “The Open Conversational Web” with Open Source AI

FOSSASIA teams up with Science Centre Singapore and Lifelong Learning Institute for Asia’s premier open technology summit. The FOSSASIA OpenTechSummit is taking place from March 22-25, 2018 under the tagline “The Open Conversational Web” with a strong focus on Artificial Intelligence and Cloud for the Industry 4.0. More than 200 speakers will fly in to present at the event. International exhibitors will showcase their latest advancements and meet developers in a careers fair.

The FOSSASIA Open Tech Summit is an annual tech event featuring tech icons from around the world since 2009. The event is all about the latest and greatest open source technologies and their impact and applications on business and society. With more than 3,000 attendees the FOSSASIA Summit is the biggest gathering of Open Source developers and businesses in Asia. A great feature of 2018 is the expanded exhibition space where tech businesses, SMEs and startups converge with developers and customers and meet potential candidates in a careers fair.

“The goal of the FOSSASIA Summit is to bring together developers, technologists and businesses to collaborate, share and explore the full potential of open source to create opportunities for new industries. And, right now there is a shift happening where users increasingly communicate through their voice with computer applications enhanced by Open Source AI technologies.“, says Ms. Hong Phuc Dang, chair of the summit and continues: “We expect to see interesting new voice gadgets to try out at the event. And, attendees will be able to learn how to develop solutions for these new voice interface devices here.”

Associate Professor Lim Tit Meng, CE of Science Centre adds: “Technologies like Big Data, AI and VR, and the web itself are becoming more open and conversational. They are also the engines behind the Industry 4.0 innovations. The open source community, with its spirit of co-creation and sharing is at the forefront of conversations on the web. At Science Centre Singapore, we aim to showcase and create content using these technologies and look forward to learning from and working with the open source community.”

The call for speakers is open and “we are seeing a large increase in proposals this year” says Mr. Mario Behling from the FOSSASIA Summit committee. Speakers are expected from companies such as car manufacturer Daimler, tech companies like Google, Microsoft, Oracle, Samsung, Intel and from many Singapore startups with topics ranging from algorithms and cognitive experts to DevOps, cloud containers, Blockchain and Neurotechnologies. Voice assistants and Open Source development solutions for SUSI.AI, Amazon Alexa, Google Assistant, Microsoft Cortana, Siri, and solutions using Nuance or IBM Watson are a big topic.

Tickets are available on the website 2018.fossasia.org.

The press representatives signup is here.

Links

Continue ReadingFOSSASIA Summit 2018: “The Open Conversational Web” with Open Source AI

What is Open Source and why you should do it?

Since Codeheat is going on and Google Code-in has started, I would like to share some knowledge with the new contributors with the help of this blog.

What is an Open Source software?

When googled, you will see:

“Open-source software is computer software with its source code made available with a license in which the copyright holder provides the rights to study, change, and distribute the software to anyone and for any purpose.”

To put it in layman terms, “A software whose source code is made available to everyone to let them change/improve provided that the contributor who changes the code cannot claim the software to be his own.”

Thus, you don’t own the software thoroughly. All you can do is change the code of the software to make it better. Now, you may be thinking what’s there in for you? There are all pros according to me and I have explained them in the latter half of this article.

Why am I writing this?

I was just in the freshman’s year of my college when I came to know about the web and how it works. I started my journey as a developer, building things, started doing some projects and keeping it with myself. Those days,  exploring more, I first came to know about the Open Source software.

Curiously, wanting to know more about the same, I got to know that anyone can make his/her software Open so as to make it available to others for use and development. Thus, learning more about the same led me to explore other’s projects on GitHub and I went through the codebases of the softwares and started contributing. I remember my first contribution was to correct a “typo” i.e correcting a spelling mistake in the README of the project. That said, I went on exploring more and more and got my hands on Open Source which made me share some of my thoughts with you.

What’s there in for you doing Open Source Contribution?

1) Teaches you how to structure code:

Now a days, nearly many of the software projects are Open Sourced and the community of developer works on the projects to constantly improve them. Thus, big projects have big codebases too which are really hard to understand at first but after giving some time to understand and contribute, you will be fine with those. The thing with such projects is they have a structured code, by “structured”, I mean to say there are strict guidelines for the project i.e they have good tests written which make you write the code as they want, i.e clean and readable. Thus, by writing such code, you will learn how to structure it which ultimately is a great habit that every developer should practice.

2) Team Work:

Creating and maintaining a large project requires team work. When you contribute to a project, you have to work in a team where you have to take others opinions, give your opinions, ask teammates for improvisations or ask anything whichever you are stuck with. Thus, working in team increases productivity, community interaction, your own network, etc.

3) Improves the developer you:

Okay, so I think, one of the most important part of your developer journey is and should be “LEARNING ALWAYS”. Thus, when you contribute, your code is reviewed by others (experts or maintainers of project) who eventually point out the mistakes or the improvisations to be done in the code so that the code can be written much cleaner than you had written. Also, you start to think a problem widely. While solving the problem, you ensure that the code you have written makes the app scalable for a large number of users, also prolonging the life of code.

4) Increases your Network:

One advantage of Open Source contribution is that it also increases your network in the developer community. Thus, you get to know about the things that you have never heard of, you get to explore them, you get to meet people, you get to know what is going in what parts of the world, etc. Having connections with other developers sitting in different countries is always a bonus.

5) Earn some bucks too:

At the end of the day, money matters. Earlier days, people used to think that contributing to Open Source projects won’t earn you money, etc. But if you are a maintainer or a continuous contributor of a great project, you get donations to get continuing the project and making it available to people.

For students in college, doing Open Source is a bonus. There are programmes like:

These programmes offer high incentives and stipends to the fellow students. FOSSASIA participates in GSoC so you can go ahead and try getting in GSoC under FOSSASIA.

6) Plus point for job seekers:

When it comes to applying for job, if you have a good Open Source profile, the recruiter finds a reason to take you out and offer you an interview since you already know how to “manage a project”, “work in team”, “get work done”, “solve a problem efficiently”, etc. Now a days, many companies mention on their job application page as “Open Source would be a bonus”.

7) Where can you start:

We have many projects at FOSSASIA to start with. There are no restrictions on the language since we have projects available for most of the languages.

Currently, we are having a couple of programs open at FOSSASIA. They are:

Feel free to check out the programs and the projects under FOSSASIA at https://github.com/fossasia.

Conclusion

So, yeah. This was it. Hope you understood what Open Source is and how would it benefit you. Keep contributing to FOSSASIA and you will see the effects in no time.

Continue ReadingWhat is Open Source and why you should do it?
Read more about the article Setting up SUSI Desktop Locally for Development and Using Webview Tag and Adding Event Listeners
SUSI Desktop

Setting up SUSI Desktop Locally for Development and Using Webview Tag and Adding Event Listeners

SUSI Desktop is a cross platform desktop application based on electron which presently uses chat.susi.ai as a submodule and allows the users to interact with susi right from their desktop.

Any electron app essentially comprises of the following components

    • Main Process (Managing windows and other interactions with the operating system)
    • Renderer Process (Manage the view inside the BrowserWindow)

Steps to setup development environment

      • Clone the repo locally.
$ git clone https://github.com/fossasia/susi_desktop.git
$ cd susi_desktop
      • Install the dependencies listed in package.json file.
$ npm install
      • Start the app using the start script.
$ npm start

Structure of the project

The project was restructured to ensure that the working environment of the Main and Renderer processes are separate which makes the codebase easier to read and debug, this is how the current project is structured.

The root directory of the project contains another directory ‘app’ which contains our electron application. Then we have a package.json which contains the information about the project and the modules required for building the project and then there are other github helper files.

Inside the app directory-

  • Main – Files for managing the main process of the app
  • Renderer – Files for managing the renderer process of the app
  • Resources – Icons for the app and the tray/media files
  • Webview Tag

    Display external web content in an isolated frame and process, this is used to load chat.susi.ai in a BrowserWindow as

    <webview src="https://chat.susi.ai/"></webview>
    

    Adding event listeners to the app

    Various electron APIs were used to give a native feel to the application.

  • Send focus to the window WebContents on focussing the app window.
  • win.on('focus', () => {
    	win.webContents.send('focus');
    });
    
  • Display the window only once the DOM has completely loaded.
  • const page = mainWindow.webContents;
    ...
    page.on('dom-ready', () => {
    	mainWindow.show();
    });
    
  • Display the window on ‘ready-to-show’ event
  • win.once('ready-to-show', () => {
    	win.show();
    });
    

    Resources

    1. A quick article to understand electron’s main and renderer process by Cameron Nokes at Medium link
    2. Official documentation about the webview tag at https://electron.atom.io/docs/api/webview-tag/
    3. Read more about electron processes at https://electronjs.org/docs/glossary#process
    4. SUSI Desktop repository at https://github.com/fossasia/susi_desktop.

    Continue ReadingSetting up SUSI Desktop Locally for Development and Using Webview Tag and Adding Event Listeners

    Creating a Notification in Open Event Android App

    It is a good practice to show user a notification for alerts and have their attention for important events they want to remember. Open Event Android app shows notifications for the actions like bookmarks, upcoming events etc. In this blog we learn how to create similar kind of alert notification.


    Displaying notification after bookmarking a track

    NotificationCompat is available as part of the Android Support Library, so the first step is opening your project’s module-level build.gradle file and adding the support library to the dependencies section. First we initialize the notification manager with the context of application so a user can see notification irrespective of where it is in app.

    NotificationManager mManager = (NotificationManager) this.getApplicationContext().getSystemService(NOTIFICATION_SERVICE);
    int id = intent.getIntExtra(ConstantStrings.SESSION, 0);
    String session_date;
    Session session = realmRepo.getSessionSync(id);

    We then get the info we want to display in the notification from the intent. While adding an action to your notification is optional, the reality is that the vast majority of applications add actions to their notifications. We define a notification action using a PendingIntent. In this instance, we update our basic notification with a PendingIntent.

    Intent intent1 = new Intent(this.getApplicationContext(), SessionDetailActivity.class);
    intent1.putExtra(ConstantStrings.SESSION, session.getTitle());
    intent1.putExtra(ConstantStrings.ID, session.getId());
    intent1.putExtra(ConstantStrings.TRACK,session.getTrack().getName());
    PendingIntent pendingNotificationIntent = PendingIntent.getActivity(this.getApplicationContext(), 0, intent1, PendingIntent.FLAG_UPDATE_CURRENT);
    Bitmap largeIcon = BitmapFactory.decodeResource(getResources(), R.mipmap.ic_launcher);

    We also test the condition for the OS version to display the marker image, see image 1 for reference. The minimum requirement for a notification are:

    • An icon: Create the image you want to use and then add it to you project’s ‘drawable’ folder. Here notification shows bookmark option
    • Title text. You can set a notification’s title either by referencing a string resource, or by adding the text to your notification directly.
    • Detail text. This is the most important part of your notification, so this text must include everything the user needs to understand exactly what they’re being notified about.
    int smallIcon = R.drawable.ic_bookmark_white_24dp;
    if (Build.VERSION.SDK_INT < Build.VERSION_CODES.LOLLIPOP) smallIcon = R.drawable.ic_noti_bookmark;
    
    String session_timings = String.format("%s - %s",
           DateConverter.formatDateWithDefault(DateConverter.FORMAT_12H, session.getStartsAt()),
           DateConverter.formatDateWithDefault(DateConverter.FORMAT_12H, session.getEndsAt()));
    session_date = DateConverter.formatDateWithDefault(DateConverter.FORMAT_DATE_COMPLETE, session.getStartsAt());

    Finally we build notification using notification builder having various options to set text style, small icons, big icon etc., see the complete class here,

    NotificationCompat.Builder mBuilder = new NotificationCompat.Builder(this)
           .setSmallIcon(smallIcon)
           .setLargeIcon(largeIcon)
           .setContentTitle(session.getTitle())
           .setContentText(session_date + "\n" + session_timings)
           .setAutoCancel(true)
           .setStyle(new NotificationCompat.BigTextStyle().bigText(session_date + "\n" + session_timings))
           .setContentIntent(pendingNotificationIntent);
    intent1.addFlags(Intent.FLAG_ACTIVITY_SINGLE_TOP | Intent.FLAG_ACTIVITY_CLEAR_TOP);
    
    mBuilder.setSound(RingtoneManager.getDefaultUri(RingtoneManager.TYPE_NOTIFICATION));
    mManager.notify(session.getId(), mBuilder.build());

    References

    Continue ReadingCreating a Notification in Open Event Android App

    Open Event Server: Creating/Rebuilding Elasticsearch Index From Existing Data In a PostgreSQL DB Using Python

    The Elasticsearch instance in the current Open Event Server deployment is currently just used to store the events and search through it due to limited resources.

    The project uses a PostgreSQL database, this blog will focus on setting up a job to create the events index if it does not exist. If the indices exists, the job will delete all the previous the data and rebuild the events index.

    Although the project uses Flask framework, the job will be in pure python so that it can run in background properly while the application continues its work. Celery is used for queueing up the aforementioned jobs. For building the job the first step would be to connect to our database:

    from config import Config
    import psycopg2
    conn = psycopg2.connect(Config.SQLALCHEMY_DATABASE_URI)
    cur = conn.cursor()


    The next step would be to fetch all the events from the database. We will only be indexing certain attributes of the event which will be useful in search. Rest of them are not stored in the index. The code given below will fetch us a collection of tuples containing the attributes mentioned in the code:

    cur.execute(
           "SELECT id, name, description, searchable_location_name, organizer_name, organizer_description FROM events WHERE state = 'published' and deleted_at is NULL ;")
       events = cur.fetchall()


    We will be using the the bulk API, which is significantly fast as compared to adding an event one by one via the API. Elasticsearch-py, the official python client for elasticsearch provides the necessary functionality to work with the bulk API of elasticsearch. The helpers present in the client enable us to use generator expressions to insert the data via the bulk API. The generator expression for events will be as follows:

    event_data = ({'_type': 'event',
                      '_index': 'events',
                      '_id': event_[0],
                      'name': event_[1],
                      'description': event_[2] or None,
                      'searchable_location_name': event_[3] or None,
                      'organizer_name': event_[4] or None,
                      'organizer_description': event_[5] or None}
                     for event_ in events)


    We will now delete the events index if it exists. The the event index will be recreated. The generator expression obtained above will be passed to the bulk API helper and the event index will repopulated. The complete code for the function will now be as follows:


    @celery.task(name='rebuild.events.elasticsearch')
    def cron_rebuild_events_elasticsearch():
       """
       Re-inserts all eligible events into elasticsearch
       :return:
       """
       conn = psycopg2.connect(Config.SQLALCHEMY_DATABASE_URI)
       cur = conn.cursor()
       cur.execute(
           "SELECT id, name, description, searchable_location_name, organizer_name, organizer_description FROM events WHERE state = 'published' and deleted_at is NULL ;")
       events = cur.fetchall()
       event_data = ({'_type': 'event',
                      '_index': 'events',
                      '_id': event_[0],
                      'name': event_[1],
                      'description': event_[2] or None,
                      'searchable_location_name': event_[3] or None,
                      'organizer_name': event_[4] or None,
                      'organizer_description': event_[5] or None}
                     for event_ in events)
       es_store.indices.delete('events')
       es_store.indices.create('events')
       abc = helpers.bulk(es_store, event_data)


    Currently we run this job on each week and also on each new deployment. Rebuilding the index is very important as some records may not be indexed when the continuous sync is taking place.

    To know more about it please visit https://gocardless.com/blog/syncing-postgres-to-elasticsearch-lessons-learned/

    Related links:

    Continue ReadingOpen Event Server: Creating/Rebuilding Elasticsearch Index From Existing Data In a PostgreSQL DB Using Python