Creating Activity for Visualizing Recorded Sensor Data from List Items

In previous blog Using RealmRecyclerView Adapter to Show Recorded Sensor Experiments[2], I  have created a DataLoggerActivity in PSLab Android app containing RecyclerView showing a list having all the recorded experiments where every list item shows the date, time and the sensor instrument used for recording the data, but there arises below questions:-

  • What if the user wants to see the actual recorded data in form of a graph?
  • How the user can see the location recorded along with the data on the map?
  • How can the user export that data?

There is no way I could show all of that information just on a list item so I created another activity called “SensorGraphViewActivity” the layout of that activity is shown in the figure below:

Figure 1 shows the layout of the Activity as produced in Android editor

The layout contains three views:-

  1. At the top there is graph view which I created using Android MP chart which will show the recorded data plotted on it forming the exact same curve that was created while recording it, this way it is useful to visualize the data and also there is also a play button on the top which simulates the data as it was being plotted on the graph in real time.
  2. In the middle, there is a Card view containing two rows which will simply show the date and time of recording.
  3. At the bottom, there is a Map view which shows the location of the user which would be fetched when the user recorded the data.

This is the gist of the layout file created for the activity.

But now the question arises:-

How to show the data in the activity for the item that the user wanted?

For that, I implemented click listener on every list item by simply adding it inside the onBindViewHolder() method

@Override
public void onBindViewHolder(@NonNull final ViewHolder holder, int position) {
   SensorLogged temp = getItem(position);
   holder.sensor.setText(temp.getSensor());
   Date date = new Date(temp.getDateTimeStart());
   holder.dateTime.setText(String.valueOf(sdf.format(date)));
   holder.cardView.setOnClickListener(new View.OnClickListener() {
       @Override
       public void onClick(View view) {
                    ...
       });
}

and inside the click listener I performed following three steps:-

  1. First I stored the position of the item clicked inside a variable.

    int positionVar = holder.getAdapterPosition();
  2. Then I used that position from the variable to fetch related data from the Realm database by simply using getItem() method which returns the SensorLogged[1] RealmObject at that position as I used a special type of RecyclerView Adapter called as RealmRecyclerViewAdapter[2].

    int positionVar = holder.getAdapterPosition();
  3. Then I created an Intent to open the SensorGraphViewActivity and passed the related data (i.e., sensortype, foreignkey, latitude, longitude, timezone, date, time) from SensorLogged[1] object to activity in form of extras.
    Intent intent = new Intent(context, SensorGraphViewActivity.class);
    intent.putExtra(SensorGraphViewActivity.TYPE_SENSOR, item.getSensor());
    intent.putExtra(SensorGraphViewActivity.DATA_FOREIGN_KEY, item.getUniqueRef());
    intent.putExtra(SensorGraphViewActivity.DATE_TIME_START,item.getDateTimeStart());
    intent.putExtra(SensorGraphViewActivity.DATE_TIME_END,item.getDateTimeEnd());
    intent.putExtra(SensorGraphViewActivity.TIME_ZONE,item.getTimeZone());
    intent.putExtra(SensorGraphViewActivity.LATITUDE,item.getLatitude());
    intent.putExtra(SensorGraphViewActivity.LONGITUDE,item.getLongitude());
    
    context.startActivity(intent);
    

And, in the SensorGraphViewActivity, I used getIntent() method to fetch all those extra data in the form of Bundle.
For showing the data in the graph I used the foreign key fetched from the intent and queried all the LuxData[1] RealmObject containing that foreignkey in the form of RealmResult<LuxData>[2] ArrayList and used that list to populate the graph.

Long foreignKey = intent.getLongExtra(DATA_FOREIGN_KEY, -1);
Realm realm = Realm.getDefaultInstance();
entries = new ArrayList<>();
RealmResults<LuxData> results = realm.where(LuxData.class).equalTo(DATA_FOREIGN_KEY, foreignKey).findAll();
for (LuxData item : results) {
   entries.add(new Entry((float) item.getTimeElapsed(), item.getLux()));
}

For the map, I fetched the latitude and longitude again from the intent and used the coordinates to show the location on the open street view map.

Thread thread = new Thread(new Runnable() {
   @Override
   public void run() {
       IMapController mapController = map.getController();
       mapController.setZoom((double) 9);
       GeoPoint startPoint = new GeoPoint(latitude, latitude);
       mapController.setCenter(startPoint);
   }
});

For map purposes, of course, I used a separate thread as it is a heavy and time-consuming process and it could lead the app to lag for a long time which could hamper the User Experience.

Thus after the data being plotted on the map and coordinated being plotted on the map, we can see the layout of the activity as shown in Figure 2.

Figure 2 shows the layout of the activity after being populated with data.

I also created the export button in the toolbar that will use the CSVLogger[3] class implemented inside the PSLab android app to export the data in the form of CSV file and save it in the external storage directory.

Resources

  1. Storing Recorded Sensor Data in Realm Database – My blog where I created the Realm Model classes to store recorded data.
  2. Using RealmRecyclerView Adapter to Show Recorded Sensor Experiments – My previous blog where I created the RecyclerView.
  3. Saving Sensor Data in CSV format – Blog by Padmal storing the data in CSV format.
Continue ReadingCreating Activity for Visualizing Recorded Sensor Data from List Items

Getting Image location in the Phimpme Android’s Camera

The Phimpme Android app along with a decent gallery and accounts section comes with a nice camera section stuffed with all the features which a user requires for the day to day usage. It comes with an Auto mode for the best experience and also with a manual mode for the users who like to have some tweaks in the camera according to their own liking. Along with all these, it also has an option to get the accurate coordinates where the image was clicked. When we enable the location from the settings, it extracts the latitude and longitude of the image when it is being clicked and displays the visible region of the map at the top of the image info section as depicted in the screenshot below.

In this tutorial, I will be discussing how we have implemented the location functionality to fetch the location of the image in the Phimpme app.

Step 1

For getting the location from the device, the first step we need is to add the permission in the androidmanifest.xml file to access the GPS and the location services. This can be done using the following lines of code below.

<uses-permission android:name="android.permission.ACCESS_COARSE_LOCATION"/>

After this, we need to download install the google play services SDK to access the Google location API. Follow the official google developer’s guide on how to install the Google play services into the project from the resources section below.

Step 2

To get the last known location of the device at the time of clicking the picture we need to make use of the FusedLocationProviderClient class and need to create an object of this class and to initialise it in the onCreate method of the camera activity. This can be done using the following lines of code below:

private FusedLocationProviderClient mFusedLocationClient;
mFusedLocationClient = LocationServices.getFusedLocationProviderClient(this);

After we have created and initialised the object mFusedLocationClient, we need to call the getLastLocation method on it as soon as the user clicks on the take picture button in the camera. In this, we can also set onSuccessListener method which will return the Location object when it successfully extracts the present or the last known location of the device. This can be done using the following lines of code below:

mFusedLocationClient.getLastLocation()
       .addOnSuccessListener(this, new OnSuccessListener<Location>() {
           @Override
           public void onSuccess(Location location) {
               if (location != null) {
            //Get the latitude and longitude here
                  }

After this, we can successfully extract the latitude and the longitude of the device in the onSuccess method of the code snippet provided below and can store it in the shared preference to get the map view of the coordinates from a different activity of the application later on when the user tries to get the info of the images.

Step 3

After getting the latitude and longitude, we need to get the image view of the visible region of the map. We can make use of the Glide library to fetch the visible map area from the url which contains our location values and to set it to the image view.

The url of the visible map can be generated using the following lines of code.

String.format(Locale.US, getUrl(value), location.getLatitude(), location.getLongitude());

This is how we have added the functionality to fetch the coordinates of the device at the time of clicking the image and to display the map in the Phimpme Android application. To get the full source code, please refer to the Phimpme Android GitHub repository.

Resources

  1. Google Developer’s : Location services guide – https://developer.android.com/training/location/retrieve-current.html
  2. Google Developer’s : Google play services SDK guide – https://developer.android.com/studio/intro/update.html#channels
  3. GitHub : Open camera Source Code –  https://github.com/almalence/OpenCamera
  4. GitHub : Phimpme Android – https://github.com/fossasia/phimpme-android/
  5. GitHub : Glide library – https://github.com/bumptech/glide


Continue ReadingGetting Image location in the Phimpme Android’s Camera

Use of ViewPager in Phimpme

Previously GalleryView was used in phimpme android app but as it is now deprecated, I decided to use ViewPager instead of GalleryView.

ViewPager allows us to view data with a horizontal swipe with the help of layoutManager.

Steps to implement the viewPager:

  1. First, add the ViewPager in Activity.xml file where you want to implement the ViewPager. This can be done using the line of code below:
<android.support.v4.view.ViewPager
             android:id="@+id/view_pager"
                android:layout_width="match_parent"
               android:layout_height="match_parent">

</android.support.v4.view.ViewPager>
  1.  To display the content of viewPager we use the viewPagerAdapter. Create new java file ViewPagerAdapter and extends it to PagerAdapter.

ViewPagerAdapter.java

public class ViewPagerAdapter extends PagerAdapter {
}
  1. After extending to PagerAdaper we have to override the two basic methods of PagerAdapter.

First, implement the constructor which helps us to provide the context of activity to ViewPagerAdapter.

You can override by pressing Alt+enter combination, click on “implement methods” and then selects these two methods.

It will implement two methods  

  • getCount()
  • isViewFromObject()

getCount will return the number of items in view pager.

  1. Now we override the few methods which are required to inflate and destroy view in viewPager.

First,

Override the instantiateItem() method it creates the page for given position.

@Override

public Object instantiateItem(ViewGroup container, int position) {
 return super.instantiateItem(container, position);
}

Now we will modify this method to inflate the view for viewPager.

As we want to display imageView in viewPager first we have to inflate the imageView and set Image according to the position of ViewPager.

Next steps,

  • Implement the customView for imageView.
  • And provide the data for  ViewPager i.e Array of images.

Create new custom_layout.xml and add ImageView in it.

<ImageView

   android:layout_width="match_parent"

   android:id="@+id/image_view"

   android:layout_height="match_parent" />

And create an array for images if you want to show images from the local memory so collect path of the images which you want to show with the array name Images.

Now we will use custom_layout layout in our ViewPager instantiateItem() method.

@Override

public Object instantiateItem(ViewGroup container, int position) {

   LayoutInflater layoutInflater = (LayoutInflater)  context.getSystemService(Context.LAYOUT_INFLATER_SERVICE);

   View view=  layoutInflater.inflate(R.layout.custom_view,null);

   ImageView imageView = (ImageView)view.findViewById(R.id.image_view);

   imageView.setBackgroundResource(images[position]);

   container.addView(view,0);

   return view;

}

The above code inflates the imageView in ViewPager.

Now we have to override destroyItem() method.  This method will destroy the content of viewPager from given position.

The below code will remove the view which we added in instantiateItem() method.

@Override

public void destroyItem(ViewGroup container, int position, Object object) {
  container.removeView((View) object);
}

Now PagerAdapter is ready, we can use this in our Activity.

  1. Reference the viewPager and set the ViewPagerAdapter to ViewPager.

Activity.java

@Override

protected void onCreate(Bundle savedInstanceState) {

   super.onCreate(savedInstanceState);

   setContentView(R.layout.activity_main);

   ViewPager viewPager = (ViewPager) findViewById(R.id.view_pager);

   viewPager.setAdapter(new ViewPagerAdapter(this));

}

The above code will set the pagerAdapter to our viewPager and display the content which we defined in instantiateItem() method of pagerAdapter.


This is how viewPager will allow viewing images by swiping horizontally in Phimpme.

Resources:

https://developer.android.com/reference/android/support/v4/view/PagerAdapter.html

https://github.com/fossasia/phimpme-android/pull/407/files

Continue ReadingUse of ViewPager in Phimpme

Autocomplete Address Form using Google Map API

Google map is one of the most widely used API of Google as most of the websites use Google map for showing address location. For a static address it’s pretty simple. All you need to do is mention the address and the map will show the nearest location. Problem arrives when the address is dynamically putted by the user. Suppose for an event in event organizer server, one enters the location. The main component used while taking input location is Google Autocomplete. But we went a step further and parsed the entire address based on city, state, country, etc. and allowed user to input the details as well which gave them the nearest location marked in Map if autocomplete couldn’t find the address.

Autocomplete Location

Screenshot from 2016-07-27 06:52:37

As we can see, in the above input box we get suggestions by Google Map on entering first few letters of our address. To this, we need the API https://maps.googleapis.com/maps/api/js?key=YOUR_API_KEY&libraries=places&callback=initMap. You can find an example code of how to do this here.

After this is done, what we wanted is not to just include this address, but to provide a form to fill up the entire address in case some parts were missing on this address. The function that the autocomplete listens to is “place_changed” . So once we click on one of the options, this event is triggered. Once the event is triggered, we use the autocomplete.getPlace() to get the complete address json. The json looks something like this:

Screenshot from 2016-07-27 07:04:49

Now what we do is we create a form with input fields having the id same as the ones we require(e.g., country, administrative_area_level_1, locality, etc.). After that we select the long_name or the short_name from this json and put the value in the corresponding input field with the ids. The code for the process after getting the json is elaborated here.

Editing Address Form

After doing this it looks something like this:
Screenshot from 2016-07-27 07:12:13

However, now the important part is to show the map according to this fields. Also, every time we update a field, the map should be updated. For this we use a hack. Instead of removing the initial location field completely, we hide the field but keep the binding to autocomplete intact. As a result the map is shown when we select a particular address.

Now when we update the fields in the address form, we append the value of this field to the value in the initial location field. Though the field is hidden but it is still bound to autocomplete. As a result as soon as we append something to the string contained in the field, the map gets updated. Also, the updated value gets stored to the DB. Thus, with every update in field, the pointer is moved to the nearest location formed by appending all the data from the form.

After saving the location data to DB, if we wish to edit it, we can get back the json by making the same request with the location value. And then we will get back the same address form and the map accordingly.

Finally it looks something like this:

Screenshot from 2016-07-27 07:19:56

Continue ReadingAutocomplete Address Form using Google Map API

Adding Notifications, Volunteer Shifts and DB Export in Engelsystem

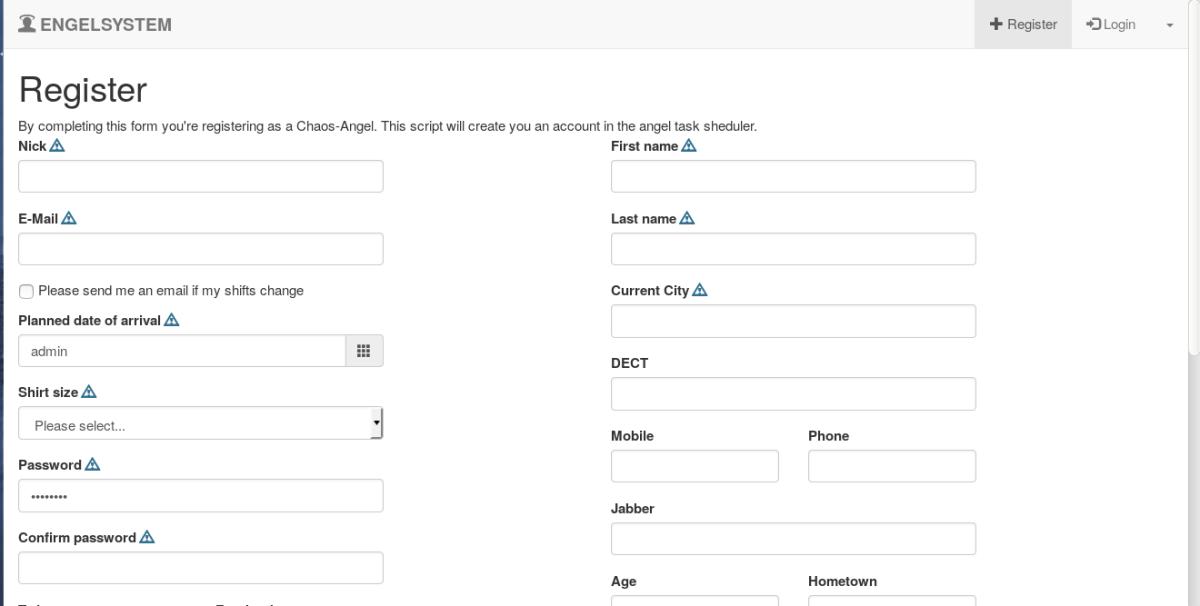
Admin can change the display message in registration form

The present system doesn’t allow to change the display message in register form. When the system is used for different events it would be useful if the admin is able to change the display message in registration form . I have added feature were admin can change the display message

settings page

By changing the message in the message box admin can change the display message.Now the message looks like this.

register page

Implementation of changing display message.

Adding display_msg field to User Table so that the display_msg can be accessed through the database any where through the code and can be changed easily

ALTER TABLE `User` 
   ADD `display_msg` varchar(255) DEFAULT "By completing this form you're registering as a Chaos-Angel. This script will create you an account in the angel task scheduler.";

Next step is to update the field whenever it is changed by admin

sql_query("UPDATE `User` SET `display_msg`='" . sql_escape($display_message) . "' WHERE  `UID`='" . sql_escape($user['UID']) . "'");

Copy/ Duplicate function for creating new shifts from existing shifts

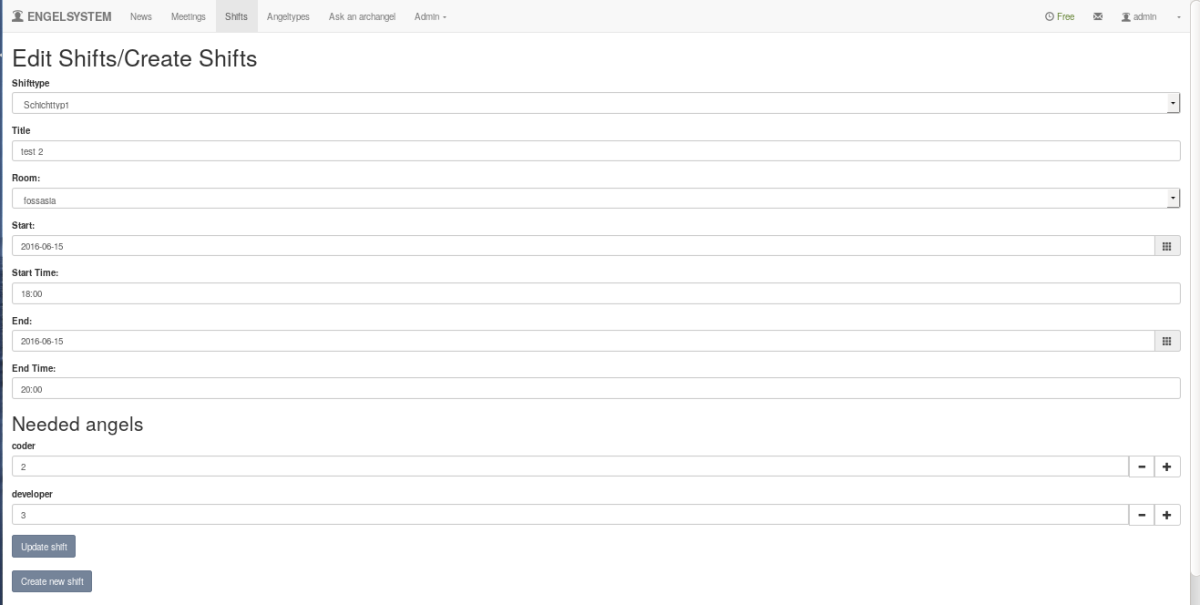
The present system doesn’t allow admin to edit an existing shift and create a new shift from the existing data of already created shifts . I have created a copy shift option where admin can edit the shift and create a new shift

create new shifts

In this page admin can create new shift or update the existing shift . Admin can change the date , time , no of angels etc as admin used to create shifts.

Implementation of copy shifts function

Once the admin selects create new shifts button , we need to use the same data so we need to store the values in variables. once admin selects the option we need to do all the error handling and create new shifts .

    if (isset($_REQUEST['shifttype_id'])) {
      $shifttype = ShiftType($_REQUEST['shifttype_id']);
      if ($shifttype === false)
        engelsystem_error('Unable to load shift type.');
      if ($shifttype == null) {
        $ok = false;
        error(_('Please select a shift type.'));
      } else
        $shifttype_id = $_REQUEST['shifttype_id'];
    } else {
      $ok = false;
      error(_('Please select a shift type.'));
    }
    
    $title = strip_request_item('title');
    // check for errors
    if (isset($_REQUEST['rid']) && preg_match("/^[0-9]+$/", 
    $_REQUEST['rid']) && isset($room_array[$_REQUEST['rid']]))
      $rid = $_REQUEST['rid'];
    else {
      $ok = false;
      $rid = $rooms[0]['RID'];
      error(_('Please select a location.'));
    }
    
    if (isset($_REQUEST['start']) && $tmp = 
    DateTime::createFromFormat("Y-m-d", trim($_REQUEST['start'])))
      $start = $tmp->getTimestamp();
    else {
      $ok = false;
      error(_('Please select a start date.'));
    }
    
    if (isset($_REQUEST['end']) && 
    $tmp = DateTime::createFromFormat("Y-m-d", trim($_REQUEST['end'])))
      $end = $tmp->getTimestamp();
    else {
      $ok = false;
      error(_('Please select an end date.'));
    }

    if (isset($_REQUEST['start_time']) &&
  $tmp = DateTime::createFromFormat("H:i", trim($_REQUEST['start_time'])))
      $start_time = $tmp->getTimestamp();
    else {
      $ok = false;
      error(_('Please select an start time.'));
    }

    if (isset($_REQUEST['end_time']) && 
    $tmp = DateTime::createFromFormat("H:i", trim($_REQUEST['end_time'])))
      $end_time = $tmp->getTimestamp();
    else {
      $ok = false;
      error(_('Please select an end time.'));
    }
    
    if (strtotime($_REQUEST['start']) > strtotime($_REQUEST['end'])) {
      $ok = false;
      error(_('The shifts end has to be after its start.'));
    }
    if (strtotime($_REQUEST['start']) == strtotime($_REQUEST['end'])) {
      if (strtotime($_REQUEST['start_time']) > 
                                     strtotime($_REQUEST['end_time'])) {
        $ok = false;
        error(_('The shifts end time  has to be after its start time.'));
      }
    }
    if (strtotime($_REQUEST['start']) == strtotime($_REQUEST['end'])) {
      if (strtotime($_REQUEST['start_time']) == 
                                 strtotime($_REQUEST['end_time'])) {
        $ok = false;
        error(_('The shifts start and end at same time.'));
      }
    }
    $angelmode = 'manually';
    foreach ($types as $type) {
      if (isset($_REQUEST['type_' . $type['id']]) && 
      preg_match("/^[0-9]+$/", trim($_REQUEST['type_' . $type['id']]))) {
        $needed_angel_types[$type['id']] = 
                       trim($_REQUEST['type_' . $type['id']]);
      } else {
        $ok = false;
        error(sprintf(_('Please check the needed angels for team %s.'), 
                                              $type['name']));
      }
    }
    if (array_sum($needed_angel_types) == 0) {
      $ok = false;
      error(_('There are 0 angels needed. 
                         Please enter the amounts of needed angels.'));
    }
    if (isset($_REQUEST['back']))
      $ok = false;

    if ($ok) {
      $shifts = array();
      $start = DateTime::createFromFormat("Y-m-d H:i",
                    date("Y-m-d", $start) . date("H:i", $start_time));
      $start = $start->getTimestamp();
      $end = DateTime::createFromFormat("Y-m-d H:i", 
                        date("Y-m-d", $end) . date("H:i", $end_time));
      $end = $end->getTimestamp();  
      $shifts[] = array(
          'start' => $start,
          'end' => $end,
          'RID' => $rid,
          'title' => $title,
          'shifttype_id' => $shifttype_id   
        );
      $shifts_table = array();
      foreach ($shifts as $shift) {
      $shifts_table_entry = [
          'timeslot' => '<span class="glyphicon glyphicon-time"></span> ' . 
date("Y-m-d H:i", $shift['start']) . ' - ' . date("H:i", $shift['end']) . 
'<br />' . Room_name_render(Room($shift['RID'])),
          'title' => ShiftType_name_render(ShiftType($shifttype_id)) . 
           ($shift['title'] ? '<br />' . $shift['title'] : ''),
            'needed_angels' => '' 
        ];
        foreach ($types as $type)
          if (isset($needed_angel_types[$type['id']]) 
          && $needed_angel_types[$type['id']] > 0)
            $shifts_table_entry['needed_angels'] .= '<b>' . 
AngelType_name_render($type) . ':</b> ' . $needed_angel_types[$type['id']]. '<br />';
        
        $shifts_table[] = $shifts_table_entry;
      }

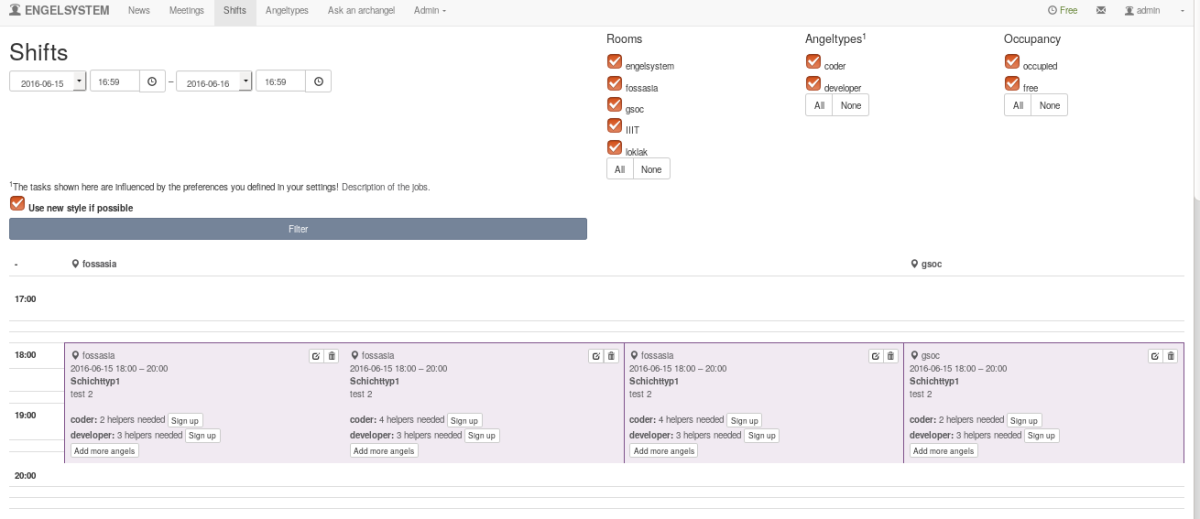
Display shifts in map view .

Map view makes the user/admin easy to view the shifts and easy to sign-up for shifts.Initially was not able to view the shifts but now the shifts can be viewed in both map view and normal view

shifts view

Implementation of map view .

Map view is very nice way of representing events with dates on Y – axis and rooms on X-axis. We need to make blocks and map the key

$_SESSION['user_shifts'][$key] = array_map('get_ids_from_array', $$key);

Here we map the ids and keys and then we need to print the keys against the id’s

Exporting database of user

In a system like this . It would be better if we could get all the user data who want to volunteer so that they can be contacted for other events also.

export database

Here is the code which can be useful for exporting database of any mysql database

function export_xls(){
// filename
$xls_filename = 'export_'.date('Y-m-d').'.xls'; // Define Excel (.xls) file name
// selecting the table user
$sql = "SELECT * FROM `User`";
//enter your mysql root password here
$Connect = @mysql_connect("localhost", "root", "") or die("Failed to connect to MySQL.You need to enter the password:<br />" . mysql_error() . "<br />" . mysql_errno());
// Select database
$Db = @mysql_select_db($databasename, $Connect) or die("Failed to select database:<br />" . mysql_error(). "<br />" . mysql_errno());
// Execute query
$result = @mysql_query($sql,$Connect) or die("Failed to execute query:<br />" . mysql_error(). "<br />" . mysql_errno());

// Header info settings
header("Content-Type: application/xls");
header("Content-Disposition: attachment; filename=$xls_filename");
header("Pragma: no-cache");
header("Expires: 0");
 
// Define separator (defines columns in excel &amp; tabs in word)
$separator = "\t";
 
// Start of printing column names as names of MySQL fields
for ($i = 0 ; $i < mysql_num_fields($result) ; $i++) {
  echo mysql_field_name($result, $i) . "\t";
}
print("\n");
 
// Start while loop to get data
while($row = mysql_fetch_row($result))
{
  $schema= "";
  for( $j=0 ; $j < mysql_num_fields($result) ; $j++)
  {
    
    if(!isset($row[$j])) {
      $schema .= "NULL".$separator;
    }
    elseif ($row[$j] != "") {
      $schema .= "$row[$j]".$separator;
    }
    else {
      $schema .= "".$separator;
    }
  }
  $schema = str_replace($seperator."$", "", $schema);
  $schema = preg_replace("/\r\n|\n\r|\n|\r/", " ", $schema);
  $schema.= "\t";
  print(trim($schema));
  print "\n";
}
}

Coding standards

Coding standards are a set of guidelines, best practices, programming styles and conventions that developers adhere to when writing source code for a project. All big software companies have them.

For our system we use drupal coding standards.

Development: https://github.com/fossasia/engelsystem

Issues/Bugs:Issues

Continue ReadingAdding Notifications, Volunteer Shifts and DB Export in Engelsystem