Automatically deploy SUSI Web Chat on surge after Travis passes

We are using surge from the very beginning of this SUSI web chat and SUSI skill cms projects development. We used surge for provide preview links for Pull requests. Surge is really easy tool to use. We can deploy our static web pages really easily and quickly.  But If user had to change something in pull request user has to deploy again in surge and update the link. If we can connect this operation with travis ci we can minimise re-works. We can embed the deploying commands inside the travis.yml.

We can tell travis to make a preview link (surge deployment) if test cases are passed by embedding the surge deployment commands inside the travis.yml like below.

This is travis.yml file

sudo: required
dist: trusty
language: node_js
node_js:
 - 6
script:
 - npm test
after_success:
 - bash ./surge_deploy.sh
 - bash ./deploy.sh
cache:
 directories:
   - node_modules
branches:
 only:
   - master

Surge deployment commands are inside the “surge_deploy.sh” file.
In that we have to check the status of the pull request whether it is passing test cases or not. We can do it like below.

if [ "$TRAVIS_PULL_REQUEST" == "false" ]; then
   echo "Not a PR. Skipping surge deployment"
   exit 0
fi

Then we have to install surge in the environment. Then after install all npm packages and run build.

npm i -g surge
npm install
npm run build

Since there is a issue with displaying moving to child routes we have to take a copy of index.html file and name it as a 404.html.

cp ./build/index.html ./build/404.html

Then make two environment variables for your surge email address and surge token

export SURGE_LOGIN=fossasiasusichat@example.com
# surge Token (run ‘surge token’ to get token)
export SURGE_TOKEN=d1c28a7a75967cc2b4c852cca0d12206

Now we have to make the surge deployment URL (Domain). It should be unique so we made a URL that contains pull request number.

export DEPLOY_DOMAIN=https://pr-${TRAVIS_PULL_REQUEST}-susi-web-chat.surge.sh
surge --project ./build/ --domain $DEPLOY_DOMAIN;

Since all our static contents which made after the build process are in “build” folder we have to tell surge to get static html files from that.
Now make a pull request. you would find the deployment link in travis ci report after travis passed.

Expand the output of the surge_deploy.sh

You will find the deployment link as we defined in the surge_deploy.sh file

References:

  • Integrating with travis ci – https://surge.sh/help/integrating-with-travis-ci
  • React Routes to Deploy 404 page on gh-pages and surge – https://blog.fossasia.org/react-routes-to-deploy-404-page-on-gh-pages-and-surge/
Continue ReadingAutomatically deploy SUSI Web Chat on surge after Travis passes

Improving Loklak apps site

In this blog I will be describing some of the recent improvements made to the Loklak apps site. A new utility script has been added to automatically update the loklak app wall after a new app has been made. Invalid app query in app details page has been handled gracefully.

A proper message is shown when a user enters an invalid app name in the url of the details page. Tests has been added for details page.

Developing updatewall script

This is a small utility script to update Loklak wall in order to expose a newly created app or update an existing app. Before moving into the working of this script let us discuss how Loklak apps site tracks all the apps and their details. In the root of the project there is a file names apps.json. This file contains an aggregation of all the app.json files present in the individual apps. Now when the site is loaded, index.html loads the Javascript code present in app_list.js. This app_list.js file makes an ajax call to root apps.json files, loads all the app details in a list and attaches this list to the AngularJS scope variable. After this the app wall consisting of various app details is rendered using html. So whenever a new app is created, in order to expose the app on the wall, the developer needs to copy the contents of the application’s app.json and paste it in the root apps.json file. This is quite tedious on the part of the developer as for making a new app he will first have to know how the site works which is not all directly related to his development work. Next, whenever he updates the app.json of his app, he needs to again update apps.json file with the new data.

This newly added script (updatewall) automates this entire process. After creating a new app all that the developer needs to do is run this script from within his app directory and the app wall will be updated automatically.

Now, let us move into the working of this script. The basic workflow of the updatewall script can be described as follows. The script loads the json data present in the app.json file of the app under consideration. Next it loads the json data present in the root apps.json file.

if __name__ == '__main__':

    #open file containg json object
    json_list_file = open(PATH_TO_ROOT_JSON, 'r')

    #load json object
    json_list = json.load(json_list_file,  object_pairs_hook=OrderedDict)
    json_list_file.close()

    app_json_file = open(PATH_TO_APP_JSON, 'r')
    app_json = json.load(app_json_file,  object_pairs_hook=OrderedDict)
    app_json_file.close()

    #method to update Loklak app wall
    expose_app(json_list, app_json)

When we are loading the json data we are using object_pairs_hook in order to load the data into an OrderedDict rather than a normal python dictionary. We are doing this so that the order of the dictionary items are maintained. Once the data is loaded we invoke the expose method.

def expose_app(json_list, app_json):
    #if app is already present in list then fetch that app
    app = getAppIfPesent(json_list, app_json)

    #if app is not present then add a new entry
    if app == None:
        json_list['apps'].append(app_json)
        update_list_file(json_list)
        print colors.BOLD + colors.OKGREEN + 'App exposed on app wall' + colors.ENDC

    #else update the existing app entry
    else:
        for key in app_json:
            app[key] = app_json[key]
        update_list_file(json_list)
        print colors.BOLD + colors.OKGREEN + 'App updated on app wall' + colors.ENDC

The apps.json file contain a key called apps. This value of this key is a list of json objects, each object being the json data of an individual app’s app.json file. In the above function we iterate over all the json objects present in the list. If we are unable to find a json object whose name value is same as that of the newly created app then we simply append the new app’s app.json object to that list. However if we find an object containing the same name value as that of the newly created app, then we simply update its properties. In short, if the app is a new one, its data gets added to apps.json otherwise the corresponding app data is updated.

Handling invalid app names in the URL of details page

The url of the app details page takes the app name as parameter. If any user wants to see the store listing of an app then he has to use the following url.

https://apps.loklak.org/details.html?q=<app_name>

Here app name is a url parameter used to load the store listing information. Now if anyone enters an invalid app name, that is an app which does not exists, then a proper error message has to be shown to the user. This can be done by checking whether the given app name is present in the root apps.json file or not. If not present if simply set a flag so that the error message can be conditionally rendered.

$scope.getSelectedApp = function() {
        for (var i = 0; i < $scope.apps.length; i++) {
            if ($scope.apps[i].name === $scope.appName) {
                $scope.selectedApp = $scope.apps[i];
                $scope.found = true;
                $("nav").show();
                break;
            }
        }
        if ($scope.found == false) {
            $scope.notFound = true;
        }
    }

In the above snippet if the app is not found then we set notFound to true. This causes the error message to appear on the page.

<div ng-if="notFound" class="not-found">
        <span class="brand-and-image">
          <img src="images/loklak_icon.png">
          <span class="loklak-brand"> <span class="loklak-header">
            loklak </span> <span>apps</span>
          </span>
        </span>
        <span class="error-404">
          Error: Requested app not found
        </span>
        <span class="go-back">
          <a href="/"> Go Back to Home Page >> </a>
        </span>
      </div>

The code renders the error message if notFound is set to true.

Writing tests for store listing page

Almost the entire content of the store listing is loaded dynamically by Javascript logic. So it is very important to write tests for store listing page. Protractor framework has been used to write automated browser test. The tests make sure that for a given app, the content of the middle section is loaded correctly.

it("should have basic information", function() {
    expect(element(by.css(".app-name")).getText()).toEqual("MultiLinePlotter");
    expect(element(by.css(".app-headline")).getText()).toEqual("App to plot tweet aggregations and statistics");
    expect(element(by.css(".author")).getText()).toEqual("by Deepjyoti Mondal");
    expect(element(by.css(".short-desc")).getText()).toEqual("An applicaton to visually compare tweet statistics");
  });

The above tests make sure that the top section is loaded properly. Next we check that getting started section and app use section are not empty.

it("main content should not be empty", function() {
    expect(element(by.css(".get-started-md")).getText()).not.toBe("");
    expect(element(by.css(".app-use-md")).getText()).not.toBe("");
  });

Apart from these, two more tests are performed to check the behaviour of the side bar menu items on click event and the functionality of the Try now button.

Future roadmap

There is still a lot of scope for the site’s improvement and enhancement. Some of the features which can be implemented next are given below.

  • Add more tests to make the site stable and add tests to travis build.
  • Make the apps independent. Work on this has already been started and can be viewed here – issue, PR
  • Optimise the site for mobile using services workers and caching (making a progressive web app).
  • Add a splash screen and home screen icon for mobile.

Important resources

Continue ReadingImproving Loklak apps site

Using Protractor for UI Tests in Angular JS for Loklak Apps Site

Loklak apps site’s home page and app details page have sections where data is dynamically loaded from external javascript and json files. Data is fetched from json files using angular js, processed and then rendered to the corresponding views by controllers. Any erroneous modification to the controller functions might cause discrepancies in the frontend. Since Loklak apps is a frontend project, any bug in the home page or details page will lead to poor UI/UX. How do we deal with this? One way is to write unit tests for the various controller functions and check their behaviours. Now how do we test the behaviours of the site. Most of the controller functions render something on the view. One thing we can do is simulate the various browser actions and test site against known, accepted behaviours with Protractor.

What is Protractor

Protractor is end to end test framework for Angular and AngularJS apps. It runs tests against our app running in browser as if a real user is interacting with our browser. It uses browser specific drivers to interact with our web application as any user would.

Using Protractor to write tests for Loklak apps site

First we need to install Protractor and its dependencies. Let us begin by creating an empty json file in the project directory using the following command.

echo {} > package.json

Next we will have to install Protractor.

The above command installs protractor and webdriver-manager. After this we need to get the necessary binaries to set up our selenium server. This can be done using the following.

./node_modules/protractor/bin/webdriver-manager update
./node_modules/protractor/bin/webdriver-manager start

Let us tidy up things a bit. We will include these commands in package.json file under scripts section so that we can shorten our commands.

Given below is the current state of package.json

{
    "scripts": {
        "start": "./node_modules/http-server/bin/http-server",
        "update-driver": "./node_modules/protractor/bin/webdriver-manager update",
        "start-driver": "./node_modules/protractor/bin/webdriver-manager start",
        "test": "./node_modules/protractor/bin/protractor conf.js"
    },
    "dependencies": {
        "http-server": "^0.10.0",
        "protractor": "^5.1.2"
    }
}

The package.json file currently holds our dependencies and scripts. It contains command for starting development server, updating webdriver and starting webdriver (mentioned just before this) and command to run test.

Next we need to include a configuration file for protractor. The configuration file should contain the test framework to be used, the address at which selenium is running and path to specs file.

// conf.js
exports.config = {
    framework: "jasmine",
    seleniumAddress: "http://localhost:4444/wd/hub",
    specs: ["tests/home-spec.js"]
};

We have set the framework as jasmine and selenium address as http://localhost:4444/wd/hub. Next we need to define our actual file. But before writing tests we need to find out what are the things that we need to test. We will mostly be testing dynamic content loaded by Javascript files. Let us define a spec. A spec is a collection of tests. We will start by testing the category name. Initially when the page loads it should be equal to All apps. Next we test the top right hand side menu which is loaded by javascript using topmenu.json file.

it("should have a category name", function() {
    expect(element(by.id("categoryName")).getText()).toEqual("All apps");
  });

  it("should have top menu", function() {
    let list = element.all(by.css(".topmenu li a"));
    expect(list.count()).toBe(5);
  });

As mentioned earlier, we are using jasmine framework for writing our specs. In the above code snippet ‘it’ describes a particular test. It takes a test description and a callback function thereby providing a very efficient way to document our tests white write the test code itself. In the first test we use expect function to check whether the category name is equal to All apps or not. Here we select the div containing the category name by its id.

Next we write a test for top menu. There should be five menu options in total for the top menu. We select all the list items that are supposed to contain the top menu items and check whether the number of such items are five or not using expect function. As it can be seen from the snippet, the process of selecting a node is almost similar to that of Jquery library.

Next we test the left hand side category list. This list is loaded by AngularJS controller from apps,json file. We should make sure the list is loaded properly and all the options are present.

it("should have a category list", function() {
    let categoryIds = ["All", "Scraper", "Search", "Visualizer", "LoklakLibraries", "InternetOfThings", "Misc"];
    let categoryNames = ["All", "Scraper", "Search", "Visualizer", "Loklak Libraries", "Internet Of Things", "Misc"];

    expect(element(by.css("#catTitle")).getText()).toBe("Categories");

    let categoryList = element.all(by.css(".category-main"));
    expect(categoryList.count()).toBe(7);

    categoryIds.forEach(function(id, index) {
      element(by.css("#" + id)).isPresent().then(function(present) {
        expect(present).toBe(true);
      });

      element(by.css("#" + id)).getText().then(function(text) {
        expect(text).toBe(categoryNames[index]);
      });
    });
  });

At first we maintain two lists of category id and category names. We begin by confirming that Category title is equal to Categories. Next we get the list of categories and iterate over them, For each category we check whether the corresponding id is present in the DOM or not. After confirming this, we match the names of the categories with the expected names. Elements.all function allows us to get a list of selected nodes.

Finally we check the click functionality of the left side menu. Expected behaviour is, on clicking a menu item, the category name should get replaced with the selected category name. For this we need to simulate the click event. Protractor allows us to do it very easily using click function.

it("category list should respond to click", function() {
    let categoryIds = ["All", "Scraper", "Search", "Visualizer", "LoklakLibraries", "InternetOfThings", "Misc"];
    let categoryNames = ["All apps", "Scraper", "Search", "Visualizer", "Loklak Libraries", "Internet Of Things", "Misc"];

    categoryIds.forEach(function(id, index) {
      element(by.id(categoryIds[index])).click().then(function() {
        browser.getCurrentUrl().then(function(url) {
          expect(url).toBe("http://127.0.0.1:8080/#/" + categoryIds[index]);
        });
        element(by.id("categoryName")).getText().then(function(text) {
          expect(text).toBe(categoryNames[index]);
        });
      });
    });
  });


Once again we maintain two lists, category id and category names. We obtain the present list of categories and iterate over them. For each category link we simulate a click event. For each click event we check two values. We check the new browser URL which should now contain the category id. Next we check the value of category name. It should be equal to the category selected.
FInally after all the tests are over we get the final report on our terminal.
In order to run the tests, use the following command.

npm test

This will start executing the tests.

Important resources

Continue ReadingUsing Protractor for UI Tests in Angular JS for Loklak Apps Site

Preparing for Automatic Publishing of Android Apps in Play Store

I spent this week searching through libraries and services which provide a way to publish built apks directly through API so that the repositories for Android apps can trigger publishing automatically after each push on master branch. The projects to be auto-deployed are:

I had eyes on fastlane for a couple of months and it came out to be the best solution for the task. The tool not only allows publishing of APK files, but also Play Store listings, screenshots, and changelogs. And that is only a subset of its capabilities bundled in a subservice supply.

There is a process before getting started to use this service, which I will go through step by step in this blog. The process is also outlined in the README of the supply project.

Enabling API Access

The first step in the process is to enable API access in your Play Store Developer account if you haven’t done so. For that, you have to open the Play Dev Console and go to Settings > Developer Account > API access.

If this is the first time you are opening it, you’ll be presented with a confirmation dialog detailing about the ramifications of the action and if you agree to do so. Read carefully about the terms and click accept if you agree with them. Once you do, you’ll be presented with a setting panel like this:

Creating Service Account

As you can see there is no registered service account here and we need to create one. So, click on CREATE SERVICE ACCOUNT button and this dialog will pop up giving you the instructions on how to do so:

So, open the highlighted link in the new tab and Google API Console will open up, which will look something like this:

Click on Create Service Account and fill in these details:

Account Name: Any name you want

Role: Project > Service Account Actor

And then, select Furnish a new private key and select JSON. Click CREATE.

A new JSON key will be created and downloaded on your device. Keep this secret as anyone with access to it can at least change play store listings of your apps if not upload new apps in place of existing ones (as they are protected by signing keys).

Granting Access

Now return to the Play Console tab (we were there in Figure 2 at the start of Creating Service Account), and click done as you have created the Service Account now. And you should see the created service account listed like this:

Now click on grant access, choose Release Manager from Role dropdown, and select these PERMISSIONS:

Of course you don’t want the fastlane API to access financial data or manage orders. Other than that it is up to you on what to allow or disallow. Same choice with expiry date as we have left it to never expire. Click on ADD USER and you’ll see the Release Manager created in the user list like below:

Now you are ready to use the fastlane service, or any other release management service for that matter.

Using fastlane

Install fastlane by

sudo gem install fastlane

Go to your project folder and run

fastlane supply init

First it will ask the location of the private key JSON file you downloaded, and then the package name of the application you are trying to initialize fastlane for.

Then it will create metadata folder with listing information excluding the images. So you’ll have to download and place the images manually for the first time

After modifying the listing, images or APK, run the command:

fastlane supply run

That’s it. Your app along with the store listing has been updated!

This is a very brief introduction to the capabilities of the supply service. All interactive options can be supplied via command line arguments, certain parts of the metadata can be omitted and alpha beta management along with release rollout can be done in steps! Make sure to check out the links below:

Continue ReadingPreparing for Automatic Publishing of Android Apps in Play Store

Writing Selenium Tests for Checking Bookmark Feature and Search functionality in Open Event Webapp

We integrated Selenium Testing in the Open Event Webapp and are in full swing in writing tests to check the major features of the webapp. Tests help us to fix the issues/bugs which have been solved earlier but keep on resurging when some new changes are incorporated in the repo. I describe the major features that we are testing in this.

Bookmark Feature
The first major feature that we want to test is the bookmark feature. It allows the users to mark a session they are interested in and view them all at once with a single click on the starred button. We want to ensure that the feature is working on all the pages.

Let us discuss the design of the test. First, we start with tracks page. We select few sessions (2 here) for test and note down their session_ids. Finding an element by its id is simple in Selenium can be done easily. After we find the session element, we then find the mark button inside it (with the help of its class name) and click on it to mark the session. After that, we click on the starred button to display only the marked sessions and proceed to count the number of visible elements on the page. If the number of visible session elements comes out to be 2 (the ones that we marked), it means that the feature is working. If the number deviates, it indicates that something is wrong and the test fails.
82080522-21e8-403d-9906-3b4f420720b9.png

Here is a part of the code implementing the above logic. The whole code can be seen here

// Returns the number of visible session elements on the tracks page
TrackPage.getNoOfVisibleSessionElems = function() {
 return this.findAll(By.className('room-filter')).then(this.getElemsDisplayStatus).then(function(displayArr) {
   return displayArr.reduce(function(counter, value) { return value == 1 ? counter + 1 : counter; }, 0);
 });
};
// Bookmark the sessions, scrolls down the page and then count the number of visible session elements
TrackPage.checkIsolatedBookmark = function() {
 // Sample sessions having ids of 3014 and 3015 being checked for the bookmark feature
 var sessionIdsArr = ['3014', '3015'];
 var self = this;
 return  self.toggleSessionBookmark(sessionIdsArr).then(self.toggleStarredButton.bind(self)).then(function() {
   return self.driver.executeScript('window.scrollTo(0, 400)').then(self.getNoOfVisibleSessionElems.bind(self));
 });
};

Here is the excerpt of code which matches the actual number of visible session elements to the expected number. You can view the whole test script here

//Test for checking the bookmark feature on the tracks page
it('Checking the bookmark toggle', function(done) {
 trackPage.checkIsolatedBookmark().then(function(num) {
   assert.equal(num, 2);
   done();
 }).catch(function(err) {
   done(err);
 });
});

Now, we want to test this feature on the other pages: schedule and rooms page. We can simply follow the same approach as done on the tracks page but it is time expensive. Checking the visibility of all the sessions elements present on the page takes quite some time due to a large number of sessions. We need to think of a different approach.We had already marked two elements on the tracks page. We then go to the schedule page and click on the starred mode. We calculate the current height of the page. We then unmark a session and then recalculate the height of the page again. If the bookmark feature is working, then the height should decrease. This determines the correctness of the test. We follow the same approach on the rooms pages too. While this is not absolutely correct, it is a good way to check the feature. We have already employed the perfect method on the tracks page so there was no need of applying it on the schedule and the rooms page since it would have increased the time of the testing by a quite large margin.

Here is an excerpt of the code. The whole work can be viewed here

RoomPage.checkIsolatedBookmark = function() {
 // We go into starred mode and unmark sessions having id 3015 which was marked previously on tracks pages. If the bookmark feature works, then length of the web page would decrease. Return true if that happens. False otherwise
 var getPageHeight = 'return document.body.scrollHeight';
 var sessionIdsArr = ['3015'];
 var self = this;
 var oldHeight, newHeight;
 return self.toggleStarredButton().then(function() {
   return self.driver.executeScript(getPageHeight).then(function(height) {
     oldHeight = height;
     return self.toggleSessionBookmark(sessionIdsArr).then(function() {
       return self.driver.executeScript(getPageHeight).then(function(height) {
         newHeight = height;
         return oldHeight > newHeight;
       });
     });
   });
 });
};

Search Feature
Now, let us go to the testing of the search feature in the webapp. The main object of focus is the Search bar. It is present on all the pages: tracks, rooms, schedule, and speakers page and allows the user to search for a particular session or a speaker and instantly fetches the result as he/she types.

We want to ensure that this feature works across all the pages. Tracks, Rooms and Schedule pages are similar in a way that they display all the session of the event albeit in a different manner. Any query made on any one of these pages should fetch the same number of session elements on the other pages too. The speaker page contains mostly information about the speakers only. So, we make a single common test for the former three pages and a little different test for the latter page.

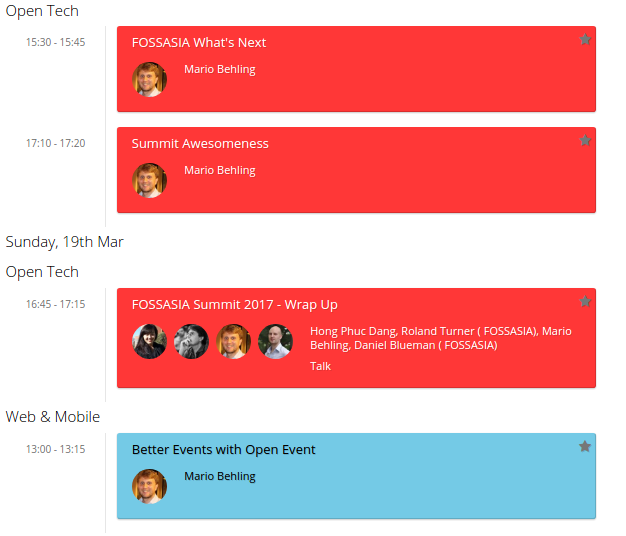
Designing a test for this feature is interesting. We want it to be fast and accurate. A simple way to approach this is to think of the components involved. One is the query text which would be entered in the search input bar. Other is the list of the sessions which would match the text entered and will be visible on the page after the text has been entered. We decide upon a text string and a list containing session ids. This list contains the id of the sessions should be visible on the above query and also contain few id of the sessions which do not match the text entered. During the actual test, we enter the decided text string and check the visibility of the sessions which are present in the decided list. If the result matches the expected order, then it means that the feature is working well and the test passes. Otherwise, it means that there is some problem with the default implementation and the test fails.

For eg: We decide upon the search text ‘Mario’ and then note the ids of the sessions which should be visible in that search.
c0e4910f-cf69-4b2a-8cc1-233badb35eee.png

Suppose the list of the ids come out to be

['3017''3029''3013''3031']

We then add few more session ids which should not be visible on that search text. Like we add two extra false ids 3014, 3015. Modified list would be something like this

['3017''3029''3013''3031''3014''3015']

Now we run the test and determine the visibility of the sessions present in the above list, compare it to the expected output and accordingly determine the fate of the test.

Expected: [truetruetruetruefalsefalse]
Actual Output: [truetruetruetruetruetrue]

Then the test would fail since the last two sessions were not expected to be visible.

Here is some code related to it. The whole work can be seen here

function commonSearchTest(text, idList) {
 var self = this;
 var searchText = text || 'Mario';
 // First 4 session ids should show up on default search text and the last two not. If no idList provided for testing, use the idList for the default search text
 var arrId = idList || ['3017', '3029', '3013', '3031', '3014', '3015'];
 var promise = new Promise(function(resolve) {
   self.search(searchText).then(function() {
     var promiseArr = arrId.map(function(curElem) {
       return self.find(By.id(curElem)).isDisplayed();
     });

     self.resetSearchBar().then(function() {
       resolve(Promise.all(promiseArr));
     });
   });
 });
 return promise;
}

Here is the code for comparing the expected and the actual output. You can view the whole file here

it('Checking search functionality', function(done) {
 schedulePage.commonSearchTest().then(function(boolArr) {
   assert.deepEqual(boolArr, [true, true, true, true, false, false]);
   done();
 }).catch(function(err) {
   done(err);
 });
});

The search functionality test for the speaker’s page is done in the same style. Just instead of having the session ids, we work with speaker ids there. Rest everything is done in a similar manner.

Resources:

Continue ReadingWriting Selenium Tests for Checking Bookmark Feature and Search functionality in Open Event Webapp

Using Cron Scheduling to automatically run background jobs

Cron scheduling is nothing new. It is basically a concept in which the system keeps executing lines of code every few seconds, minutes, or hours. It is required in many large applications which require some automation in their working. I had to use it for two purposes in our Open-Event application.

  • To automatically delete the items in the trash after a period of 30 days.
  • To automatically send after event mails to the speakers and organizers when an event gets completed

1. Delete items in Trash system

So the deleted items get stored in the trash of the admin. However if the items are not deleted or no action is performed on them then they should be deleted automatically if they stay in the trash for more than 30 days. I have used a framework – apscheduler (Advanced Python Scheduler) for this.The code is like this

from apscheduler.schedulers.background import BackgroundScheduler

def empty_trash():
 with app.app_context():
 print 'HELLO'
 events = Event.query.filter_by(in_trash=True)
 users = User.query.filter_by(in_trash=True)
 sessions = Session.query.filter_by(in_trash=True)
 for event in events:
 if datetime.now() - event.trash_date >= timedelta(days=30):
 DataManager.delete_event(event.id)

 for user in users:
 if datetime.now() - user.trash_date >= timedelta(days=30):
 transaction = transaction_class(Event)
 transaction.query.filter_by(user_id=user.id).delete()
 delete_from_db(user, "User deleted permanently")

 for session in sessions:
 if datetime.now() - session.trash_date >= timedelta(days=30):
 delete_from_db(session, "Session deleted permanently")


trash_sched = BackgroundScheduler(timezone=utc)
trash_sched.add_job(empty_trash, 'cron', day_of_week='mon-fri', hour=5,
                    minute=30)
trash_sched.start()

The trash_sched is initialized first. It is given an instance of BackgroundScheduler() meaning it will always run in the background as long as the application server is running.

The second line defines the trigger which is given to the scheduler meaning at what time intervals do we want the scheduler to execute the function.

trash_sched.add_job(empty_trash, 'cron', day_of_week='mon-fri', hour=5, 
                    minute=30)

Here the scheduler adds the function to the job list. The function is empty_trash and the trigger given here is ‘cron’. The following line:

day_of_week='mon-fri', hour=5, minute=30

sets the time at which the sheduler executes the job. The above line means that the job will be executed every day from Monday to Friday at 5:30 AM. Now coming to the function which is to be executed:

def empty_trash():
    with app.app_context():
        events = Event.query.filter_by(in_trash=True)
        users = User.query.filter_by(in_trash=True)
        sessions = Session.query.filter_by(in_trash=True)
        for event in events:
            if datetime.now() - event.trash_date >= timedelta(days=30):
                DataManager.delete_event(event.id)

        for user in users:
            if datetime.now() - user.trash_date >= timedelta(days=30):
                transaction = transaction_class(Event)
                transaction.query.filter_by(user_id=user.id).delete()
                delete_from_db(user, "User deleted permanently")

        for session in sessions:
            if datetime.now() - session.trash_date >= timedelta(days=30):
                delete_from_db(session, "Session deleted permanently")

There are three items in the trash: events, users and sessions. We get all the items in the trash by the query.all() method. Each model: Events, Users and Sessions has a column

trash_date = db.Column(db.DateTime)

The date on which the item is moved to the trash is stored in the trash_date column. And the following line:

 if datetime.now() - event.trash_date >= timedelta(days=30)

checks if the item has been in the trash for more than 30 days. If yes then it is deleted automatically. This function is constantly executed by the apscheduler according to the time settings given by us. Thus we do not need to manually delete the trash after 30 days.

2. Send After Event Mails

This is similar to the trash emptying function.

from apscheduler.schedulers.background import BackgroundScheduler

def send_after_event_mail():
 with app.app_context():
 events = Event.query.all()
 for event in events:
 upcoming_events = DataGetter.get_upcoming_events(event.id)
 organizers = DataGetter.get_user_event_roles_by_role_name(event.id, 'organizer')
 speakers = DataGetter.get_user_event_roles_by_role_name(event.id, 'speaker')
 if datetime.now() > event.end_time:
 for speaker in speakers:
 send_after_event(speaker.user.email, event.id, upcoming_events)
 for organizer in organizers:
 send_after_event(organizer.user.email, event.id, upcoming_events)

#logging.basicConfig()
sched = BackgroundScheduler(timezone=utc)
sched.add_job(send_after_event_mail, 'cron', day_of_week='mon-fri', hour=5, minute=30)
#sched.start()

The scheduler settings are the same as the trash scheduler settings. The function returns all the events and checks whether the event’s end_date has come or not. This check is performed against the present date by the following line:

if datetime.now() > event.end_time

If yes then the speakers and organizers for that event are obtained and after event mails are sent to them automatically.

In this way the whole system is automated. 🙂

Continue ReadingUsing Cron Scheduling to automatically run background jobs

Open Event Apk generator

So we made this apk generator currently hosted on a server (http://192.241.232.231) which let’s you generate an android app for your event in 10 minutes out of which the server takes about 8 minutes to build 😛 . So, essentially you just have to spare 2 minutes and just enter 3 things(email, Desired app’s name and Api link). Isn’t this cool?

So how exactly do we do this?

At the backend, we are running a python scripts with some shell scripts where the python script is basically creating directories, interacting with our firebase database to get the data entered by a user. So we made these scripts to first of all to clone the open event android repo, then customise and change the code in the repo according to the parameters entered by the organiser earlier(shown in the image).

Screen Shot 2016-06-14 at 12.13.12 AM
Generator Website

After the code has been changed by the scripts to customise the app according to the event the app will be used for, we move on to the script to build the apk, where we build and sign the apk in release mode using signing configs and release keys from the server because we don’t the organiser to generate keys and store it on the server to avoid the hassle and also the privacy concerns involving the keys. So this is when the apk is generated on the server. Now you have questions like the apk is generated but how do I get it? Do I have to wait on the same page for 10 minutes while the apk is being sent? The answer is no and yes. What I mean by this is that you can wait to download the apk if you want but we’ll anyways send it to your email you specified on the apk generator website. This is the sample Email we got when we were testing the system

Screen Shot 2016-06-14 at 12.08.59 AM.png

So it’s an end to end complete solution from which you can easily get an android app for your event in just 2 minutes. Would love to hear feedback and reviews. Please feel free to contact me @ manan13056@iiitd.ac.in or on social media’s(Twitter, Facebook). Adios!

P.S. : Here is the link to the scripts we’re using.

Continue ReadingOpen Event Apk generator