Implementing ICS/ICAL to sync calendars with the event schedule in Open Event Webapp

As an end result, we want to provide a button to the user which will export the whole data of the event schedule to an ICS file and present it to the user for download after clicking the button. The whole work regarding the feature can be seen here.

Instead of implementing the whole specification ourselves which would be much tougher and time-consuming, we looked for some good open source libraries to do a bit of heavy lifting for us. After searching exhaustively for the solution, we came across this library which seemed appropriate for the job. The heart of the library is a function which takes in an object which contains information about the session. It expects information about the start and end time, subject, description and location of the session. Here is an excerpt from the function. The whole file can be seen here

var addEvent = function (session) {
 var calendarEvent = [
   'BEGIN:VEVENT',
   'UID:' + session.uid,
   'CLASS:PUBLIC',
   'DESCRIPTION:' + session.description,
   'DTSTART;VALUE=DATETIME:' + session.begin,
   'DTEND;VALUE=DATE:' + session.stop,
   'LOCATION:' + session.location,
   'SUMMARY;LANGUAGE=en-us:' + session.subject,
   'TRANSP:TRANSPARENT',
   'END:VEVENT'
 ];
 calendarEvents.push(calendarEvent);
};

We need to call the above function for every session in the event schedule. In the schedule template file, we have the jsonData object available which contain all the information about the event. It contains a field called timeList which contains the chronological order of the different sessions taking place throughout the events. The structure of that sub-object is something like this.

[{'slug': '2017-03-20', 'times': {'caption' : '09:00-09:30', 'sessions': [{'title': 'Welcome', 'description': 'Opening of the event', 'start': '09:00', 'end': '09:30'}]}]

So, we define a function for iterating through every session in the above object and adding it to the calendar. We can use most of the attributes directly but have to modify the date and time fields of the session to an appropriate format before adding it. The specification expects time in the ISO 8601 Format. You can read more about the specification here. For eg – If the date is 2017-03-20 and the time is 09:30 then it should be written as 20170320T093000. Here is some part of the function here

function exportICS() {
 var scheduleArr = {{{json timeList}}};
 // Helper functions for converting time to ISO 8601 Format
 function removeDashFromDate(date) {
   return date.replace(/-/g, '');
 }
 function removeColonFromTime(time) {
   return time.replace(/:/g, '');
 }
 // Iteration through the object and adding every session to the calendar
 scheduleArr.forEach(function(scheduleDay) {
   var date = removeDashFromDate(scheduleDay.slug);
   scheduleDay.times.forEach(function(time) {
     time.sessions.forEach(function(session) {
       var sessObj = {};
       sessObj.begin = date + 'T' + removeColonFromTime(session.start) + '00';
       sessObj.stop = date + 'T' + removeColonFromTime(session.end) + '00';
       sessObj.subject = session.title;
       sessObj.description = session.description;
       sessObj.location = session.location;
       cal.addEvent(sessObj);
     });
   });
 });
 cal.download('calendar', 'ics', false); // Download the ics file of the calendar
}

After defining the function, we add a button for starting the download of the whole schedule of the event. On clicking, we call the function which initiates the download after all the sessions of the event have been added.

<span class="schedule-download">
 <button type="button" class="btn btn-default export-schedule"><i class="fa fa-calendar" aria-hidden="true"></i></button>
</span>

$('.export-schedule').click(function() {
 exportICS();
});

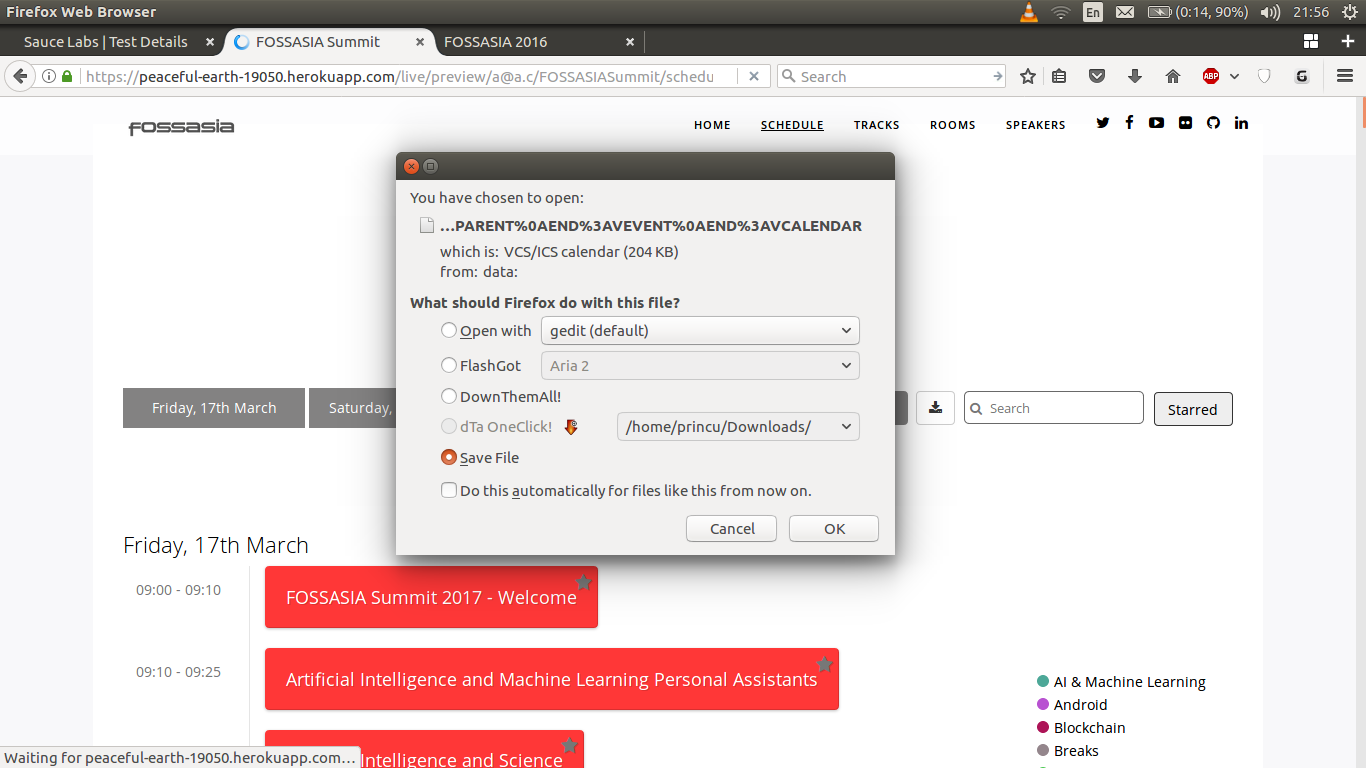
Here is the export schedule button

65203af9-3962-4ab5-9655-3250bf2253a0.png

This is the download pop-up of the ICS file of the event.

Screenshot from 2017-08-10 21-56-16.png

After importing it in the Google calendar

Screenshot from 2017-08-10 23-01-22.png

References

Continue ReadingImplementing ICS/ICAL to sync calendars with the event schedule in Open Event Webapp

Customising URL Using Custom Adapters in Open Event Front-end

Open-Event Front-end uses Ember data for handling Open Event Orga API which abides by JSON API specs. The API has relationships which represent models in the database, however there are some API endpoints for which the URL is not direct. We make use of custom adapter to build a custom URL for the requests.
In this blog we will see how to Implement relationships which do not have a model in the API server. Lets see how we implemented the admin-statistics-event API using custom adapter?

Creating Order-statistics model
To create a new model we use ember-cli command:

ember g model admin-statistics-event

The generated model:

export default ModelBase.extend({
  draft     : attr('number'),
  published : attr('number'),
  past      : attr('number')
})

The API returns 3 attributes namely draft, published & past which represent the total number of drafted, live and past event in the system. The admin-statistics-event is an admin related model.
Creating custom adapter
To create a new adapter we use ember-cli command:

ember g adapter event-statistics-event

If we try to do a GET request the URL for the request will be ‘v1/admin-statistics-event’ which is an incorrect endpoint. We create a custom adapter to override the buildURL method.

buildURL(modelName, id, snapshot, requestType, query) {
  let url = this._super(modelName, id, snapshot, requestType, query);
  url = url.replace('admin-statistics-event', 'admin/statistics/event');
  return url;
}

We create a new variable url which holds the url generated by the buildURL method of the super adapter. We call the super method using ‘this._super’. We will now replace the ‘admin-statistics-event’ with ‘admin/statistics/event’ in url variable. We return the new url variable. This results in generation of correct URL for the request.
Thank you for reading the blog, you can check the source code for the example here.
Resources

Continue ReadingCustomising URL Using Custom Adapters in Open Event Front-end

Preparing for Automatic Publishing of Android Apps in Play Store

I spent this week searching through libraries and services which provide a way to publish built apks directly through API so that the repositories for Android apps can trigger publishing automatically after each push on master branch. The projects to be auto-deployed are:

I had eyes on fastlane for a couple of months and it came out to be the best solution for the task. The tool not only allows publishing of APK files, but also Play Store listings, screenshots, and changelogs. And that is only a subset of its capabilities bundled in a subservice supply.

There is a process before getting started to use this service, which I will go through step by step in this blog. The process is also outlined in the README of the supply project.

Enabling API Access

The first step in the process is to enable API access in your Play Store Developer account if you haven’t done so. For that, you have to open the Play Dev Console and go to Settings > Developer Account > API access.

If this is the first time you are opening it, you’ll be presented with a confirmation dialog detailing about the ramifications of the action and if you agree to do so. Read carefully about the terms and click accept if you agree with them. Once you do, you’ll be presented with a setting panel like this:

Creating Service Account

As you can see there is no registered service account here and we need to create one. So, click on CREATE SERVICE ACCOUNT button and this dialog will pop up giving you the instructions on how to do so:

So, open the highlighted link in the new tab and Google API Console will open up, which will look something like this:

Click on Create Service Account and fill in these details:

Account Name: Any name you want

Role: Project > Service Account Actor

And then, select Furnish a new private key and select JSON. Click CREATE.

A new JSON key will be created and downloaded on your device. Keep this secret as anyone with access to it can at least change play store listings of your apps if not upload new apps in place of existing ones (as they are protected by signing keys).

Granting Access

Now return to the Play Console tab (we were there in Figure 2 at the start of Creating Service Account), and click done as you have created the Service Account now. And you should see the created service account listed like this:

Now click on grant access, choose Release Manager from Role dropdown, and select these PERMISSIONS:

Of course you don’t want the fastlane API to access financial data or manage orders. Other than that it is up to you on what to allow or disallow. Same choice with expiry date as we have left it to never expire. Click on ADD USER and you’ll see the Release Manager created in the user list like below:

Now you are ready to use the fastlane service, or any other release management service for that matter.

Using fastlane

Install fastlane by

sudo gem install fastlane

Go to your project folder and run

fastlane supply init

First it will ask the location of the private key JSON file you downloaded, and then the package name of the application you are trying to initialize fastlane for.

Then it will create metadata folder with listing information excluding the images. So you’ll have to download and place the images manually for the first time

After modifying the listing, images or APK, run the command:

fastlane supply run

That’s it. Your app along with the store listing has been updated!

This is a very brief introduction to the capabilities of the supply service. All interactive options can be supplied via command line arguments, certain parts of the metadata can be omitted and alpha beta management along with release rollout can be done in steps! Make sure to check out the links below:

Continue ReadingPreparing for Automatic Publishing of Android Apps in Play Store

Create Event by Importing JSON files in Open Event Server

Apart from the usual way of creating an event in  FOSSASIA’s Orga Server project by using POST requests in Events API, another way of creating events is importing a zip file which is an archive of multiple JSON files. This way you can create a large event like FOSSASIA with lots of data related to sessions, speakers, microlocations, sponsors just by uploading JSON files to the system. Sample JSON file can be found in the open-event project of FOSSASIA. The basic workflow of importing an event and how it works is as follows:

  • First step is similar to uploading files to the server. We need to send a POST request with a multipart form data with the zipped archive containing the JSON files.
  • The POST request starts a celery task to start importing data from JSON files and storing them in the database.
  • The celery task URL is returned as a response to the POST request. You can use this celery task for polling purposes to get the status. If the status is FAILURE, we get the error text along with it. If status is SUCCESS we get the resulting event data
  • In the celery task, each JSON file is read separately and the data is stored in the db with the proper relations.
  • Sending a GET request to the above mentioned celery task, after the task has been completed returns the event id along with the event URL.

Let’s see how each of these points work in the background.

Uploading ZIP containing JSON Files

For uploading a zip archive instead of sending a JSON data in the POST request we send a multipart form data. The multipart/form-data format of sending data allows an entire file to be sent as a data in the POST request along with the relevant file informations. One can know about various form content types here .

An example cURL request looks something like this:

curl -H "Authorization: JWT <access token>" -X POST -F 'file=@event1.zip' http://localhost:5000/v1/events/import/json

The above cURL request uploads a file event1.zip from your current directory with the key as ‘file’ to the endpoint /v1/events/import/json. The user uploading the feels needs to have a JWT authentication key or in other words be logged in to the system as it is necessary to create an event.

@import_routes.route('/events/import/<string:source_type>', methods=['POST'])
@jwt_required()
def import_event(source_type):
    if source_type == 'json':
        file_path = get_file_from_request(['zip'])
    else:
        file_path = None
        abort(404)
    from helpers.tasks import import_event_task
    task = import_event_task.delay(email=current_identity.email, file=file_path,
                                   source_type=source_type, creator_id=current_identity.id)
    # create import job
    create_import_job(task.id)

    # if testing
    if current_app.config.get('CELERY_ALWAYS_EAGER'):
        TASK_RESULTS[task.id] = {
            'result': task.get(),
            'state': task.state
        }
    return jsonify(
        task_url=url_for('tasks.celery_task', task_id=task.id)
    )


After the request is received we check if a file exists in the key ‘file’ of the form-data. If it is there, we save the file and get the path to the saved file. Then we send this path over to the celery task and run the task with the
.delay() function of celery. After the celery task is started, the corresponding data about the import job is stored in the database for future debugging and logging purposes. After this we return the task url for the celery task that we started.

Celery Task to Import Data

Just like exporting of event, importing is also a time consuming task and we don’t want other application requests to be paused because of this task. Hence, we use a celery queue to execute this task. Whenever an import task is started, it is added to the celery queue. When it comes to the front of the queue it is executed.

For importing, we have created a celery task, import.event which calls the import_event_task_base() function that uses the import helper functions to get the data from JSON files imported and saved in the DB. After the task is completed, we update the import job data in the table with the status as either SUCCESS or FAILURE depending on the outcome of the celery task.

As a result of the celery task, the newly created event’s id and the frontend link from where we can visit the url is returned. This along with the status of the celery task is returned as the response for a GET request on the celery task. If the celery task fails, then the state is changed to FAILURE and the error which the celery faced is returned as the error message in the result key. We also print an error traceback in the celery worker.

@celery.task(base=RequestContextTask, name='import.event', bind=True, throws=(BaseError,))
def import_event_task(self, file, source_type, creator_id):
    """Import Event Task"""
    task_id = self.request.id.__str__()  # str(async result)
    try:
        result = import_event_task_base(self, file, source_type, creator_id)
        update_import_job(task_id, result['id'], 'SUCCESS')
        # return item
    except BaseError as e:
        print(traceback.format_exc())
        update_import_job(task_id, e.message, e.status if hasattr(e, 'status') else 'failure')
        result = {'__error': True, 'result': e.to_dict()}
    except Exception as e:
        print(traceback.format_exc())
        update_import_job(task_id, e.message, e.status if hasattr(e, 'status') else 'failure')
        result = {'__error': True, 'result': ServerError().to_dict()}
    # send email
    send_import_mail(task_id, result)
    # return result
    return result


Save Data from JSON

In import helpers, we have the functions which perform the main task of reading the JSON files, creating sqlalchemy model objects from them and saving them in the database. There are few global dictionaries which help maintain the order in which the files are to be imported and saved and also the file vs model mapping. The first JSON file to be imported is the event JSON file. Since all the other tables to be imported are related to the event table so first we read the event JSON file. After that the order in which the files are read is as follows:

  1. SocialLink
  2. CustomForms
  3. Microlocation
  4. Sponsor
  5. Speaker
  6. Track
  7. SessionType
  8. Session

This order helps maintain the foreign constraints. For importing data from these files we use the function create_service_from_json(). It sorts the elements in the data list  based on the key “id”. It then loops over all the elements or dictionaries contained in the data list. In each iteration delete the unnecessary key-value pairs from the dictionary. Then set the event_id for that element to the id of the newly created event from import instead of the old id present in the data.  After all this is done, create a model object based on the mapping with the filename with the dict data. Then save that model data into the database.

def create_service_from_json(task_handle, data, srv, event_id, service_ids=None):
    """
    Given :data as json, create the service on server
    :service_ids are the mapping of ids of already created services.
        Used for mapping old ids to new
    """
    if service_ids is None:
        service_ids = {}
    global CUR_ID
    # sort by id
    data.sort(key=lambda k: k['id'])
    ids = {}
    ct = 0
    total = len(data)
    # start creating
    for obj in data:
        # update status
        ct += 1
        update_state(task_handle, 'Importing %s (%d/%d)' % (srv[0], ct, total))
        # trim id field
        old_id, obj = _trim_id(obj)
        CUR_ID = old_id
        # delete not needed fields
        obj = _delete_fields(srv, obj)
        # related
        obj = _fix_related_fields(srv, obj, service_ids)
        obj['event_id'] = event_id
        # create object
        new_obj = srv[1](**obj)
        db.session.add(new_obj)
        db.session.commit()
        ids[old_id] = new_obj.id
        # add uploads to queue
        _upload_media_queue(srv, new_obj)

    return ids


After the data has been saved, the next thing to do is upload all the media files to the server. This we do using the
_upload_media_queue()  function. It takes paths to upload the files to from the storage.py helper file for APIs. Then it uploads the files using the various helper functions to the static data storage services like AWS S3, Google storage, etc.

Other than this, the import helpers also contains the function to create an import job that keeps a record of all the imports along with the task url and the user id of the user who started the importing task. It also stores the status of the task. Then there is the get_file_from_request()  function which saves the file that is uploaded through the POST request and returns the path to that file.

Get Response about Event Imported

The POST request returns a task url of the form /v1/tasks/ebe07632-392b-4ae9-8501-87ac27258ce5. To get the final result, you need to keep polling this URL. To know more about polling read my previous blog about exporting event or visit this link. So when the task is completed you would get a “result” key along with the status. The state can either be SUCCESS or FAILURE. If it is a FAILURE you will get a corresponding error message due to which the celery task failed. If it is a success then you get data related to the corresponding event that was created because of import. The data returned are the event id, event name and the event url which you can use to visit the event from the frontend. This data is also sent to the user as an email and notification.

An example response looks something like this:

{ 
    “result”: {
“event_name” : “FOSSASIA 2016”,
     “id” : “24”,
     “url” : “https://eventyay.com/events/ab3de6
},
    “state” : “SUCCESS”
}

The corresponding event name and the url is also sent to the user who started the import task. From the frontend, one can use the object value of the result to show the name of the event that is imported along with providing the event url. Since the id and identifier are both present in the result returned one can also make use of them to send GET, PATCH and other API requests to the events/ endpoint and get the corresponding relationship urls from it to query the other APIs. Thus, the entire data that is imported gets available to the frontend as well.


Reference Links:


Continue ReadingCreate Event by Importing JSON files in Open Event Server

Image Loading in Open Event Organizer Android App using Glide

Open Event Organizer is an Android App for the Event Organizers and Entry Managers. Open Event API Server acts as a backend for this App. The core feature of the App is to scan a QR code from the ticket to validate an attendee’s check in. Other features of the App are to display an overview of sales and ticket management. As per the functionality, the performance of the App is very important. The App should be functional even on a weak network. Talking about the performance, the image loading part in the app should be handled efficiently as it is not an essential part of the functionality of the App. Open Event Organizer uses Glide, a fast and efficient image loading library created by Sam Judd. I will be talking about its implementation in the App in this blog.

First part is the configuration of the glide in the App. The library provides a very easy way to do that. Your app needs to implement a class named AppGlideModule using annotations provided by the library and it generates a glide API which can be used in the app for all the image loading stuff. The AppGlideModule implementation in the Orga App looks like:

@GlideModule
public final class GlideAPI extends AppGlideModule {

   @Override
   public void registerComponents(Context context, Glide glide, Registry registry) {
       registry.replace(GlideUrl.class, InputStream.class, new OkHttpUrlLoader.Factory());
   }

   // TODO: Modify the options here according to the need
   @Override
   public void applyOptions(Context context, GlideBuilder builder) {
       int diskCacheSizeBytes = 1024 * 1024 * 10; // 10mb
       builder.setDiskCache(new InternalCacheDiskCacheFactory(context, diskCacheSizeBytes));
   }

   @Override
   public boolean isManifestParsingEnabled() {
       return false;
   }
}


This generates the API named GlideApp by default in the same package which can be used in the whole app. Just make sure to add the annotation @GlideModule to this implementation which is used to find this class in the app. The second part is using the generated API GlideApp in the app to load images using URLs. Orga App uses data binding for layouts. So all the image loading related code is placed at a single place in DataBinding class which is used by the layouts. The class has a method named setGlideImage which takes an image view, an image URL, a placeholder drawable and a transformation. The relevant code is:

private static void setGlideImage(ImageView imageView, String url, Drawable drawable, Transformation<Bitmap> transformation) {
       if (TextUtils.isEmpty(url)) {
           if (drawable != null)
               imageView.setImageDrawable(drawable);
           return;
       }
       GlideRequest<Drawable> request = GlideApp
           .with(imageView.getContext())
           .load(Uri.parse(url));

       if (drawable != null) {
           request
               .placeholder(drawable)
               .error(drawable);
       }
       request
           .centerCrop()
           .transition(withCrossFade())
           .transform(transformation == null ? new CenterCrop() : transformation)
           .into(imageView);
   }


The method is very clear. First, the URL is checked for nullability. If null, the drawable is set to the imageview and method returns. Usage of GlideApp is simpler. Pass the URL to the GlideApp using the method with which returns a GlideRequest which has operators to set other required options like transitions, transformations, placeholder etc. Lastly, pass the imageview using into operator. By default, Glide uses HttpURLConnection provided by android to load the image which can be changed to use Okhttp using the extension provided by the library. This is set in the AppGlideModule implementation in the registerComponents method.

Links:
1. Documentation for Glide, an Image Loading Library
2. Documentation for Okhttp, an HTTP client for Android and Java Applications

Continue ReadingImage Loading in Open Event Organizer Android App using Glide

Adding Static Code Analyzers in Open Event Orga Android App

This week, in Open Event Orga App project (Github Repo), we wanted to add some static code analysers that run on each build to ensure that the app code is free of potential bugs and follows a certain style. Codacy handles a few of these things, but it is quirky and sometimes produces false positives. Furthermore, it is not a required check for builds so errors can creep in gradually. We chose checkstyle, PMD and Findbugs for static analysis as they are most popular for Java. The area they work on kind of overlaps but gives security regarding code quality. Findbugs actually analyses the bytecode instead of source code to find possible JVM bugs.

Adding dependencies

The first step was to add the required dependencies. We chose the library android-check as it contained all 3 libraries and was focused on Android and easily configurable. First, we add classpath in project level build.gradle

dependencies {
   classpath 'com.noveogroup.android:check:1.2.4'
}


Then, we apply the plugin in app level build.gradle

apply plugin: 'com.noveogroup.android.check'


This much is enough to get you started, but by default, the build will not fail if any violations are found. To change this behaviour, we add this block in app level build.gradle

check {
   abortOnError true
}


There are many configuration options available for the library. Do check out the project github repo using the link provided above

Configuration

The default configuration is of easy level, and will be enough for most projects, but it is of course configurable. So we took the default hard configs for 3 analysers and disabled properties which we did not need. The place you need to store the config files is the config folder in either root project directory or the app directory. The name of the config file should be checkstyle.xml, pmd.xml and findbugs.xml

These are the default settings and you can obviously configure them by following the instructions on the project repo

Checkstyle

For checkstyle, you can find the easy and hard configuration here

The basic principle is that if you need to add a check, you include a module like this:

<module name="NewlineAtEndOfFile" />


If you want to modify the default value of some property, you do it like this:

<module name="RegexpSingleline">
   <property name="format" value="\s+$" />
   <property name="minimum" value="0" />
   <property name="maximum" value="0" />
   <property name="message" value="Line has trailing spaces." />
   <property name="severity" value="info" />
</module>


And if you want to remove a check, you can ignore it like this:

<module name="EqualsHashCode">
   <property name="severity" value="ignore" />
</module>


It’s pretty straightforward and easy to configure.

Findbugs

For findbugs, you can find the easy and hard configuration here

Findbugs configuration exists in the form of filters where we list resources it should skip analyzing, like:

<Match>
   <Class name="~.*\.BuildConfig" />
</Match>


If we want to ignore a particular pattern, we can do so like this:

<!-- No need to force hashCode for simple models -->
<Match>
   <Bug pattern="HE_EQUALS_USE_HASHCODE " />
</Match>


Sometimes, you’d want to only ignore a pattern only for certain files or fields. Findbugs supports regex to match such items:

<!-- Don't complain about rules in tests. -->
<Match>
   <Field name="~.*mockitoRule"/>
   <Bug pattern="URF_UNREAD_PUBLIC_OR_PROTECTED_FIELD" />
</Match>


You can also annotate your code to suppress warning in the particular class, mehod or field rather than disabling it for the whole project. For that, you need to add findbugs annotations dependency in the project

compile 'com.google.code.findbugs:findbugs-annotations:3.0.1'


And then use it like this:

@SuppressFBWarnings(
   value = "ICAST_IDIV_CAST_TO_DOUBLE",
   justification = "We want granularity to be integer")
public void showChart(LineChart lineChart) {
   ...
}


It also allows setting the justification of suppressing the rule for clarity

PMD

For findbugs, you can find the easy and hard configuration here

Like checkstyle, you have to first add a rule set to tell PMD which checks to perform:

<rule ref="rulesets/java/android.xml" />


If you want to modify the default value of the rule, you can do it like this:

<rule ref="rulesets/java/codesize.xml/TooManyMethods">
   <properties>
       <property name="maxmethods" value="15" />
   </properties>
</rule>


Or if you want to entirely exclude a rule, you can do it like this:

<rule ref="rulesets/java/basic.xml">
   <exclude name="OverrideBothEqualsAndHashcode" />
</rule>


PMD also supports suppressing warnings in the code itself using annotations. You don’t require any external libraries for it as it supports the in built java.lang.SuppessWarnings annotations. You can use it like this:

@SuppressWarnings("PMD.AvoidInstantiatingObjectsInLoops") // Entries cannot be created outside loop
private LineDataSet setData(Map<String, Long> map, String label) throws ParseException {
   ...
}


As you can see, we need to prepend “PMD.” to the rule name so that there are no clashes while annotation processing. Remember to comment the reason for suppressing the warning so that your co-developers know and can remove it in future if criteria does not meet anymore.

There is a lot more to learn about these static analyzers, which you can read upon in their official documentation:

Continue ReadingAdding Static Code Analyzers in Open Event Orga Android App

Implementing Admin Statistics Mail and Session API on Open Event Frontend

This blog article will illustrate how the admin-statistics-mail and admin-statistics-session API  are implemented on the admin dashboard page in Open Event Frontend.Our discussion primarily will involve the admin/index route to illustrate the process.The primary end points of Open Event API with which we are concerned with for fetching the admin statistics  for the dashboard are

GET /v1/admin/statistics/mails
GET /v1/admin/statistics/sessions

First we need to create the corresponding models according to the type of the response returned by the server , which in this case will be admin-statistics-event and admin-statistics-sessions, so we proceed with the ember CLI commands:

ember g model admin-statistics-mail
ember g model admin-statistics-session

Next we define the model according to the requirements. The model needs to extend the base model class, and all the fields will be number since the all the data obtained via these models from the API will be numerical statistics

import attr from 'ember-data/attr';
import ModelBase from 'open-event-frontend/models/base';

export default ModelBase.extend({
 oneDay     : attr('number'),
 threeDays  : attr('number'),
 sevenDays  : attr('number'),
 thirtyDays : attr('number')
});

And the model for sessions will be the following. It too will consist all the attributes of type number since it represents statistics

import attr from 'ember-data/attr';
import ModelBase from 'open-event-frontend/models/base';

export default ModelBase.extend({
 confirmed : attr('number'),
 accepted  : attr('number'),
 submitted : attr('number'),
 draft     : attr('number'),
 rejected  : attr('number'),
 pending   : attr('number')
});

Now we need to load the data from the api using the models, so will send a get request to the api to fetch the current permissions. This can be easily achieved via a store query in the model hook of the admin/index route.However this cannot be a normal get request. Because the the urls for the end point are /v1/admin/statistics/mails & /v1/admin/statistics/sessions but there are no relationships between statistics and various sub routes, which is what ember’s default behaviour would expect.

Hence we need to override the generated default request url using custom adapters and use buildUrl method to customize the request urls.

import ApplicationAdapter from './application';

export default ApplicationAdapter.extend({
 buildURL(modelName, id, snapshot, requestType, query) {
   let url = this._super(modelName, id, snapshot, requestType, query);
   url = url.replace('admin-statistics-session', 'admin/statistics/session');
   return url;
 }
});

The buildURL method replaces the the default  URL for admin-statistics-session  with admin/statistics/session otherwise the the default request would have been

GET v1/admin-statistics-session

Similarly it must be done for the mail statistics too. These will ensure that the correct request is sent to the server. Now all that remains is making the requests in the model hooks and adjusting the template slightly for the new model.

model() {
   return RSVP.hash({
         mails: this.get('store').queryRecord('admin-statistics-mail', {
       filter: {
         name : 'id',
         op   : 'eq',
         val  : 1
       }
     }),
     sessions: this.get('store').queryRecord('admin-statistics-session', {
       filter: {
         name : 'id',
         op   : 'eq',
         val  : 1
       }
     })
   });
 }


queryRecord is used instead of query because only a single record is expected to be returned by the API.

Resources

Tags :

Open event, Open event frontend, ember JS, ember service, semantic UI, ember-data, ember adapters,  tickets, Open Event API, Ember models

Continue ReadingImplementing Admin Statistics Mail and Session API on Open Event Frontend

Implementing Tracks Filter in Open Event Webapp using the side track name list

4f451d29-c6c2-44be-9ef7-d91a45fc1eb0.png

On Clicking the Design, Art, Community Track

ff85d907-512b-4a41-be49-888bbd17bf83.png

But, it was not an elegant solution. We already had a track names list present on the side of the page which remained unused. A better idea was to use this side track names list to filter the sessions. Other event management sites like http://sched.org follow the same idea. The relevant issue for it is here and the major work can be seen in this Pull Request. Below is the screenshot of the unused side track names list.

5b15a297-fd5e-4c23-bc1b-dbed193db0f4.png

The end behavior should be something like this, the user clicks on a track and only sessions belonging to the track should be visible and the rest be hidden. There should also be a button for clearing the applied filter and reverting the page back to its default view. Let’s jump to the implementation part.

First, we make the side track name list and make the individual tracks clickable.

<div class="track-names col-md-3 col-sm-3"> 
  {{#tracknames}}
    <div class="track-info">
      <span style="background-color: {{color}};" 
      class="titlecolor"></span>
      <span class="track-name" style="cursor: pointer">{{title}}
      </span>
    </div>
  {{/tracknames}}
</div>

f45f1591-937d-4e2f-9245-237cfaf3af0d.png

Now we need to write a function for handling the user click event on the track name. Before writing the function, we need to see the basic structure of the tracks page. The divs with the class date-filter contain all the sessions scheduled on a given day. Inside that div, we have another div with class tracks-filter which contains the name of the track and all the sessions of that track are inside the div with class room-filter.

Below is a relevant block of code from the tracks.hbs file

<div class="date-filter">
  // Contains all the sessions present in a single day
  <div class="track-filter row">
    // Contains all the sessions of a single track
    <div class="row">
      // Contains the name of the track
      <h5 class="text">{{caption}}</h4>
    </div>
    <div class="room-filter" id="{{session_id}}">
      // Contain the information about the session
    </div>
  </div>
</div>

We iterate over all the date-filter divs and check all the track-filter divs inside it. We extract the name of the track and compare it to the name of the track which the user selected. If both of them are same, then we show that track div and all the sessions inside it. If the names don’t match, then we hide that track div and all the content inside it. We also keep a variable named flag and set it to 0 initially. If the user selected track is present on a given day, we set the flag to 1. Based on it, we decide whether to display that particular day or not. If the flag is set, we display the date-filter div of that day and the matched track inside it. Otherwise, we hide the div and all tracks inside it.

$('.track-name').click(function() {
  // Get the name of the track which the user clicked
  trackName = $(this).text();
  // Show the button for clearing the filter applied and reverting to the default view
  $('#filterInfo').show();
  $('#curFilter').text(trackName);
  // Iterate through the divs and show sessions of user selected track
  $('.date-filter').each(function() {
    var flag = 0;
    $(this).find('.track-filter').each(function() {
      var name = $(this).find('.text').text();
      if(name != trackName) {
        $(this).hide();
        return;
      }
      flag = 1;
      $(this).show();
    });
    if (flag) {
     $(this).show();
    } else {
      $(this).hide();
    }
  });
});

On Selecting the Android Track of FOSSASIA Summit, we see something like this

935f208b-c17c-4d41-abb6-7197c003d962.png

Now the user may want to remove the filter. He/she can just click on the Clear Filter button shown in the above screenshot to remove the filter and revert back to the default view of the page.

$('#clearFilter').click(function() {                                                                                                   
  trackFilterMode = 0;                                                                                                                 
  display();                                                                                                                           
  $('#filterInfo').hide();                                                                                                             
});

Back to the default view of the page

2ff61ccf-17cf-4595-9c2f-e6825de549f7.png

References:

Continue ReadingImplementing Tracks Filter in Open Event Webapp using the side track name list

Implementing the UI of the Scheduler in Open Event Frontend with Sub Rooms and External Events

This blog article will illustrate how exactly the UI of the scheduler is implemented in  Open Event Frontend, using the fullcalendar library. Our discussion primarily will involve the events/view/scheduler  route.

FullCalendar is an open source javascript scheduler with an option to use it’s scheduler functionality. To use it with ember JS, we make use of it’s ember-wrapper (ember-fullcalendar). We begin by installing it via CLI

npm install  ember-fullcalendar

Next to initialise it, we need to specify some properties in the config/environment.js File.

Note: It is wrongly mentioned in the official documentation. (issue) Hence specified in this blog.

emberFullCalendar: {
includeScheduler: true
}

This enables the scheduler functionality of the calendar, next we need to specify the model, which will include the details of the rooms and the events which need to be displayed, the full calendar scheduler requires them in a specific way, hence the model will hook will be:

model() {
return RSVP.hash({
events: [{
title      : 'Session 1',
start      : '2017-07-26T07:08:08',
end        : '2017-07-26T09:08:08',
resourceId : 'a'
}],
rooms: [
{ id: 'a', title: 'Auditorium A' },
{ id: 'b', title: 'Auditorium B', eventColor: 'green' },
{ id: 'c', title: 'Auditorium C', eventColor: 'orange' },
{ id       : 'd', title    : 'Auditorium D', children : [
{ id: 'd1', title: 'Room D1' },
{ id: 'd2', title: 'Room D2' }
] },
{ id: 'e', title: 'Auditorium E' },
{ id: 'f', title: 'Auditorium F', eventColor: 'red' }
]
});

Now we begin with the basic structure we will require for the scheduler in the template files.Since we need an option of dragging and dropping external events, we will split the page into two columns, and make a separate component for storing the list of external events.The component is aptly named external-event-list. Hence the scheduler.hbs will have the following grid column structure.

<div class="ui grid">
<div class="row">
<div class="three wide column">
{{scheduler/external-event-list}}
</div>
<div class="thirteen wide column">
{{full-calendar events=model.events
editable=true
resources=model.rooms
header=header
views=views
viewName='timelineDay'
drop=(action 'drop')
eventReceive=(action 'eventReceive')
ondragover=(action 'eventDrop')
}}
</div>
</div>
</div>

It is important to note here that the full-calendar has various callbacks which are triggered when the events are dragged and dropped. The editable property allows the user to change the events’ venue and timeline, and is enabled only for the organiser of the event. The resources refer to the rooms/locations where the session/events will be held. Since ember executes functionality via functions, each of the standard callback of the full calendar has been translated into an action. Please see the official docs for what each callback does.The only thing which remains is the list of external events. It is necessary for the actual event to be wrapped in fc-event spans, as  they are the default classes for full calendar, and the calendar is able to fetch the event or session name from these spans.

<div id='external-events'>
<h4 class="ui header">{{t 'Events'}}</h4>
<span class='fc-event' draggable="true">My Event 1</span>
<span class='fc-event' draggable="true">My Event 2</span>
<span class='fc-event' draggable="true">My Event 3</span>
</div>

Whenever the events will be dragged and dropped onto the scheduler, they will trigger the drop action inside it, which will fetch the data from them and create an event object for the scheduler.

Resources

Tags :

Open event, Open event frontend, ember JS, ember service, semantic UI, ember-data, ember controllers,  tickets, Open Event API, Ember models

Continue ReadingImplementing the UI of the Scheduler in Open Event Frontend with Sub Rooms and External Events

Handling Requests for hasMany Relationships in Open Event Front-end

In Open Event Front-end we use Ember Data and JSON API specs to integrate the application with the server. Ember Data provides an easy way to handle API requests, however it does not support a direct POST for saving bulk data which was the problem we faced while implementing event creation using the API.

In this blog we will take a look at how we implemented POST requests for saving hasMany relationships, using an example of sessions-speakers route to see how we saved the tracks, microlocations & session-types. Lets see how we did it.

Fetching the data from the server

Ember by default does not support hasMany requests for getting related model data. However we can use external add on which enable the hasMany Get requests, we use ember-data-has-many-query which is a great add on for querying hasMany relations of a model.

let data = this.modelFor('events.view.edit');
data.tracks = data.event.get('tracks');
data.microlocations = data.event.get('microlocations');
data.sessionTypes = data.event.get('sessionTypes');
return RSVP.hash(data);

In the above example we are querying the tracks, microlocations & sessionTypes which are hasMany relationships, related to the events model. We can simply do a to do a GET request for the related model.

data.event.get('tracks');

In the above example we are retrieving the all the tracks of the event.

Sending a POST request for hasMany relationship
Ember currently does not saving bulk data POST requests for hasMany relations. We solved this by doing a POST request for individual data of the hasMany array.

We start with creating a `promises` array which contains all the individual requests. We then iterate over all the hasMany relations & push it to the `promises` array. Now each request is an individual promise.

let promises = [];

promises.push(this.get('model.event.tracks').toArray().map(track => track.save()));
promises.push(this.get('model.event.sessionTypes').toArray().map(type => type.save()));
promises.push(this.get('model.event.microlocations').toArray().map(location => location.save()));

Once we have all the promises we then use RSVP to make the POST requests. We make use of all() method which takes an array of promises as parameter and resolves all the promises. If the promises are not resolved successfully then we simply notify the user using the notify service, else we redirect to the home page.

RSVP.Promise.all(promises)
  .then(() => {
    this.transitionToRoute('index');
  }, function() {
    this.get('notify').error(this.l10n.t(Data did not save. Please try again'));
  });

The result of this we can now retrieve & create new tracks, microlocations & sessionTypes on sessions-speakers route.

Thank you for reading the blog, you can check the source code for the example here.

Resources


Continue ReadingHandling Requests for hasMany Relationships in Open Event Front-end