Showing only Logged-in Accounts in the Sharing Page of Phimpme Android

In Phimpme Android application, users can edit their pictures and share them to a number of platforms ranging from social networking sites like Facebook, Twitter etc to cloud storage and image hosting sites like Box, Dropbox, Imgur etc.

Desired flow of the application

According to the flow of the application, the user has to add an account first i.e. log in to the particular account that needs to be connected to the application. After that when the user enters the share page for sharing the image, a button corresponding to the connected account is visible in that page which on clicking will share the image to that platform directly.

What was happening previously?

The list of accounts which is present in the account manager of Phimpme Android application is also getting displayed in the share image page. As the list is large, it is difficult for the user to find the connected account from the list. There is not even an indicator whether a particular account is connected or not. On clicking the button corresponding to the non-connected account, an error dialog instructing the user to log in from the account manager first, will get displayed.

How we solved it?

We first thought of just adding an indicator on the buttons in the accounts page to show whether it is connected or not. But this fix solves only a single issue. Find the connected account in that large list will be difficult for the user even then. So we decided to remove the whole list and show only the accounts which are connected previously in account manager. This cleans the flow of the accounts and share in  Phimpme Android application

When a user logins from the account manager, the credentials, tokens and other details corresponding to that accounts gets saved in database. We used realm database for saving the details in our application. As the details are present in this database, the list can be dynamically generated when the user opens share image page. We implemented a function in Utils class for getting the list of logged in accounts. Its implementation is shown below.

public static boolean checkAlreadyExist(AccountDatabase.AccountName s) {

   Realm realm = Realm.getDefaultInstance();

   RealmQuery<AccountDatabase> query = realm.where(AccountDatabase.class);

   query.equalTo("name", s.toString());

   RealmResults<AccountDatabase> result1 = query.findAll();

   return (result1.size() > 0);

}


public static ArrayList<AccountDatabase.AccountName> getLoggedInAccountsList(){

   ArrayList<AccountDatabase.AccountName> list = new ArrayList<>();

   for (AccountDatabase.AccountName account : AccountDatabase.AccountName.values()){

       if (checkAlreadyExist(account))

           list.add(account);

   }

   return list;

}

Additional changes

There are few accounts which don’t need authentication. Those accounts need their respective application to be installed in the user’s device. So for adding those accounts to the list, we added another function which checks whether a particular package is installed in user’s device or not. Using that it adds the account to the list. The implementation for checking whether a package is installed or not is shown below.

public static boolean isAppInstalled(String packageName, PackageManager pm) {

   boolean installed;

   try {

       pm.getPackageInfo(packageName, PackageManager.GET_ACTIVITIES);

       installed = true;

   } catch (PackageManager.NameNotFoundException e) {

       installed = false;

   }

   return installed;

}


Resources:

Continue ReadingShowing only Logged-in Accounts in the Sharing Page of Phimpme Android

Setting the Foreground Color Based on the Background Color in Phimpme Android

In the situations where the background color gets changed, the foreground color should also change to some other color. Otherwise the foreground item may not be properly visible on the background.

In Phimpme Android, we came across this situation when dealing with the bottom navigation bar. We have a preference option in our application which enables the user to change the primary color of the application. This change affects the background color of the bottom navigation bar also. We initially had white as selected foreground item’s color and grey as the unselected items’ color. It was fine for darker background colors. But problem arose when we changed the primary color of the application to the lighter shade of any color. The foreground item which was in white color was not clearly visible over the background. So we had to dynamically decide the foreground color when the background color gets changed.

Deciding the foreground color of the bottom navigation bar in Phimpme Android was tough. The foreground item should not only be visible on the background color but it should also be visibly attractive. We needed a minimal look. So we decided to use only two colors – black and white for the selected item’s color. The unselected items’ color can be fixed. A shade of gray with less alpha can be used for it.

The black and white colors are decided based on the lightness of the background color. We used the rgb value of the background color to find the lightness. We fixed a threshold for this lightness by visual judgement and selected the foreground color from the black and white colors based on this threshold lightness. If the lightness of the background color of the bottom navigation color of Phimpme Android application is less than the defined threshold value, we used white as the foreground color and vice-versa.

The lightness can be found out by taking the average of the red, green and blue values of the background color. We considered 100 as the threshold lightness for deciding the foreground color.

void setIconColor(int color){
   if(Color.red(color) + Color.green(color)+ Color.blue(color) < 300)
       colors[0] = Color.WHITE;
   else
       colors[0] = Color.BLACK;
}

For setting the different colors for different states of the foreground items on the bottom navigation bar, we used the setItemIconTintList method which takes ColorStatesList as an argument.

colors[1]  = ContextCompat.getColor(this, R.color.bottom_navigation_tabs);
ColorStateList bottomNavList = new ColorStateList(states, colors);
navigationView.setItemIconTintList(bottomNavList);

This above ColorStateList takes a two dimensional array of states for which we wanted to change the color of item and an array of corresponding colors for those states as arguments. In Phimpme Android we used the following way.

private int[][] states = new int[][] {
       new int[] {android.R.attr.state_checked}, // checked
       new int[] {-android.R.attr.state_checked}, // unchecked
};

private int[] colors = new int[] {
       Color.WHITE, // checked
       0 // unchecked set default in onCreate
};

Resources:

Continue ReadingSetting the Foreground Color Based on the Background Color in Phimpme Android

Creating Sajuno Filter in Editor of Phimpme Android

What is Sajuno filter?

Sajuno filter is an image filter which we used in the editor of Phimpme Android application for brightening the skin region of a portrait photo.

How to perform?

Generally in a portrait photo, the dark regions formed due to shadows or low lightning conditions or even due to tanning of skin contains more darker reds than the greens and blues. So, for fixing this darkness of picture, we need to find out the area where reds are more dominant than the greens and blues. After finding the region of interest, we need to brighten that area corresponding to the difference of the reds and other colors.

How we implemented in Phimpme Android?

In Phimpme Android application, first we created a mask satisfying the above conditions. It can be created by subtracting blues and greens from red. The intensity can be varied by adjusting the intensity of reds. The condition mentioned here in programmatical way is shown below.


bright = saturate_cast<uchar>((intensity * r - g * 0.4 - b * 0.4));

In the above statement, r,g,b are the reds, greens and blues of the pixels respectively. The coefficients can be tweaked a little. But these are the values which we used in Phimpme Android application. After the above operation, a mask is generated as below.


This mask has the values that correspond to the difference of reds and greens and difference of reds and blues. So, we used this mask directly to increase the brightness of the dark toned skin of the original image. We simply need to add the mask and the original image. This results the required output image shown below.


As you can see the resultant image has less darker shades on the face than the original image. The way of implementation which we used in Phimpme Android editor is shown below.


double intensity = 0.5 + 0.35 * val;     // 0 < val < 1
dst = Mat::zeros(src.size(), src.type());
uchar r, g, b;
int bright;

for (y = 0; y < src.rows; y++) {
   for (x = 0; x < src.cols; x++) {
       r = src.at<Vec3b>(y, x)[0];
       g = src.at<Vec3b>(y, x)[1];
       b = src.at<Vec3b>(y, x)[2];

       bright = saturate_cast<uchar>((intensity * r - g * 0.4 - b * 0.4));
       dst.at<Vec3b>(y, x)[0] =
               saturate_cast<uchar>(r + bright);
       dst.at<Vec3b>(y, x)[1] =
               saturate_cast<uchar>(g + bright);
       dst.at<Vec3b>(y, x)[2] =
               saturate_cast<uchar>(b + bright);
   }
}

Resources:

Continue ReadingCreating Sajuno Filter in Editor of Phimpme Android

Displaying an Animated Image in Splash Screen of Phimpme Android

A splash screen is the welcome page of the application. It gives the first impression of the application to the user. So, it is very important to make this page a better-looking one. In Phimpme Android, we had a normal page with a static image which is very common in all applications. So, in order to make it different from the most applications, we created an animation of the logo and added it to the splash screen.

As the splash screen is the first page/activity of the Phimpme Android application, most of the initialization functions are called in this activity. These initializations might take a little time giving us the time to display the logo animation.

Creating the animation of the Phimpme logo

For creating the animation of the Phimpme Android application’s logo, we used Adobe After Effects software. There are many free tools available on the web for creating the animation but due to the sophistic features present in After Effects, we used that software. We created the Phimpme Android application’s logo animation like any other normal video but with a lower frame rate. We used 12 FPS for the animation and it was fine as it was for a logo. Finally, we exported the animation as a transparent PNG formatted image sequence.

How to display the animation?

In Phimpme Android, we could’ve directly used the sequence of resultant images for displaying the animation. We could’ve done that by using a handler to change the image resource of an imageview. But this approach is very crude. So, we planned to create a GIF with the image sequence first and then display the GIF in the image view.

Creating a GIF from the image sequence

There are many tools on the web which create a GIF image from the given image sequence but most of the tools don’t support transparent images. This tool which we used to create the transparent GIF image supports both transparent and normal images. The frame rate and loop count can also be adjusted using this free tool. Below is the GIF image created using that tool.

Displaying the GIF in Phimpme

GIF image can be displayed in Phimpme Android application very easily using the famous Glide image caching and displaying library. But glide library doesn’t fulfill the need of the current scenario. Here, in Phimpme Android, we are displaying the GIF in the splash screen i.e. the next page should get displayed automatically. As we are showing an intro animation, the next activity/page should get opened only after the animation is completed. For achieving this we need a listener which triggers on the loop completion of the GIF image. Glide doesn’t provide any listener of this kind so we cannot Glide here.

There is a library named android-gif-drawable, which has the support for a GIF completion listener and many other methods. So, we used this for displaying the Phimpme Android application’s logo animation GIF image in the splash screen. When the GIF completed function gets triggered, we started the next activity if all the tasks which had to get completed in this activity itself are finished. Otherwise, we added a flag that the animation is done so that when the task gets completed, it just navigates to next page.

The way of the implementation described above is performed in Phimpme Android in the following manner.

First of all, we imported the library by adding it to the dependencies of build.gradle file.

compile 'pl.droidsonroids.gif:android-gif-drawable:1.2.7'

Then we added a normal imageview widget in the layout of the SplashScreen activity.

<ImageView
   android:id="@+id/imgLogo"
   android:layout_width="match_parent"
   android:layout_height="wrap_content"
   android:scaleType="fitCenter"
   android:layout_centerInParent="true"
   />

Finally, in the SplashScreen.java, we created a GifDrawable object using the GIF image of Phimpme Android logo animation, which we copied in the assets folder of the Phimpme application. We added a listener to the GifDrawble and added function calls inside that function. It is shown below.

GifDrawable gifDrawable = null;
try {
   gifDrawable = new GifDrawable( getAssets(), "splash_logo_anim.gif" );
} catch (IOException e) {
   e.printStackTrace();
}
if (gifDrawable != null) {
   gifDrawable.addAnimationListener(new AnimationListener() {
       @Override
       public void onAnimationCompleted(int loopNumber) {
           Log.d("splashscreen","Gif animation completed");
           if (can_be_finished && nextIntent != null){
               startActivity(nextIntent);
               finish();
           }else {
               can_be_finished = true;
           }
       }
   });
}
logoView.setImageDrawable(gifDrawable);

Resources:

Continue ReadingDisplaying an Animated Image in Splash Screen of Phimpme Android

Creating Different Shades of a Color in Phimpme Android

Getting different shades of a particular color is very much useful when setting color to layouts which are just adjacent to each other. It maintains the uniformity of the theme and also creates a distinction between those layouts. In Phimpme Android application we used this method for setting colors for the status bar, navigation bar and few other foreground elements.

Use of different shades of a color

As per the normal theme of the application, we assigned the primary color of the theme to the  background color of the action bar in Phimpme Android application. The status bar will be present just above the action bar. So if we assign the same primary color to the status bar also, then there will be no distinction between both the views and it is not visibly attractive. For getting the distinction between both the views, we created a dark shade of the primary color of the current theme and set it as the background color of the status bar.


In Phimpme Android application we used a bottomnavigationview widget for navigating between activities in the application. It is placed at the bottom of the application window i.e. just above the system navigation bar. So, even here, for creating the distinction between both the views, we used the similar approach of getting the darker shade of the color, assigning it to the system navigation bar and normal shade to the bottomnavigationview of Phimpme Android application.


In the splash screen of the Phimpme Android application, the primary color of the theme is set as the main background. A progress bar also gets displayed on the screen. Its color should match the theme and should also get distinguished from the background. We could’ve used darker shade for this too, but a lighter foreground object would be visibly much better. So, we created a lighter shade of the primary color and used it as the color filter for the progress bar.

Implementation

In Phimpme Android, this is implemented by getting the color coordinates in HSV space corresponding to the given coordinates (here – primary color of theme) in RGB space and changing the luminance in that HSV space and remapping it back to RGB space. By this we get almost any shade of the color.

The implementation for getting darker shade of a color which we used for status bar in Phimpme application is shown below.

public int getDarkerShadeColor(int c){
   float[] hsv = new float[3];
   int color = c;
   Color.colorToHSV(color, hsv);
   hsv[2] *= 0.80f; 
   color = Color.HSVToColor(hsv);
   return color;
}

Generally 20% darker color would be enough for distinguishing from original color. So, we reduced the luminosity to 80% of its previous value and created darker color in the above function.

The implementation for getting lighter color is also almost same. It is given below

public int getLighterShadeColor(int c){
   float[] hsv = new float[3];
   int color = c;
   Color.colorToHSV(color, hsv);
   hsv[2] *= 1.35f; 
   color = Color.HSVToColor(hsv);
   return color;
}

As you can see that both functions are almost same except the multiplier. If the multiplier is less than 1 then the function returns darker shade of the original color and if the multiplier is greater than 1 then the function returns lighter shade of the color. So by using this function, one can produce any shade of a color dynamically without the need hard code in xml files.

Resources:

Continue ReadingCreating Different Shades of a Color in Phimpme Android

Integration of Flickr in Phimpme Android

Flickr is very widely used photo sharing website. So, we added a functionality in Phimpme Android to share the image to Flickr. Using this feature, the user can upload a picture to Flickr, without leaving the application with a single click. The way how we implemented this Flickr in our Phimpme Android application is shown below.

Setting up Flickr API

Flickr provides only an official web API. So we used the flickrj-android library built using the official Flickr API. First of all, we created an application in Flickr App Garden and requested API tokens from here. We noted down the resultant API key and secret key. These keys are necessary for authenticating Flickr in the application.

Steps for Authentication

Establishing the authentication with Flickr requires the following steps as per the official documentation.

  • Getting a request token
  • Getting User Authorization
  • Exchanging the Request Token for an Access Token
  • Use the Access Token with up.flickr.com/services/upload/ to upload pictures.

Authorizing the user of Flickr in Phimpme

As shown in the above picture, a request token has to be generated. Flickrj SDK provides it for us using Flickr object which further is created using the API key and Secret key. This request token is used for directing the user to a page for manually authorizing the Phimpme application to share the picture to his/her Flickr account. In Phimpme Android application, we created the Flickr object as shown below.

Flickr f = new Flickr(API_KEY, API_SEC, new REST());
OAuthToken oauthToken = f.getOAuthInterface().getRequestToken(
     OAUTH_CALLBACK_URI.toString());
saveTokenSecrent(oauthToken.getOauthTokenSecret());
URL oauthUrl = f.getOAuthInterface().buildAuthenticationUrl(
     Permission.WRITE, oauthToken);

Getting Access Token

After the manual authorization of the application, Flickr returns the OAuth token and OAuth verifier. These have to used for making another request to Flickr for getting the “Access Token” which gives us the access to upload the picture to Flickr account. For implementing this, intent data is collected when the application reopens after manual authorization. This data contains the OAuth token and OAuth verifier. These are passed to get Access Token from functions present Flickrj library. In Phimpme Android, we implemented this in following way.

Uri uri = intent.getData();
String query = uri.getQuery();
String[] data = query.split("&");
if (data != null && data.length == 2) {
  String oauthToken = data[0].substring(data[0].indexOf("=") + 1);
  String oauthVerifier = data[1].substring(data[1].indexOf("=") + 1);
  OAuth oauth = getOAuthToken();
  if (oauth != null && oauth.getToken() != null && oauth.getToken().getOauthTokenSecret() != null) {
  Flickr f = new Flickr(API_KEY, API_SEC, new REST());
  OAuthInterface oauthApi = null;
  if (f != null) {
     oauthApi = f.getOAuthInterface();
     return oauthApi.getAccessToken(oauthToken, oauthTokenSecret,verifier);}
  }
}

Uploading Image to Flickr

As we got the Access Token, we used that for creating new Flickr Object. The upload function present in the API requires three arguments – a file name, input stream and its metadata. The input stream is generated using the ContentResolver present in the Android. The code showing how we implemented uploading to Flickr is shown below.

Flickr f = new Flickr(API_KEY, API_SEC, new REST());
RequestContext requestContext = RequestContext.getRequestContext();
OAuth auth = new OAuth();
auth.setToken(new OAuthToken(token, secret));
requestContext.setOAuth(auth);
UploadMetaData uploadMetaData = new UploadMetaData();
uploadMetaData.setTitle(your file name);
InputStream is = getContentResolver().openInputStream(Uri.fromFile(your file object));
f.getUploader().upload(your file name, is, uploadMetaData);

The full implementation, using AsyncTasks and other well-optimized functions, is available in our Phimpme Android project repo on GitHub.

Resources

Continue ReadingIntegration of Flickr in Phimpme Android

Using OpenCV for Native Image Processing in Phimpme Android

OpenCV is very widely used open-source image processing library. After the integration of OpenCV Android SDK in the Phimpme Android application, the image processing functions can be written in Java part or native part. Taking runtime of the functions into consideration we used native functions for image processing in the Phimpme application.

We didn’t have the whole application written in native code, we just called the native functions on the Java OpenCV Mat object. Mat is short for the matrix in OpenCV. The image on which we perform image processing operations in the Phimpme Android application is stored as Mat object in OpenCV.

Creating a Java OpenCV Mat object

Mat object of OpenCV is same whether we use it in Java or C++. We have common OpenCV object in Phimpme for accessing from both Java part and native part of the application. We have a Java bitmap object on which we have to perform image processing operations using OpenCV. For doing that we need to create a Java Mat object and pass its address to native. Mat object of OpenCV can be created using the bitmap2Mat() function present in the OpenCV library. The implementation is shown below.

Mat inputMat = new Mat(bitmap.getWidth(), bitmap.getHeight(), CvType.CV_8UC3);
Utils.bitmapToMat(bitmap, inputMat);

“bitmap” is the Java bitmap object which has the image to be processed. The third argument in the Mat function indicates that the Mat should be of type 8UC3 i.e. three color channels with 8-bit depth. With the second line above, the bitmap gets saved as the OpenCV Mat object.

Passing Mat Object to Native

We have the OpenCV Mat object in the memory. If we pass the whole object again to native, the same object gets copied from one memory location to another. In Phimpme application, instead of doing all that we can just get the memory location of the current OpenCV Mat object and pass it to native. As we have the address of the Mat, we can access it directly from native functions. Implementation of this is shown below.

Native Function Definition:

private static native void nativeApplyFilter(long inpAddr);

Native Function call:

nativeApplyFilter(inputMat.getNativeObjAddr());

Getting Native Mat Object to Java

We can follow the similar steps for getting the Mat from the native part after processing. In the Java part of Phimpme, we created an OpenCV Mat object before we pass the inputMat OpenCV Mat object to native for processing. So we have inputMat and outputMat in the memory before we send them to native. We get the memory locations of both the Mat objects and pass those addresses to native part. After the processing is done, the data gets written to the same memory location and can be accessed in Java. The above functions can be modified and rewritten for this purpose as shown below

Native Function Definition:

private static native void nativeApplyFilter(long inpAddr, long outAddr );

Native Function call:

nativeApplyFilter(inputMat.getNativeObjAddr(),outputMat.getNativeObjAddr());
inputMat.release();

if (outputMat !=null){
   Bitmap outbit = Bitmap.createBitmap(bitmap.getWidth(),bitmap.getHeight(),bitmap.getConfig());
   Utils.matToBitmap(outputMat,outbit);
   outputMat.release();
   return outbit;
}

Native operations on Mat using OpenCV

The JNI function in the native part of Phimpme application receives the memory locations of both the OpenCV Mat objects. As we have the addresses, we can create Mat object pointing that memory location and can be passed to processing functions for performing native operations just like all OpenCV functions. This implementation is shown below.

#include <jni.h>
#include <opencv2/core/core.hpp>
#include <opencv2/imgproc/imgproc.hpp>
#include "enhance.h"
using namespace std;
using namespace cv;

JNIEXPORT void JNICALL
Java_org_fossasia_phimpme_editor_editimage_filter_PhotoProcessing_nativeApplyFilter(JNIEnv *env, jclass type, jlong inpAddr,jlong outAddr) {
       Mat &src = *(Mat*)inpAddr;
       Mat &dst = *(Mat*)outAddr;
       applyFilter(src, dst);
}

applyFilter() function can have any image processing operation. The implementation of edge detection function using OpenCV in the Phimpme Android is shown below. We were able to do this in very few lines which otherwise would have needed an extremely large code.  

Mat grey,detected_edges;
cvtColor( src, grey, CV_BGR2GRAY );
blur( grey, detected_edges, Size(3,3) );
dst.create( grey.size(), grey.type() );
Canny( detected_edges, detected_edges, 70, 200, 3 );
dst = Scalar::all(0);
detected_edges.copyTo( dst, detected_edges);


The general structure of an OpenCV function which is necessary for implementing custom image processing operations can be understood by referring this below-mentioned brightness adjustment function.  

int x,y,bright;
cvtColor(src,src,CV_BGRA2BGR);
dst = Mat::zeros( src.size(), src.type() );
for (y = 0; y < src.rows; y++) {
   for (x = 0; x < src.cols; x++) {
       dst.at<Vec3b>(y, x)[0] =
                  saturate_cast<uchar>((src.at<Vec3b>(y, x)[0]) + bright);
       dst.at<Vec3b>(y, x)[1] =
               saturate_cast<uchar>((src.at<Vec3b>(y, x)[1]) + bright);
       dst.at<Vec3b>(y, x)[2] =
               saturate_cast<uchar>((src.at<Vec3b>(y, x)[2]) + bright);
   }
}


Resources:

Continue ReadingUsing OpenCV for Native Image Processing in Phimpme Android

Integrating OpenCV for Native Image Processing in Phimpme Android

OpenCV is an open source computer vision library written in C and C++. It has many pre-built image processing functions for all kinds of purposes. The filters and image enhancing functions which we implemented in Phimpme are not fully optimized. So we decided to integrate the Android SDK of OpenCV in the Phimpme Android application.

For integrating OpenCV in the application, the files inside the OpenCV Android SDK have to be properly placed inside the project. The build and make files of the project have to be configured correspondingly.

Here, in this post, I will mention how we fully integrated OpenCV Android SDK and configured the Phimpme project.

Setting Up

First, we downloaded the OpenCV-Android-SDK zip from the official release page here.

Now we extracted the OpenCV-Android-SDK.zip file to navigated to SDK folder to see that there are three folders inside it. etc, Java and native.

All the build files are present inside the native directory and are necessarily copied to our project. The java directory inside the SDK folder is an external gradle module which has to imported and added as a dependency to our project.

So we copied all the files from jni directory of SDK folder inside OpenCV-Android-SDK to jni directory of the Phimpme project inside main. Similarly copied the 3rdparty directory into the main folder of the Phimpme project. Libs folder should also be copied into the main folder of the Phimpme but it has to be renamed to jniLibs. The project structure can be viewed in the below image.

Adding Module to Project

Now we headed to Android Studio and right clicked on the app in the project view, to add a new module. In that window select import Gradle project and browse to the java folder inside the SDK folder of OpenCV-Android-SDK as shown in figures.

Now we opened the build.gradle file of app level (not project level) and added the following line as a dependency.

  compile project(':openCVLibrary320')

Now open the build.gradle inside the openCVLibrary320 external module and change the platform tools version and  SDK versions.

Configuring Native Build Files

We removed all files related to cmake be we use ndk-build to compile native code. After removing the cmake files, added following lines in the application.mk file

APP_OPTIM := release
APP_ABI := all
APP_STL := gnustl_static
APP_CPPFLAGS := -frtti -fexceptions
APP_PLATFORM := android-25

Now we further added the following lines to the top of Android.mk file

OPENCV_INSTALL_MODULES:=on
OPENCV_CAMERA_MODULES:=on
OPENCV_LIB_TYPE := STATIC
include $(LOCAL_PATH)/OpenCV.mk

The third line here is a flag indicating that the library has to be static and there is no need for external OpenCVLoader application.

Finally, find this line

OPENCV_LIBS_DIR:=$(OPENCV_THIS_DIR)/../libs/$(OPENCV_TARGET_ARCH_ABI)

in OpenCV.mk file and replace it with

OPENCV_LIBS_DIR:=$(OPENCV_THIS_DIR)/../jniLibs/$(OPENCV_TARGET_ARCH_ABI)

And finally, add the following lines to java part. So that the OpenCV is initialized and linked to application

static {
   if (!OpenCVLoader.initDebug()) {
       Log.e( TAG + " - Error", "Unable to load OpenCV");
   } else {
       System.loadLibrary("modulename_present_in_Android.mk");
   }
}

With this, the integration of OpenCV and the configuration of the project is completed. Remove the build directories i.e. .build and .externalNativeBuild directories inside app folder for a fresh build so that you don’t face any wrong build error.

Resources

Continue ReadingIntegrating OpenCV for Native Image Processing in Phimpme Android

Passing Java Bitmap Object to Native for Image Processing and Getting it back in Phimpme Android

To perform any image processing operations on an image, we must have an image object in native part like we have a Bitmap object in Java. We cannot just pass the image bitmap object directly as an argument to native function because ‘Bitmap’ is a java object and C/C++ cannot interpret it directly as an image. So, here I’ll discuss a method to send java Bitmap object to Native part for performing image processing operations on it, which we implemented in the image editor of Phimpme Android Image Application.

C/C++ cannot interpret java bitmap object. So, we have to find the pixels of the java bitmap object and send them to native part to create a native bitmap over there.

In Phimpme, we used a “struct” data structure in C to represent native bitmap. An image has three color channels red, green, blue. We consider alpha channel(transparency) for an argb8888 type image. But in Phimpme, we considered only three channels as it is enough to manipulate these channels to implement the edit functions, which we used in the Editor of Phimpme.

We defined a struct, type-defined as NativeBitmap with attributes corresponding to all the three channels. We defined this in the nativebitmap.h header file in the jni/ folder of Phimpme so that we can include this header file in c files in which we needed to use a NativeBitmap struct.

#ifndef NATIVEBITMAP
#define NATIVEBITMAP
#endif
typedef struct {
  unsigned int width;
  unsigned int height;
  unsigned int redWidth;
  unsigned int redHeight;
  unsigned int greenWidth;
  unsigned int greenHeight;
  unsigned int blueWidth;
  unsigned int blueHeight;
  unsigned char* red;
  unsigned char* green;
  unsigned char* blue;
} NativeBitmap;

void deleteBitmap(NativeBitmap* bitmap);
int initBitmapMemory(NativeBitmap* bitmap, int width, int height);

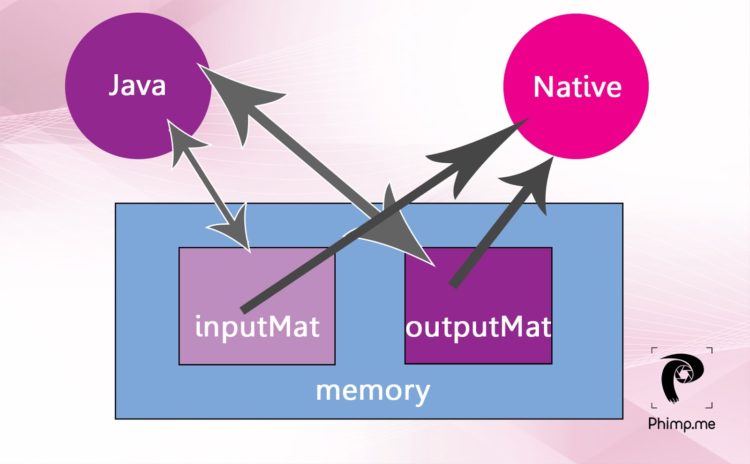
As I explained in my previous post here on introduction to flow of native functions in Phimpme-Android, we defined the native functions with necessary arguments in Java part of Phimpme. We needed the image bitmap to be sent to the native part of the Phimpme application. So the argument in the function should have been java Bitmap object. But as mentioned earlier, the C code cannot interpret this java bitmap object directly as an image. So we created a function for getting pixels from a bitmap object in the Java class of Phimpme application. This function returns an array of unsigned integers which correspond to the pixels of a particular row of the image bitmap. The array of integers can be interpreted by C, so we can send this array of integers to native part and create a receiving native function to create NativeBitmap.

We performed image processing operations like enhancing and applying filters on this NativeBitmap and after the processing is done, we sent the array of integers corresponding to a row of the image bitmap and constructed the Java Bitmap Object using those received arrays in java.

The integers present in the array correspond to the color value of a particular pixel of the image bitmap. We used this color value to get red, green and blue values in native part of the Phimpme application.

Java Implementation for getting pixels from the bitmap, sending to and receiving from native is shown below.

private static void sendBitmapToNative(NativeBitmap bitmap) {
   int width = bitmap.getWidth();
   int height = bitmap.getHeight();
   nativeInitBitmap(width, height);
   int[] pixels = new int[width];
   for (int y = 0; y < height; y++) {
       bitmap.getPixels(pixels, 0, width, 0, y, width, 1); 
                    //gets pixels of the y’th row
       nativeSetBitmapRow(y, pixels);
   }
}
private static Bitmap getBitmapFromNative(NativeBitmap bitmap) {
   bitmap = Bitmap.createBitmap(srcBitmap.getWidth(), srcBitmap.getHeight(), srcBitmap.getConfig());
   int[] pixels = new int[width];
   for (int y = 0; y < height; y++) {
       nativeGetBitmapRow(y, pixels);
       bitmap.setPixels(pixels, 0, width, 0, y, width, 1);
   }
   return bitmap;
}

The native functions which are defined in Java part have to be linked to native functions. So they have to be created with proper function name in main.c (JNI) file of the Phimpme application. We included nativebitmap.h in main.c so that we can use NativeBitmap struct which is defined in nativebitmap.h.
The main functions which do the actual work related to converting integer array received from java part to NativeBitmap and converting back to an integer array of color values of pixels in rows of image bitmap are present in nativebitamp.c. The main.c file acts as Java Native Interface which helps in linking native functions and java functions in Phimpme Android.

After adding all the JNI functions, the main.c function looks as below.

main.c

static NativeBitmap bitmap;
int Java_org_fossasia_phimpme_PhotoProcessing_nativeInitBitmap(JNIEnv* env, jobject thiz, jint width, jint height) {
  return initBitmapMemory(&bitmap, width, height);  //function present
                                                    // in nativebitmap.c
}

void Java_org_fossasia_phimpme_PhotoProcessing_nativeSetBitmapRow(JNIEnv* env, jobject thiz, jint y, jintArray pixels) {
  int cpixels[bitmap.width];
  (*env)->GetIntArrayRegion(env, pixels, 0, bitmap.width, cpixels);
  setBitmapRowFromIntegers(&bitmap, (int)y, &cpixels);
}

void Java_org_fossasia_phimpme_PhotoProcessing_nativeGetBitmapRow(JNIEnv* env, jobject thiz, jint y, jintArray pixels) {
  int cpixels[bitmap.width];
  getBitmapRowAsIntegers(&bitmap, (int)y, &cpixels);
  (*env)->SetIntArrayRegion(env, pixels, 0, bitmap.width, cpixels);
                    //sending bitmap row as output
}

We now reached the main part of the implementation where we created the functions for storing integer array of color values of pixels in the NativeBitmap struct, which we created in nativebitmap.h of Phimpme Application. The definition of all the functions is present in nativebitmap.h, so we included that header file in the nativebitmap.c for using NativeBitmap struct in the functions. We implemented the functions defined in main.c i.e. initializing bitmap memory, setting bitmap row using integer array, getting bitmap row and a method for deleting native bitmap from memory after completion of processing the image in nativebitmap.c.

The implementation of nativebitmap.c after adding all functions is shown below. A proper explanation is added as comments wherever necessary.

void setBitmapRowFromIntegers(NativeBitmap* bitmap, int y, int* pixels) {
  //y is the number of the row (yth row)
  //pixels is the pointer to integer array which contains color value of a pixel
  unsigned int width = (*bitmap).width;
  register unsigned int i = (width*y) + width - 1;
                                //this represent the absolute                                 //index of the pixel in the image bitmap  
  register unsigned int x;      //this represent the index of the pixel 
                                //in the particular row of image bitmap
  for (x = width; x--; i--) {
          //functions defined above
     (*bitmap).red[i] = red(pixels[x]);
     (*bitmap).green[i] = green(pixels[x]);
     (*bitmap).blue[i] = blue(pixels[x]);
  }
}

void getBitmapRowAsIntegers(NativeBitmap* bitmap, int y, int* pixels) {
  unsigned int width = (*bitmap).width;
  register unsigned int i = (width*y) + width - 1; 
  register unsigned int x;              
  for (x = width; x--; i--) {
          //function defined above
     pixels[x] = rgb((int)(*bitmap).red[i], (int)(*bitmap).green[i], (int)(*bitmap).blue[i]);
  }
}

The native bitmap has to be initialized first before we set pixel values to it and has to be deleted from memory after completion of the processing. The functions for doing these tasks are given below. These functions should be added to nativebitmap.c file.

void deleteBitmap(NativeBitmap* bitmap) {
//free up memory
  freeUnsignedCharArray(&(*bitmap).red);//do same for green and blue
}

int initBitmapMemory(NativeBitmap* bitmap, int width, int height) {
  deleteBitmap(bitmap); 
             //if nativebitmap already has some value it gets removed
  (*bitmap).width = width;
  (*bitmap).height = height;
  int size = width*height;
  (*bitmap).redWidth = width;
  (*bitmap).redHeight = height;
            //assigning memory to the red,green and blue arrays and
            //checking if it succeeded for each step.
  int resultCode = newUnsignedCharArray(size, &(*bitmap).red);
  if (resultCode != MEMORY_OK) return resultCode;
            //repeat the code given above for green and blue colors
}

You can find the values of different color components of the RGB color value and RGB color values from the values of color components using the below functions. Add these functions to the top of the nativebitmap.c file.

int rgb(int red, int green, int blue) {
  return (0xFF << 24) | (red << 16) | (green << 8) | blue;
//Find the color value(int) from the red, green, blue values of a particular //pixel.
}

unsigned char red(int color) {
  return (unsigned char)((color >> 16) & 0xFF);
//Getting the red value form the color value of a particular pixel
}

//for green return this ((color >> 8) & 0xFF)
//for blue return this (color & 0xFF);

Do not forget to define native functions in Java part. As now everything got set up, we can use this in PhotoProcessing.java in the following manner to send Bitmap object to native.

Bitmap input = somebitmap;
if  (bitmap != null) {
    sendBitmapToNative(bitmap);
}

////Do some native processing on native bitmap struct
////Discussed in the next post

Bitmap output = getBitmapFromNative(input);
nativeDeleteBitmap();

Performing image processing operations on the NativeBitmap in the image editor of Phimpme like enhancing the image, applying filters are discussed in next posts.

Resources

Continue ReadingPassing Java Bitmap Object to Native for Image Processing and Getting it back in Phimpme Android