Creating Animations in GTK+ with Pycairo in SUSI Linux App

SUSI Linux has an assistant user interface to answer your queries. You may ask queries and SUSI answers interactively using a host of skills which range from entertainment, knowledge, media to science, technology and sports. While SUSI is finding the answer to the query, it makes sense to add some animations depicting the process. The UI for SUSI Linux app is wholly made using GTK+ 3 using PyGObject (PyGTK). Thus, I needed to find a way create animations in GTK+.

Animations in most frameworks are generally created using repetitive drawing after an interval which leads to the effect of an object’s movement. Thus, basic need was to find a way to draw a custom object in GTK+. Reading the documentation of the GTK+, I realized that this could be done with a GTKDrawingArea.

GTKDrawingArea defines an area on which application developers can do the drawing on their own. GTK itself does not provide Canvas and related object to draw the shapes. For that, we need to use Cairo graphics library. Cairo is an open source graphics library with support for multiple window systems. It can run on a variety of backends, though here, we are not concerned about them.

Cairo can be accessed in Python using Pycairo. Pycairo is a set of Python 2 & 3 bindings for the cairo graphics library. Resources for usage of Pycairo for animations with GTK+ 3 are very less thus I will try to explain it in this blog in detail. We will start by creating an Animator class extending the GTK DrawingArea class.

class Animator(Gtk.DrawingArea):
   def __init__(self, **properties):
       super().__init__(**properties)
       self.set_size_request(200, 80)
       self.connect("draw", self.do_drawing)
       GLib.timeout_add(50, self.tick)

   def tick(self):
       self.queue_draw()
       return True

   def do_drawing(self, widget, ctx):
       self.draw(ctx, self.get_allocated_width(), self.get_allocated_height())

   def draw(self, ctx, width, height):
       pass

In the above code stub, we created the Animator class extending the GTK.DrawingArea. Animator class is meant to be an abstract class for the other animators. We defined the size request of the area we want and connected the “draw” signal to the do_drawing method. On notable thing to note here is that, we have “draw” signal on GTK+ 3 while on GTK+2 we have “on_expose” signal. On the creation of the widget, draw signal is fired. In the handler do_drawing method, we receive widget and ctx. Here ctx is the Cairo context. We can perform our drawing with the help of the of Cairo context. We further call the draw method passing the context, width and height of the widget. On notable thing here is that, even though we requested for a size for the widget, allocated size might be different depending upon a number of factors. Thus, drawing must be done according to allocated area instead of the absolute area.

The draw is an abstract method. All the animators must override this method to implement custom drawing on the widget area. Lastly, we add a timeout based call to tick method. This is what drives the animation. This is done with the help of GLib.timeout_add(). Here the first argument is the time in milliseconds after which callback should be fired and second argument is the callback that should be fired. We are calling tick method in the class. It is required for the method to return True if successful for proper functioning. We call queue_draw method from within the tick method. queue_draw leads to invalidation of current area and again generates the draw signal.

Now that we know how the core of the animation will work, let us define some cool animations for the Listening phase of the application. We define the Listening Animator for the same.

class ListeningAnimator(Animator):
   def __init__(self, window, **properties):
       super().__init__(**properties)
       self.window = window
       self.tc = 0

   def draw(self, ctx, width, height):

       self.tc += 0.2
       self.tc %= 2 * math.pi

       for i in range(-4, 5):
           ctx.set_source_rgb(0.2, 0.5, 1)
           ctx.set_line_width(6)
           ctx.set_line_cap(cairo.LINE_CAP_ROUND)
           if i % 2 == 0:
               ctx.move_to(width / 2 + i * 10, height / 2 + 3 - 
                           8 * math.sin(self.tc + i))
               ctx.line_to(width / 2 + i * 10, height / 2 - 3 + 
                           8 * math.sin(self.tc + i))
           else:
               ctx.set_source_rgb(0.2, 0.7, 1)
               ctx.move_to(width / 2 + i * 10, height / 2 + 3 - 
                           8 * math.cos(self.tc - i))
               ctx.line_to(width / 2 + i * 10, height / 2 - 3 + 
                           8 * math.cos(self.tc - i))
               ctx.stroke()

In this we are drawing some lines with round cap to create an effect like below.

Since, the lines must move we are using trigonometric functions to create sinusoidal movement with some phase difference between adjacent lines. To set color of the brush, we use set_source_rgb method. We may then move the pointer to desired position, draw lines or other shapes. Then, we can either fill the shape or draw strokes using the relevant methods. The full list of methods can be accessed here in the official documentation.
After creating the widget, it can be easily added to the UI depending on the type of the container, generally by add method. You may access the full code of SUSI Linux repository to learn more about the usage in SUSI Linux App. The final result can be seen in the following video.

Resources:

Continue ReadingCreating Animations in GTK+ with Pycairo in SUSI Linux App

Creating GUI for configuring SUSI Linux Settings

SUSI Linux app provides access to SUSI on Linux distributions on desktop as well as hardware devices like Raspberry Pi. The settings for SUSI Linux are controlled with the use of a config.json file. You may edit the file manually, but to provide safe configurations, we have a config generator script. You may run the script to configure settings like TTS Engine, STT Engine, authentication, choice about the hotword engine etc. Generally, it is easier to configure application settings through a GUI. Thus, we added a GUI for it using PyGTK and Glade.

Glade is a GUI designer for GNOME based Linux systems. I wrote a blog about how to create user interfaces in Glade and access it from Python code in SUSI Linux. Now, for creating UI for Configuration screen, we need to choose an ideal layout. Glade provides various choices like BoxLayout, GridLayout, FlowBox, ListBox , Notebook etc. Since, we need to display only basic settings options, we select the BoxLayout for this purpose.

BoxLayout as the name suggests, forms a box like arrangement for widgets. You can arrange the widgets in either Landscape or Horizontal Layout. We select Application Window as a top-level container and add a BoxLayout container in it. Now, in each box of the BoxLayout, we need to add the widgets like ComboBox and Switch for user’s choice and a Label. This can be done by using a horizontal BoxLayout with corresponding widgets. After arranging the UI in above described manner, we have a GUI like below.

If you see the current window in the preview now, you will find that the ComboBox do not have any items. We need to define items in the ComboBox using a GTKListStore. You may refer to this video tutorial to see how this can be done.

Now, when we see the preview, our GUI is fully functional. We have options for Speech Recognition Service, Text to Speech Service in ComboBox. Other simple settings are available as switches.

Now, we need to add functionality to our UI. We want our code to be modular and structured, therefore, we declare a ConfigurationWindow class. Though the ideal way to handle such cases is inheriting from the Gtk.Window class, but reading the documentation of PyGTK+ 3, I could not find a way to do this for windows created through Glade. Thus, we will use composition for storing the window object. We add window and other widgets present in the UI as properties of ConfigurationWindow class like this.

class ConfigurationWindow:
   def __init__(self) -> None:
       super().__init__()
       builder = Gtk.Builder()
       builder.add_from_file(os.path.join("glade_files/configure.glade"))

       self.window = builder.get_object("configuration_window")
       self.stt_combobox = builder.get_object("stt_combobox")
       self.tts_combobox = builder.get_object("tts_combobox")
       self.auth_switch = builder.get_object("auth_switch")
       self.snowboy_switch = builder.get_object("snowboy_switch")
       self.wake_button_switch = builder.get_object("wake_button_switch")

Now, we need to connect the Signals from our configuration window to the Handler. We declare the Handler as a nested class in the ConfigurationWindow class because its scope of usage is inside the ConfigurationWindow object. Then you may connect signals to an object of the Handler class.

builder.connect_signals(ConfigurationWindow.Handler(self))

Since we may need to modify the state of the widgets, we hold a reference of the parent ConfigurationWindow object in the Handler and pass the self as a parameter to the Handler. You may read more about using the handlers in my previous blog.

In the Handler, we connect to the config.json file and change the parameters of the the file based on the user inputs on the GUI. We handle it for the Text to Speech selection comboBox in the following manner. We also declare two addition Dialogs for handling the input of credentials by the users for the Watson and Bing services.

def on_stt_combobox_changed(self, combo: Gtk.ComboBox):
   selection = combo.get_active()

   if selection == 0:
       config['default_stt'] = 'google'

   elif selection == 1:
       credential_dialog = WatsonCredentialsDialog(self.config_window.window)
       response = credential_dialog.run()

       if response == Gtk.ResponseType.OK:
           username = credential_dialog.username_field.get_text()
           password = credential_dialog.password_field.get_text()
           config['default_stt'] = 'watson'
           config['watson_stt_config']['username'] = username
           config['watson_stt_config']['password'] = password
       else:
           self.config_window.init_stt_combobox()

       credential_dialog.destroy()

   elif selection == 2:
       credential_dialog = BingCredentialDialog(self.config_window.window)
       response = credential_dialog.run()

       if response == Gtk.ResponseType.OK:
           api_key = credential_dialog.api_key_field.get_text()
           config['default_stt'] = 'bing'
           config['bing_speech_api_key']['username'] = api_key
       else:
           self.config_window.init_stt_combobox()

       credential_dialog.destroy()

Now, we declare two more methods to show and exit the Window.

def show_window(self):
   self.window.show_all()
   Gtk.main()

def exit_window(self):
   self.window.destroy()
   Gtk.main_quit()

Now, we may use the ConfigurationWindow class object anywhere from our code. This modularized approach is better when you need to manage multiple windows as you can just declare the Window of a particular type and show it whenever need in your code.

Resources

  • Glade usage Youtube tutorial: https://www.youtube.com/watch?v=vOGK3TveDDk
  • Creating GUI using PyGTK for SUSI Linux: https://blog.fossasia.org/making-gui-for-susi-linux-with-pygtk/
  • PyGObject Documentation: http://pygobject.readthedocs.io/en/latest/getting_started.html
Continue ReadingCreating GUI for configuring SUSI Linux Settings

Making GUI for SUSI Linux with PyGTK

SUSI Linux app provides access to SUSI on Linux distributions on desktop as well as hardware devices like Raspberry Pi. It started off as a headless client but we decided to add a minimalist GUI to SUSI Linux for performing login and configuring settings. Since, SUSI Linux is a Python App, it was desirable to use a GUI Framework compatible with Python. Many popular GUI frameworks now provide bindings for Python. Some popular available choices are:

wxPython: wxPython is a Python GUI framework based on wxWidgets, a cross-platform GUI library written in C++. In addition to the standard dialogs, it includes a 2D path drawing API, dockable windows, support for many file formats and both text-editing and word-processing widgets. wxPython though mainly support Python 2 as programming language.

PyQT: Qt is a multi-licensed cross-platform framework written in C++. Qt needs a commercial licence for use but if application is completely Open Source, community license can be used. Qt is an excellent choice for GUIs and many applications are based on it.

PyGTK / PyGObject: PyGObject is a Python module that lets you write GUI applications in GTK+. It provides bindings to GObject, a cross platform C library. GTK+ applications are natively supported in most distros and you do not need to install any other development tools for developing with PyGTK.

Comparing all these frameworks, PyGTK was found to meet our needs very well. To make UIs in PyGTK, you have a WYSIWYG (What you see is what you get) editor called Glade. Though you can design whole UI programmatically, it is always convenient to use an editor like Glade to simplify the creation and styling of widgets.

To create a UI, you need to install Glade in your specific distribution. After that open glade, and add a Top Level container Window or AppWindow to your app.

Once that is done, you may pick from the available Layout Managers. We are using BoxLayout Manager in SUSI Linux GUIs. Once that is done, add your widgets to the Application Window using Drag and Drop.

Properties of widgets are available on the right panel. Edit your widget properties to give them meaningful IDs so we can address them later in our code. GTK also provides Signals for signaling about a events associated with the widgets. Open the Signals tab in the Widget properties pane. Then, you need to write name of the signal handler for the events associated with Widgets. A signal handler is a function that is fired upon the occurrence of the associated event. For example, we have signals like text_changed in Text Entry boxes, and clicked for Button.

After completing the design of GUI, we can address the .glade file of the UI we just created in the Python code. We can do this using the following snippet.

import gi
gi.require_version('Gtk', '3.0')
from gi.repository import Gtk

builder = Gtk.Builder()
builder.add_from_file("glade_files/signin.glade")

You can reference each widget from the Glade file using its ID like below.

email_field = builder.get_object("email_field")

Now, to handle all the declared signals in the Glade file, we need to make a Handler class. In this class, you need to define call the valid callbacks for your signals. On the occurrence of the signal, respective callback is fired.

class Handler:

   def onDeleteWindow(self, *args):
       Gtk.main_quit(*args)

   def signInButtonClicked(self, *args):
       # implementation

   def input_changed(self, *args):
       # implementation

We may associate a handler function to more than one Signal. For that, we just need to specify the respective function in both the Signals.

Now, we need to connect this Handler to builder signals. This can be done using the following line.

builder.connect_signals(Handler())

Now, we can show our window using the following lines.

window.show_all()
Gtk.main()

The above lines displays the window and start the Gtk main loop. The script waits on the Gtk main loop. The app may be quitted using the Gtk.main_quit() call. Running this script shows the Login Screen of our app like below.

Resources:

Continue ReadingMaking GUI for SUSI Linux with PyGTK

Implementing SUSI Linux App as a Finite State Machine

SUSI Linux app provides access to SUSI on Linux distributions on desktop as well as hardware devices like Raspberry Pi. It is a headless client that can be used to interact to SUSI via voice only. As more and more features like multiple hotword detection support and wake button support was added to SUSI Linux, the code became complex to understand and manage. A system was needed to model the app after. Finite State Machine is a perfect approach for such system.

The Wikipedia definition of State Machine is

It is an abstract machine that can be in exactly one of a finite number of states at any given time. The FSM can change from one state to another in response to some external inputs; the change from one state to another is called a transition.”

This means that if you can model your app into a finite number of states, you may consider using the State Machine implementation.

State Machine implementation has following advantages:

  • Better control over the working of the app.
  • Improved Error handling by making an Error State to handle errors.
  • States work independently which helps to modularize code in a better form.

To begin with, we declare an abstract State class. This class declares all the common properties of a state and transition method.

from abc import ABC, abstractclassmethod
import logging

class State(ABC):
   def __init__(self, components):
       self.components = components
       self.allowedStateTransitions = {}

   @abstractclassmethod
   def on_enter(self, payload=None):
       pass

   @abstractclassmethod
   def on_exit(self):
       pass

   def transition(self, state, payload=None):
       if not self.__can_transition(state):
           logging.warning("Invalid transition to State{0}".format(state))
           return

       self.on_exit()
       state.on_enter(payload)

   def __can_transition(self, state):
       return state in self.allowedStateTransitions.values()

We declared the on_enter() and on_exit() abstract method. These methods are executed on the entering and exiting a state respectively. The task designated for the state can be performed in the on_enter() method and it can free up resources or stop listening to callbacks in the on_exit() method. The transition method is to transition between one state to another. In a state machine, a state can transition to one of the allowed states only. Thus, we check if the transition is allowed or not before continuing it. The on_enter() and transition() methods additionally accepts a payload argument. This can be used to transfer some data to the state from the previous state.

We also added the components property to the State. Components store the shared components that can be used across all the State and are needed to be initialized only once. We create a component class declaring all the components that are needed to be used by states.

class Components:

   def __init__(self):
       recognizer = Recognizer()
       recognizer.dynamic_energy_threshold = False
       recognizer.energy_threshold = 1000
       self.recognizer = recognizer
       self.microphone = Microphone()
       self.susi = susi
       self.config = json_config.connect('config.json')

       if self.config['hotword_engine'] == 'Snowboy':
           from main.hotword_engine import SnowboyDetector
           self.hotword_detector = SnowboyDetector()
       else:
           from main.hotword_engine import PocketSphinxDetector
           self.hotword_detector = PocketSphinxDetector()

       if self.config['wake_button'] == 'enabled':
           if self.config['device'] == 'RaspberryPi':
               from ..hardware_components import RaspberryPiWakeButton
               self.wake_button = RaspberryPiWakeButton()
           else:
               self.wake_button = None
       else:
           self.wake_button = None

Now, we list out all the states that we need to implement in our app. This includes:

  • Idle State: App is listening for Hotword or Wake Button.
  • Recognizing State: App actively records audio from Microphone and performs Speech Recognition.
  • Busy State: SUSI API is called for the response of the query and the reply is spoken.
  • Error State: Upon any error in the above state, control transfers to Error State. This state needs to handle the speak the correct error message and then move the machine to Idle State.

Each state can be implemented by inheriting the base State class and implementing the on_enter() and on_exit() methods to implement the correct behavior.

We also declare a SUSI State Machine class to store the information about current state and declare the valid transitions for all the states.

class SusiStateMachine:
   def __init__(self):
       super().__init__()
       components = Components()
       self.__idle_state = IdleState(components)
       self.__recognizing_state = RecognizingState(components)
       self.__busy_state = BusyState(components)
       self.__error_state = ErrorState(components)
       self.current_state = self.__idle_state

       self.__idle_state.allowedStateTransitions = \
           {'recognizing': self.__recognizing_state, 'error': self.__error_state}
       self.__recognizing_state.allowedStateTransitions = \
           {'busy': self.__busy_state, 'error': self.__error_state}
       self.__busy_state.allowedStateTransitions = \
           {'idle': self.__idle_state, 'error': self.__error_state}
       self.__error_state.allowedStateTransitions = \
           {'idle': self.__idle_state}

       self.current_state.on_enter(payload=None)

We also set Idle State as the current State of the System. In this way, State Machine approach is implemented in SUSI Linux.

Resources:


Continue ReadingImplementing SUSI Linux App as a Finite State Machine

Adding Push Wake Button to SUSI on Raspberry PI

SUSI Linux for Raspberry Pi provides the ability to call SUSI with the help of a Hotword ‘Susi’. Calling via Hotword is a natural way of interaction but it is even handier to invoke SUSI listening mode with the help of a Push button. It enables to call SUSI in a noisy environment where detection of Hotword is not that accurate.

To enable Push Wake button is Susi, we need access to Hardware Pins. Devices like Raspberry PI provides GPIO (General Purpose Input Output) Pins for interacting with Hardware Devices.

In this tutorial, we are adding support for Push Wake Button in Raspberry PI, though similar procedure can be extended to add Wake Button to Orange Pi, Beaglebone Black, and other devices. For adding push wake button, we require:

We now need to do wiring to connect button to Raspberry Pi. The button can be connected to Raspberry Pi following the connection diagram. 

After this, we need to install the Raspberry Pi GPIO Python Library. Install it using:

$ pip3 install RPi.GPIO

Now, we may detect the press of the button in our code. We declare an abstract class for implementing Wake Button. In this way, we can later extend our code to include Wake Buttons for more platforms.

import os
from abc import ABC, abstractclassmethod
from queue import Queue
from threading import Thread

from utils.susi_config import config


class WakeButton(ABC, Thread):
   def __init__(self, detection_callback, callback_queue: Queue):
       super().__init__()
       self.detection_callback = detection_callback
       self.callback_queue = callback_queue
       self.is_active = False

   @abstractclassmethod
   def run(self):
       pass

   def on_detected(self):
       if self.is_active:
           self.callback_queue.put(self.detection_callback)
           os.system('play {0} &'.format(config['detection_bell_sound']))
           self.is_active = False

We defined WakeButton class as a Thread. This is done to ensure that listening to Wake Buttons is done in background thread and it does not disturb the main thread. The callback to be executed on main thread after button press is detected is added to callback queue. Main Thread listens on the callback queue and executes any pending functions from other threads.

We also play an Audio File additionally on detection of a button press to confirm the activation of detection to the user.

Now, we define Raspberry Pi Wake Button class. This class extends from abstract WakeButton declared above.

from queue import Queue

import RPi.GPIO as GPIO
import time
from .wake_button import WakeButton


class RaspberryPiWakeButton(WakeButton):
   def __init__(self, detection_callback, callback_queue: Queue):
       super().__init__(detection_callback, callback_queue)
       GPIO.setmode(GPIO.BCM)
       GPIO.setup(18, GPIO.IN, pull_up_down=GPIO.PUD_UP)

   def run(self):
       while True:
           input_state = GPIO.input(18)
           if not input_state:
               self.on_detected()
               self.is_active = False
               time.sleep(0.2)

This class defines the Wake Button for Raspberry Pi. We continuously poll for the input value of GPIO Pin number 18 on which button is connected. If value is negative, it indicated that button was pressed.

Now, we need to add an option if configuration script to give users a choice to enable or disable wake button. We first need to check, if device is Raspberry Pi, since feature is available on Raspberry PI only. To do this, we try to import RPi.GPIO module. If module loading fails, it indicates that device does not support Raspberry Pi GPIO modes. We set the configuration parameters according to it.

def setup_wake_button():
   try:
       import RPi.GPIO
       print("Device supports RPi.GPIO")
       choice = input("Do you wish to enable hardware wake button? (y/n)")
       if choice == 'y':
           config['WakeButton'] = 'enabled'
           config['Device'] = 'RaspberryPi'
       else:
           config['WakeButton'] = 'disabled'
   except ImportError:
       print("This device does not support RPi.GPIO")
       config['WakeButton'] = 'not available'

Now, we simply use the Raspberry Pi wake button detector in our code.

if config['wake_button'] == 'enabled':
   if config['device'] == 'RaspberryPi':
       from hardware_components import RaspberryPiWakeButton

       wake_button = RaspberryPiWakeButton(callback_queue=callback_queue, detection_callback=start_speech_recognition)
       wake_button.start()

Now, when you need to invoke SUSI Listening Mode, instead of saying ‘SUSI’ as Hotword, you may also press the push button. Ask your query after hearing a small bell and get instant reply from SUSI.

Resources:

Continue ReadingAdding Push Wake Button to SUSI on Raspberry PI

Adding Map and RSS Action Type Support to SUSI MagicMirror Module with React

SUSI being an interactive personal assistant, answers questions in a variety of formats. This includes maps, RSS, table, and pie-chart. SUSI MagicMirror Module earlier provided support for only Answer Action Type. So, if you were to ask about a location, it could not show you a map for that location. Support for a variety of formats was added to SUSI Module for MagicMirror so that users can benefit from rich responses by SUSI.AI.

One problem that was faced while adding UI components is that in the MagicMirror Module structure, each module needs to supply its DOM by overriding the getDom() method. Therefore, you need to manage all the UI programmatically. Managing UI programmatically in Javascript is a cumbersome task since you need to create DOM nodes, manually apply styling to them, and add them to parent DOM object which is needed to be returned. We need to write UI for each element like below:

getDom: function () {
        .... 
        ....
        const moduleDiv = document.createElement("div");

        const visualizerCanvas = document.createElement("canvas");
        moduleDiv.appendChild(visualizerCanvas);

        const mapDiv = document.createElement("div");
        loadMap(mapDiv,lat, long);
        moduleDiv.appendChild(mapDiv);
        ...
        ...
}

As you can see, manually managing the DOM is neither that easy nor a recommended practice. It can be done in a more efficient way using the React Library by Facebook.  React is an open source UI library by Facebook. It works on the concept of Virtual DOM i.e. the whole DOM object gets created in the memory and only the changed components are reflected on the document.

Since the SUSI MagicMirror Module is primarily written in open-source TypeScript Lang (a typed superset of JavaScript), we also need to write React in TypeScript. To add React to a Typescript Project, we need to add some dependencies. They can be added using:

$ yarn add react react-dom @types/react @types/react

Now, we need to change our Webpack config to build .tsx files for React. TSX like JSX can contain HTML like syntax for representing DOM object in a syntactic sugar form. This can be done by changing resolve extensions and loaders config so that awesome typescript loaded compiles that TSX files. It is needed to be modified like below

resolve: {
   extensions: [".js", ".ts", ".tsx", ".jsx"],
},

module: {
   loaders: [{
       test: /\.tsx?$/,
       loaders: ["awesome-typescript-loader"],
   },
       {
           test: /\.json$/,
           loaders: ["json-loader"],
       }],
},

This will allow webpack to build and load both .tsx and .ts files. Now that project is setup properly, we need to add UI for Map and RSS Action Type.

The UI for Map is added with the help of React-Leaflet library. React-Leaflet module is a module build on top of Leaflet Map library for loading maps in Browser. We add the React-Leaflet library using

$ yarn add react-leaflet

Now, we declare a MapView Component in React and render Map in it using the React-Leaflet Library. Custom styling can be applied to it. The render function for MapView React Component is defined as follows.

import * as React from "react";
import {Map, Marker, Popup, TileLayer} from "react-leaflet";
interface IMapProps {
   latitude: number;
   longitude: number;
   zoom: number;
}

export class MapView extends React.Component<IMapProps, any> {

   public constructor(props: IMapProps) {
       super(props);
   }

   public render(): JSX.Element | any | any {
       const center = [this.props.latitude, this.props.longitude];
       console.log(center);
       return <Map center={center} zoom={this.props.zoom} style={{height: "300px"}}>
           <TileLayer url="http://{s}.tile.osm.org/{z}/{x}/{y}.png"/>
           <Marker position={center}>
               <Popup>
                   <span> Here </span>
               </Popup>
           </Marker>
       </Map>;
   }
}

For making the UI for RSS Action Type, we define an RSS Card Component. An RSS feed is constituted by various RSS Cards. An RSS Card is defined as follows.

import * as React from "react";

export interface IRssProps {
   title: string;
   description: string;
   link: string;
}

export class RSSCard extends React.Component <IRssProps, any> {

   constructor(props: IRssProps) {
       super(props);
   }

   public render(): JSX.Element | any | any {
       return <div className="card">
           <div className="card-title">{this.props.title}</div>
           <div className="card-description">{this.props.description}</div>
       </div>;
   }
}

Now, we define an RSS feed which is constituted by various RSS Information Cards. Since screen size is limited and there is no option available to the user to scroll, we limit the number of cards displayed to 5 with slice operation on data array.

import * as React from "react";
import {IRssProps, RSSCard} from "./rss-card";

export interface IRSSFeedProps {
   feeds: Array<IRssProps>;
}

export class RSSFeed extends React.Component <IRSSFeedProps, any> {

   public constructor(props: IRSSFeedProps) {
       super(props);
   }

   public render(): JSX.Element | any | any {
       return <div className="rss-div">
           {this.props.feeds.map((feed: IRssProps) => {
                   return <RSSCard key={feed.title} title={feed.title} description={feed.description} link={feed.link}/>;
               }
           ).slice(0, 5)}
       </div>;
   }
}

Now, we can add these components to UI easily and render it with ReactDOM like:

ReactDOM.render(<TableView data={tableData} columns={action.columns}/>, tableDiv);

Below is an example screenshot of RSS and Map View in SUSI MagicMirror.

Resources:

Continue ReadingAdding Map and RSS Action Type Support to SUSI MagicMirror Module with React

Adding Face Recognition based Authentication to SUSI MagicMirror Module

SUSI MagicMirror Module is a module designed for MagicMirror that helps you get SUSI Intelligence right on your Mirror. You may then ask it questions in the way the Queen in the tale “Snow White and the Seven Dwarfs” asked. One key feature that was missing in it was that the user could be recognized and queries he asked are answered in a personalized manner. This could be achieved if SUSI uses the account dedicated to that person to answer his/her queries. Thus, we need an authentication support.

The authentication on MagicMirror is not as trivial as on Web, Android and iOS client apps for SUSI. Key difference here is that user, while using the MagicMirror, does not have access to a keyboard and mouse. Therefore, we cannot simply ask him to input email and password. Furthermore, a MagicMirror installed in your home may be used by several members of your family. Thus, we need a mechanism to tell each user apart.

This was done with the help of MMM-Facial-Recognition module which brings face recognition support to MagicMirror.

MMM-Facial-Recognition module provides support for recognizing multiple faces and setting the modules on the mirror screen based on the user facing the mirror using OpenCV. Other modules can also take advantage of knowing about the person with the help of module notifications sent by MMM-Facial-Recognition Module.

To add Face based Authentication support to SUSI with MMM-Facial-Recognition, we first need to add the latter to MagicMirror. It can be added easily by first cloning the repository to modules directory of MagicMirror.

$ git clone https://github.com/paviro/MMM-Facial-Recognition

Go inside the directory and install dependencies

$ npm run install

Now, we need to train a model for the users who are going to use the MagicMirror. This can be done by the MMM-Facial-Recognition-Tools. This tool captures photos from the camera and trains a model for Face Recognition. The guide to use the tool is very well written on the Github page so I am not including it here. After training for faces of the users, you will get a training.xml file. This file contains the information about the facial features of every person so that it can tell users apart. You need to copy this file to the Module directory for MMM-Facial-Recognition module i.e. MagicMirror/module/MMM-Facial-Recognition.

After this we can add the module to MagicMirror, by modifying the config file. Add the following lines in the config file (config.js). Copy and paster username array from the training script in the asked position.

{
    module: 'MMM-Facial-Recognition',
    config: {
        // 1=LBPH | 2=Fisher | 3=Eigen
        recognitionAlgorithm: 1,
        lbphThreshold: 50,
        fisherThreshold: 250,
        eigenThreshold: 3000,
        useUSBCam: true,
        trainingFile: 'modules/MMM-Facial-Recognition/training.xml',
        interval: 2,
        logoutDelay: 15,
        // Array with usernames (copy and paste from training script)
        users: [],
        defaultClass: "default",
        everyoneClass: "everyone",
        welcomeMessage: true
    }
}

You may configure the show and hide behavior of modules based on the person. Find more information about it in the official guide on the repository. After setting up it recognizes and shows welcome message to each user like this.


Now, we need to integrate this module to SUSI for Authentication. To do this first of all we make config for SUSI MagicMirror Module to add user authentication along with their name registered on Facial Recognition Module. It can be done by adding SUSI MagicMirror module config file (config.js) like below.

{
       module: "MMM-SUSI-AI",
       position: "top_center",
       config: {
            hotword: "Susi",
            users: [{
                face_recognition_username: "Pranjal Paliwal",
                email: "paliwal.pranjal83@gmail.com",
                password: "PASSWORD_HERE"
            }, {
                face_recognition_username: "Chashmeet Singh",
                email: "chashmeetsingh@gmail.com",
                password: "PASSWORD_HERE"
            }],
        },
        classes: 'default everyone'
},

Now, we need to know that which user is facing the mirror at that time. MMM-Facial-Recognition sends a module notification when a user is detected. The format of the notification is

sender : MMM-Facial-Recognition
type: CURRENT_USER
payload: Name of the User / None 

If the user is recognized we get the name of the User as payload. If no face could be identified, we get None as payload.

We need to find out user based on the user’s name registered in the module. We already have that parameter in the user object in users array in config for SUSI MagicMirror Module (MMM-SUSI-AI). We can iterate over users array to find out the user facing the mirror on receiving the notification. In SUSI Chat API, users are identified with the help of an access token. On identifying a user, we perform login with the help of SignInService to obtain token for him. The implementation of the above task can be understood via the following snippet.

public receivedNotification(type: NotificationType, payload: any): void {
   if (type === "CURRENT_USER") {
       console.log("Current User", payload);
       if (payload === "None") {
           this.configService.Config.accessToken = null;
       } else {
           console.log(this.config.users);
           for (const user of this.config.users) {
               if (user.face_recognition_username === payload) {
                   if (isUndefined(this.signInService)) {
                       this.signInService = new SignInService(user);
                   }
                   this.signInService.updateUser(user).then((token) => {
                       console.log("updating token for " + user);
                       this.configService.Config.accessToken = token;
                   });
                   return;
               }
           }
           this.configService.Config.accessToken = null;
       }
   }
}

Explanation: In the receivedNotification method of the Main Component of SUSI MagicMirror module, we check if notification is of type CURRENT_USER. If the payload is None, we set access-token to null. If a user is identified, we check if it is contained in the users array. If present, we perform Sign In to SUSI Server for that user and store the access token obtained in the Config.

Now, every time a recognized my Facial Recognition module, the access token is updated in the config. We use the accessToken field in Config to send the message to SUSI Chat API. The implementation of it can be referred below.

public async askSusi(query: string): Promise<any> {

   const accessToken = this.configService.Config.accessToken;

   const requestString: string = (!isUndefined(accessToken) && accessToken != null) ?
       `http://api.susi.ai/susi/chat.json?q=${query}&access_token=${accessToken}` :
       `http://api.susi.ai/susi/chat.json?q=${query}`;

   const response = await WebRequest.get(requestString);
   return JSON.parse(response.content);
}

By using the above approach, the request sent to SUSI Server are identified according to the person facing the mirror. SUSI can, therefore, answer according to the user. In this way, authentication with Face Recognition is performed in the SUSI Magic Mirror Module.

Resources


Continue ReadingAdding Face Recognition based Authentication to SUSI MagicMirror Module

Adding IBM Watson TTS Support in Susi Assistant on Raspberry Pi

Susi Hardware project aims at creating a smart assistant for your home that you can run on your Raspberry Pi or similar Development Boards.
I previously wrote a blog on choosing a perfect Text to Speech engine for Susi AI and had used Flite as the solution for it. While Flite is an Open Source solution that can run locally on a client, it does not provide the same quality of voice and speed as cloud providers. We always crave for a more natural voice for better interaction with our assistant. It is always good to have more options. We, therefore, added IBM Watson Text to Speech API in SUSI Hardware project.

IBM Watson TTS can be added to a Python Project easily using the IBM Watson Developer SDK.

For using the IBM Watson Developer SDK for Text to Speech, first of all, we need to sign up for Bluemix
https://console.bluemix.net/registration/

After that, we will get the empty dashboard without any service added currently. We need to create a Text to Speech Service. To do so, click on Create Watson Service button


Select Watson on the left pane and then select Text to Speech service from the list.

Select the standard plan from the options and then click on create button.

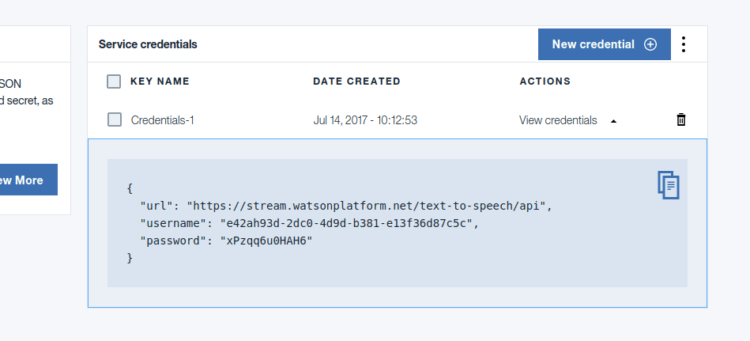
You will get service credentials for your newly created text to speech service. Save it for future reference.

After that, we need to add Watson developer cloud python package.

sudo pip3 install watson-developer-cloud

On Ubuntu with Python 3.5 watson-developer-cloud has some extra dependencies. Install them using the following command.

sudo apt install libssl-dev

Now we can add Text to Speech to our project. For that, we need to first import TextToSpeechV1 library. It can be added using following import statement.

from watson_developer_cloud import TextToSpeechV1

Now we need to create a new TextToSpeechV1 object using the Service Credentials we created earlier.

text_to_speech = TextToSpeechV1(
   username='API_USERNAME',
   password='API_PASSWORD')

We can now perform synthesis of a text input and write the incoming speech stream from IBM Watson API to a file.

with open('output.wav', 'wb') as audio_file:
   audio_file.write(
       text_to_speech.synthesize(text, accept='audio/wav’, voice='en-US_AllisonVoice'))

In the above code snippet,  we are opening an output file ‘output.wav’ for writing. We then write the binary audio data returned by text_to_speech.synthesize method. IBM Watson provides many free voices. We supply an argument specifying which voice we need to use. We are using English female ‘en-US_AllisonVoice’. You may test out more voices in the online demo here and select the voice that you find best.

We can play the ‘output.wav’ file using the play command from SoX. To do so, we need to install SoX binary.

sudo apt install sox libsox-fmt-all

We can play the file easily now using the following code.

import os
os.system('play output.wav')

The above code invokes the ‘play’ command from the SoX package to play the audio file. We can also use PyAudio to play the audio file but it would require us to manage the audio thread separately. Thus, SoX is a better solution.

Resources:

Continue ReadingAdding IBM Watson TTS Support in Susi Assistant on Raspberry Pi

Setup SUSI Assistant on Raspberry Pi in under 30 minutes

With our ever growing list of list of platforms supported by Susi AI, we now have a client that can run on Raspberry Pi and you can access it hands-free!! Here is a video that you can refer for its working.

But it might have left you wondering how you can replicate such a setup yourself? It is fairly easy and will be done fairly easy. Just follow the following instructions.

You need to have following hardware in order to have your own SUSI Assistant running on Raspberry Pi.

  • A Raspberry Pi (prefer 2 or 3) with Raspbian Jessie OS.
  • A stable internet connection.  ( Recommended 4 Mbps )
  • A USB Microphone /  USB Webcam with Microphone. You may buy one like this.
  • A Speaker that connects through 3.5mm jack. You may buy one like this.

After you get all the above items in order, you need to get access to a terminal of your Raspberry Pi. You can have that by either connecting a monitor to Raspberry Pi temporarily or by connecting to Raspberry Pi over SSH.

Once this is done, next step is the installation of the dependencies. The installation of the SUSI on Raspberry is automated after dependencies are installed. Run the following command on Raspberry Pi terminal.

sudo apt install git swig3.0 portaudio19-dev pulseaudio libpulse-dev unzip sox libatlas-dev libatlas-base-dev libsox-fmt-all python3

After this, you may check if your output and input devices are working alright. For this, run rec recording.wav . It will start recording audio and saving it to a file named recording.wav. Play back the file using play recording.wav If you hear your audio clearly, setup is done right else you need to configure your Audio Devices correctly.  Most of the time the configuration of Audio works out the box and devices are plug and play so you would not encounter any errors. If you are successful in configuring your devices, install extra dependencies for SUSI Hardware by running the automated install script. In your terminal run,

$ git clone https://github.com/fossasia/susi_hardware.git
$ cd susi_hardware
$ ./install.sh 

This will install all the remaining dependencies. After the above step is complete, you may run configuration file generator script to choose the Text to Speech and Speech to Text service according to your wish. For doing so, you need to run

$ python3 config_generator.py

Follow the instructions in the script. It will ask you to configure the default service for Text to Speech and Speech to Text and other options. After the configuration is complete, you can simply run the following command to start SUSI.

$ python3 main.py

This will start SUSI in a continuously listening mode. You may invoke SUSI anytime, just by saying SUSI followed by a query. The query will be answered by SUSI subsequently.

Since configurations for different hardware devices may vary, you may encounter some problems. In such a scenario, you may refer to the following resources to solve the issues.

Resources:

Continue ReadingSetup SUSI Assistant on Raspberry Pi in under 30 minutes

Sending Data between components of SUSI MagicMirror Module

SUSI MagicMirror module is a module to add SUSI assistant right on your MagicMirror. The software for MagicMirror constitutes of an Electron app to which modules can be added easily. Since there are many modules, there might be functionalities that need interaction between various modules by transfer of information. MagicMirror also provides a node_helper script that facilitates a module to perform some background tasks. Therefore, a mechanism to transfer information from node_helper to various components of module is also needed.

MagicMirror provides an inbuilt module notification system that can be used to send notification across the modules and a socket notification system to send information between node_helper and various components of the system.

Our codebase for SUSI MagicMirror is divided mainly into two parts. A Main module that handles all the process of hotword detection, speech recognition, calling SUSI API and saving audio after Text to Speech and a Renderer module which performs the task of managing the display of content on the Mirror Screen and playing back the file obtained by Speech Synthesis. Plainly put, Main module mainly handles the backend logic of the application and the Renderer handles the frontend. Main and Renderer module work on different layers of the application and to facilitate communication between them, we need to make a mechanism. A schematic of flow that is needed to be maintained can be highlighted as:

As you can see in the above diagram, we need to transfer a lot of information between the components. We display animation and text based on the current state of recognition in the  module, thus we need to transfer this information frequently. This task is accomplished by utilizing the inbuilt socket notification system in the MagicMirror. For every event like when system enters into listening , busy or recognized speech state, we need to pass message to renderer. To achieve this, we made a rendererSend function to send notification to renderer.

const rendererSend =  (event: NotificationType , payload: any) => {
   this.sendSocketNotification(event, payload);
}

This function takes an event and a payload as arguments. Event tells which event occurred and payload is any data that we wish to send. This method in turn calls the method provided by MagicMirror module to send socket notifications within the module.

When certain events occur like when system enters busy state or listening state, we trigger the rendererSend call to send a socket notification to the module. The rendererSend method is supplied in the State Machine Components available to every state. The task of sending notifications can be done using the code snippet as follows:

// system enters busy state
this.components.rendererSend("busy", {});
// send speech recognition hypothesis text to renderer
this.components.rendererSend("recognized", {text: recognizedText});
// send susi api output json to renderer to display interactive results while Speech Output is performed
this.components.rendererSend("speak", {data: susiResponse});

The socket notification sent via the above method is received in SUSI Module via a callback called socketNotificationReceived . We need to define this callback with implementation while registering module to MagicMirror. So, we register the MMM-SUSI-AI module by adding the definition for socketNotificationReceived method.

Module.register("MMM-SUSI-AI", {
//other function definitions
***
   // define socketNotificationReceived function
   socketNotificationReceived: function (notification, payload) {
       susiMirror.receivedNotification(notification, payload);
   },
***
});

In this way, we send all the notification received to susiMirror object in the renderer module by calling the receivedNotification method of susiMirror object

We can now receive all the notifications in the SusiMirror and update UI. To handle notifications, we define receivedNotification method as follows:

public receivedNotification(type: NotificationType, payload: any): void {

   this.visualizer.setMode(type);
   switch (type) {
       case "idle":
            // handle idle state
           break;
       case "listening":
           // handle listening state
           break;
       case "busy":
           // handle busy state
         break;
       case "recognized":
           // handle recognized state. This notification also contains a payload about the hypothesis text           
           break;
       case "speak":
           // handle speaking state. We need to play back audio file and display text on screen for SUSI Output. Notification Payload contains SUSI Response
           break;
   }
}

In this way, we utilize the Socket Notification System provided by the MagicMirror Electron Application to send data across the components of Magic Mirror module for SUSI AI.

Resources

Continue ReadingSending Data between components of SUSI MagicMirror Module