

Susi Hardware project aims at creating a smart assistant for your home that you can run on your Raspberry Pi or similar Development Boards.
I previously wrote a blog on choosing a perfect Text to Speech engine for Susi AI and had used Flite as the solution for it. While Flite is an Open Source solution that can run locally on a client, it does not provide the same quality of voice and speed as cloud providers. We always crave for a more natural voice for better interaction with our assistant. It is always good to have more options. We, therefore, added IBM Watson Text to Speech API in SUSI Hardware project.
IBM Watson TTS can be added to a Python Project easily using the IBM Watson Developer SDK.
For using the IBM Watson Developer SDK for Text to Speech, first of all, we need to sign up for Bluemix
https://console.bluemix.net/registration/
After that, we will get the empty dashboard without any service added currently. We need to create a Text to Speech Service. To do so, click on Create Watson Service button

Select Watson on the left pane and then select Text to Speech service from the list.

Select the standard plan from the options and then click on create button.

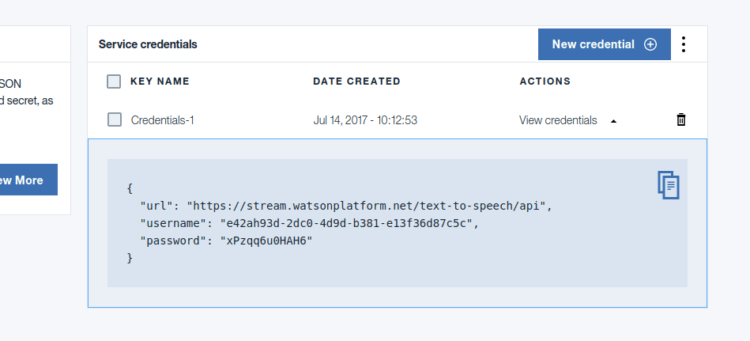
You will get service credentials for your newly created text to speech service. Save it for future reference.
After that, we need to add Watson developer cloud python package.
sudo pip3 install watson-developer-cloud
On Ubuntu with Python 3.5 watson-developer-cloud has some extra dependencies. Install them using the following command.
sudo apt install libssl-dev
Now we can add Text to Speech to our project. For that, we need to first import TextToSpeechV1 library. It can be added using following import statement.
from watson_developer_cloud import TextToSpeechV1
Now we need to create a new TextToSpeechV1 object using the Service Credentials we created earlier.
text_to_speech = TextToSpeechV1(
   username='API_USERNAME',
   password='API_PASSWORD')
We can now perform synthesis of a text input and write the incoming speech stream from IBM Watson API to a file.
with open('output.wav', 'wb') as audio_file:
   audio_file.write(
       text_to_speech.synthesize(text, accept='audio/wav’, voice='en-US_AllisonVoice'))
In the above code snippet, we are opening an output file ‘output.wav’ for writing. We then write the binary audio data returned by text_to_speech.synthesize method. IBM Watson provides many free voices. We supply an argument specifying which voice we need to use. We are using English female ‘en-US_AllisonVoice’. You may test out more voices in the online demo here and select the voice that you find best.
We can play the ‘output.wav’ file using the play command from SoX. To do so, we need to install SoX binary.
sudo apt install sox libsox-fmt-all
We can play the file easily now using the following code.
import os
os.system('play output.wav')
The above code invokes the ‘play’ command from the SoX package to play the audio file. We can also use PyAudio to play the audio file but it would require us to manage the audio thread separately. Thus, SoX is a better solution.
Resources:
- IBM Text to Speech Tutorial: https://www.ibm.com/watson/developercloud/doc/text-to-speech/tutorial.html
- Online Demo for IBM Watson TTS: https://text-to-speech-demo.mybluemix.net/
- IBM Watson Python SDK: https://github.com/watson-developer-cloud/python-sdk